EN
BENZING M1 with BENZING Live Smart Hub
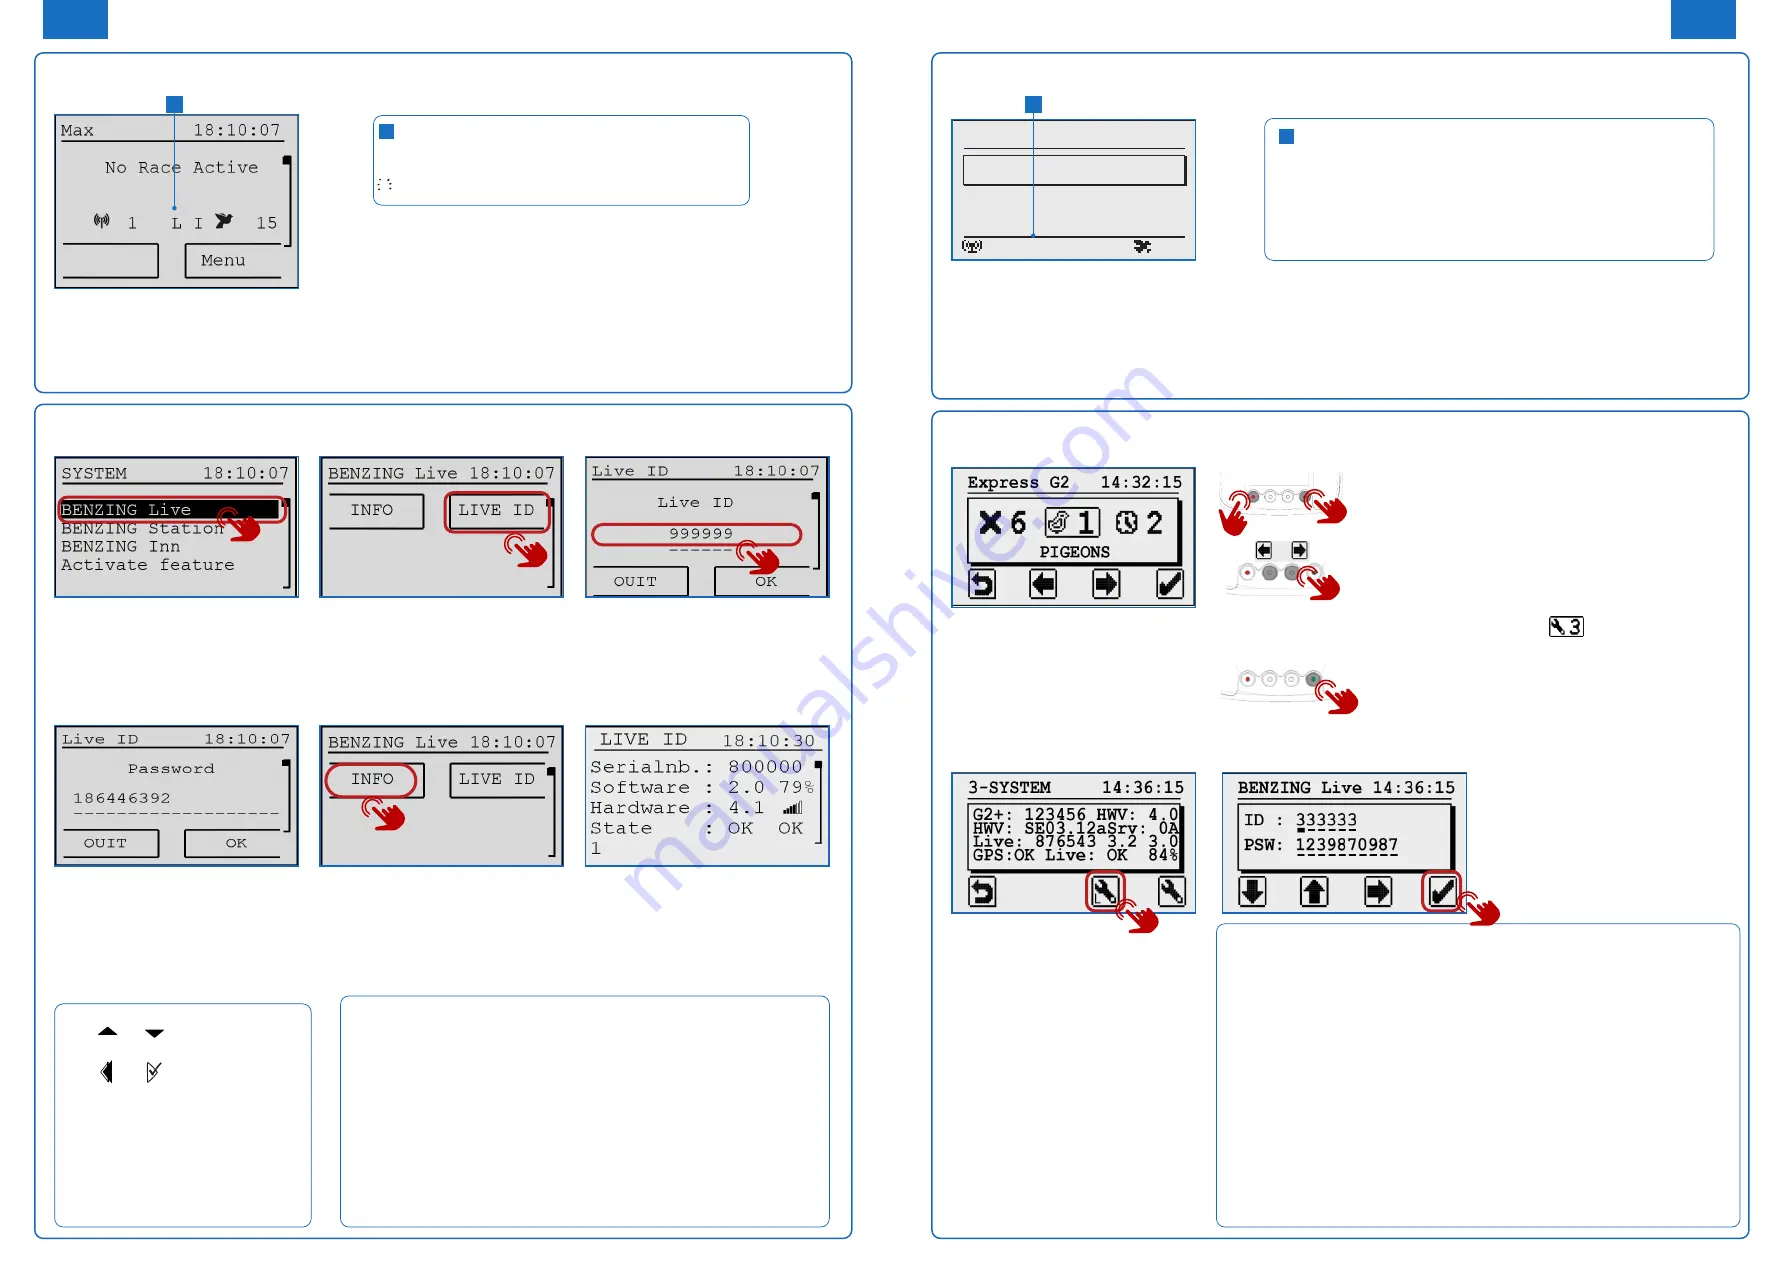
Connecting with LIVE ID:
After you entered your LIVE ID and
password press the “OK” button to
store your login data. The BENZING
Live Smart Hub and the BENZING
M1 will now be ready for transiting
data over the GSM network.
Check Settings:
When you press the “INFO” button
in the BENZING Live menu you will
see all the system information from
the BENZING Live Smart Hub.
Explanation Settings:
There are several different „States“ that can occur:
SIM:
SIM card not inserted or defective
INIT:
The BENZING Live Smart Hub is in Initial/Startup state
OK:
Everything is OK
COM ERR:
Communication problem
1 or X:
1 = user details correct
x = user details not correct
NOK:
No GPS signal / GPS receiver not connected
The symbol and the percentage shows you the quality of the signal.
Start BENZING Live:
Once all devices are connected to
each other, connect the power to the
system. The BENZING Live and the
BENZING M1 will start up.
General:
Please choose the MENU button
settings and then select BENZING
Live to be able to enter the LIVE ID.
LIVE ID:
In order to have the GSM network
and transfer the arrival data, you
need to enter a user ID and
password. To enter the login data,
select the “LIVE ID” button.
Settings
EN
BENZING G2 with BENZING Live Smart Hub
Explanation Settings:
The system screen displays various information about the system,
including the status of the BENZING Live Smart Hub. The last line of the
status screen shows the the GPS and GSM connection status.
GPS: OK
GPS is OK, position could be determined
GPS: --
GPS not OK, GPS not recognized
Live: OK
Everything is ok
Live: ID
Problem with LIVE ID or password
Live: COM
Communication error with BENZING Live
Live: BUSY
BENZING Live is transmitting data
Live: NOK
General error
Live: SIM
Problem with the SIM Card
Live: PIN
Problem with the PIN Code
Live: GSM
Problem with the GSM network
Live: DATA
Problem with the data network
Live: INIT
BENZING Live is in Initial/Start up state
000
1
Max 14:32:15
Kein Rennen/Training
I L
Start BENZING Live Smart Hub:
Once all the devices are connected to
each other, connect the power to the
system. The BENZING Live and the
BENZING Express G2 start up.
Main Menu:
The Main Menu of the BENZING
Express G2.
Activate the Main Menu:
Push and hold the red and green buttons of the
BENZING Express G2 for appropriately 3 seconds.
Connecting with LIVE ID:
To transmit data via the GSM network, you will need
to enter a User ID and Password. To enter the login
data, use the two middle buttons to scroll to System
menu option - System Icon
Enter the settings menu:
Select the green button to enter the settings menu.
The system settings will be displayed.
Settings
Status BENZING Live Explanation
L:
Connection to the BENZING Live server is OK
L-I:
Login error. BENZING Live Smart Hub could not
login at the server
L-G:
GPS not OK, GPS not recognized
L-M:
Modem error. Mobile network not detected
L-C:
Communication error
System:
You will need to enter the LIVE ID
and the password which was
included on the LIVE ID card.You will
find this card in the BENZING Live
packaging.
Once the LIVE ID and Password
have been stored in the BENZING
Express G2, the BENZING Live and
the BENZING Express G2 are ready
for use.
Notice:
With [ ] or [ ] you can select the
desired characters and numbers.
With [
] or [ ] you can move the
cursor to the left and to the right.
[OK] (green button) saves the
entered data.
If there is no cellular connection or a
connection is interrupted, all data will
be sent as soon as the connection is
reestablished.
Status BENZING Live Explanation
L Connected with BENZING Live Smart Hub
L! BENZING Live server is transmitting data
L (flashing L) GPS or GSM connection is lost
Enter LIVE ID:
Please enter the Live ID and the
password which was included on the
Live ID card.
LIVE ID Overview:
This screen shows the overview
about the software version and
LIVE status. This can be used to
troubleshoot any connection issues if
needed. See the various „States“ below.
1
1
1
1


