background image

General Information

Quality

This exercise product has been designed and

manufactured to comply with the latest (BS EN 957)

British and European Safety Standards.


Questions

Queries

If you do have any queries, please ensure that you have

the following information ready for our Customer Support

Staff:
YOUR NAME

YOUR ADDRESS

YOUR PHONE NUMBER

PRODUCT MAKE OR BRAND

PRODUCT MODEL

PRODUCT SERIAL NUMBER

DATE OF PURCHASE

NAME OF RETAILER

PART NUMBERS REQUIRED

a). Provide parts for the purchaser to effect repair.

b). Repair the product, returned to our warehouse 

(at the purchaser's cost). 

c). Replace the product if it is deemed (by us) to be 

economical to do so.

This guarantee does not cover wear and tear on 

upholstery or consumables.

This guarantee does not cover abuse, defects caused by 

storage or use outside those intended.

If you need to advise us of a defect with your product and 

in order for us to service any requirement for replacement 

parts or repairs, we will ask for proof of purchase. Failure 

to do so will result in any claim for replacement parts or 

repairs being refused.

This guarantee, (both given and implied) applies to the 

original purchaser only, is not transferable and will be 

invalidated if used outside of the above criteria.

This guarantee is valid only in the United Kingdom and Eire.

This does not affect your statutory rights as a consumer.


Customer Support

Guarantee

This product is guaranteed for 

DOMESTIC USE ONLY

 for 

a period of 

1 YEAR

 from the original certified date of

 purchase. During this period we have the right to: - 

Page 3

Should you encounter any difficulty with the assembly,

operation or use of your exercise product or if you

think that you may have parts missing, please DO NOT

return it to your retailer but contact us first for help and

advice, asking for CUSTOMER SUPPORT, by any of the

following means. 

Tel:- 01535 637711 or

Fax:- 01535 637722 or

Email:- [email protected]  

Website: www.benysports.co.uk

CUSTOMER SUPPORT is open from 9.00am to 5.00pm

from Monday to Friday

Beny Sports Co. UK Ltd.
Unit 8, Riparian Way,
The Crossings, Cross Hills,
West Yorkshire.
BD20 7BW  

Tel:- 01535 637711 or 

Fax:- 01535 637722 or 

Email:- [email protected] 

Website: www.benysports.co.uk

CUSTOMER SUPPORT is open from 9.00am to

5.00pm from Monday to Friday
Beny Sports Co. UK Ltd.

Unit 8, Riparian Way,

The Crossings, Cross Hills,

West Yorkshire 
BD20 7BW

Содержание Xer-Fit

Страница 1: ...sembly User Manual Please ensure that you read this manual carefully before attempting to assemble or use your new product and retain for future use Xer Fit FOLDING MOTORISED TREADMILL SERIAL NO HY2761 UK ...

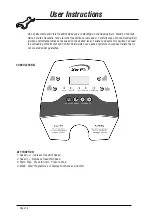
Страница 2: ...ntents Section Page General Information 3 Before You Start 4 Safety 5 Exercise Information 7 Assembly 10 User Instructions 15 Protect the environment by not disposing of this product with household waste ...

Страница 3: ...s guarantee both given and implied applies to the original purchaser only is not transferable and will be invalidated if used outside of the above criteria This guarantee is valid only in the United Kingdom and Eire This does not affect your statutory rights as a consumer Customer Support Guarantee This product is guaranteed for DOMESTIC USE ONLY for a period of 1 YEAR from the original certified ...

Страница 4: ...nts and will reduce the possibility of injury during assembly Work with a Friend You may find it quicker safer and easier to assemble this product with the help of a friend as some of the components may be large heavy or awkward to handle alone Unpack the Components Carefully unpack each component checking against the parts list that you have all the necessary parts to complete the assembly of you...

Страница 5: ...ou are in any doubt do not use your product but contact CUSTOMER SUPPORT by any of the means listed on the opposite page Before use always ensure that your product is positioned on a solid flat surface If necessary use a rubber mat underneath to reduce the possibility of damaging flooring or slipping in use Always wear appropriate clothing and footwear such as training shoes when exercising Do not...

Страница 6: ...rer 4 Never operate this Treadmill if it has a damaged cord or plug if it is not working properly if it has been dropped or damaged or dropped into water Contact Customer Support 5 Do not carry this Treadmill by power supply cord or use cord as a handle 6 Keep the cord away from heated surfaces 7 Never operate the Treadmill with the air openings blocked Keep the air openings free of lint hair and ...

Страница 7: ...upply of oxygen to your muscles via the blood pumped by your heart With regular exercise your cardiovascular system will become stronger and more efficient Your recovery rate i e the time taken for your heart to reach its normal resting level will also decrease Initially you may only be able to exercise for a few minutes each day Do not hesitate to breathe through your mouth should you need more o...

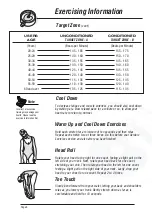
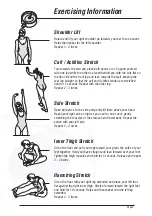
Страница 8: ...onds and then relax Repeat each stretch two or three times Do this before your Aerobic Exercise session and also after you have finished Head Roll Rotate your head to the right for one count feeling a slight pull on the left side of your neck Next rotate your head back for one count stretching your chin Then rotate your head to the left for one count feeling a slight pull on the right side of your...

Страница 9: ...ch Open both arms to the side and gently lift them above your head Reach your right arm as high as you can for one count gently stretching the muscles of the stomach and lower back Repeat the action with your left arm Repeat 3 4 times Inner Thigh Stretch Sit on the floor and pull your legs toward your groin the soles of your feet together Hold your back straight and lean forward over your feet Tig...

Страница 10: ...ty Key chord until you can stand with both feet on the rear of the Running Belt with your heels on the Rear Roller clip the chord to your clothing and take up the slack in the chord until it s tight The idea is if you stumble or fall the Safety Key will pull out and stop the treadmill You can test this by standing in the normal position you would use the product take a step backwards and the Safet...

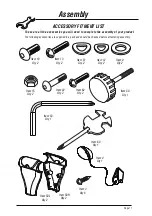
Страница 11: ...llowing accessories are supplied in a pack and should be checked before attempting assembly Assembly Item 10 Qty 2 Item 13 Qty 2 Item 22 Qty 2 Item 60 Qty 1 Item 15 Qty 2 Item 3 Qty 6 Item 4 Qty 1 Item 59L Qty 2 Item 59R Qty 2 Item 53 Qty 1 Item 50 Qty 1 Item 51 Qty 2 Item 12 Qty 2 Item 9 Qty 2 Item 62 Qty 2 Page 11 ...

Страница 12: ...ross Hills West Yorkshire BD20 7BW Carefully unpack each component checking against the parts list that you have all the necessary parts to complete the assembly of your product Please note that some of the parts may be pre fitted to major components so please check carefully before contacting our CUSTOMER SUPPORT team In any event please do not return the product to your retailer before contactin...

Страница 13: ... M8 x 35mm Allen Bolts 22 2 x M8 Flat Washers 9 and 2 x M8 Nuts 15 Now fit 2 x M4 x 16mm Screws 62 as shown below 3 Undo the Locking Knob 50 from the Upright Frame 16 Gently lower the Main Frame 26 to the ground 26 16 50 50 16 Insert the Locking Knob 50 to secure the Main Frame 26 Note 26 50 Page 13 ...

Страница 14: ...dlebar 11 to the Base Frame Uprights 16 using 1 x M8 x 15mm Allen Bolt 10 and 1 x M8 Curved Washer 51 on each side As shown below CAUTION Take care not to trap and wires feeding any excess into the Upright Tube As shown below 51 2 1 Page 14 ...

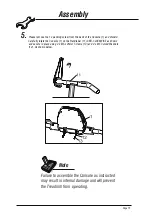
Страница 15: ... in place using 2 x M5 x 25mm Screws 13 and 2 x M5 Curved Washers 12 As shown below Please remove the 1 x packing screw from the back of the Console 1 and discard Failure to assemble the Console as instructed may result in internal damage and will prevent the Treadmill from operating Note Page 15 ...

Страница 16: ...ing Pins 57 and inserting them into one of the three holes in the Incline Feet 56L R making sure they are equal on both sides 56L 59L 59R 3 16 57 To change the incline of the treadmill FULLY TIGHTEN all Bolts Nuts and Fittings now ensuring that your product is located on a clean flat surface before doing so If necessary use a rubber mat underneath to aid stability and reduce the possibility of sli...

Страница 17: ...AT POSITION ON THE FLOOR TO ENSURE THAT THE FRAME TRANSPORTATION WHEELS 24 RUN SMOOTHLY CAREFULLY MANOEUVER THE TREADMILL TO ITS DESIRED POSITION TREADMILL MOVING INSTRUCTIONS TO FOLD YOUR TREADMILL 1 Remove the Locking Knob 50 from the Upright Frame lower hole Lift the rear of the Main Frame and fold upwards until the hole in the Main Frame is in alignment with the Upper Hole of the Upright Frame...

Страница 18: ...mpt to start this Treadmill while you are standing on the Running Belt Stand on the Side Rails hold the Handrails then start the Treadmill at a low speed Carefully step onto the Running Belt when comfortable increase the speed to the desired level Failure to observe this caution can lead to overloading of the Motor and Control Board which can cause premature component failure that is not covered u...

Страница 19: ...s This is an average reading and will take approximately 30 seconds to stabilise 8 To Stop the Treadmill either press Start Stop or remove the Safety Key and the Treadmill will slow to a stop and return to its Standby Mode Note None of the Computer functions will be operational when the Safety Key is removed or the Treadmill is slowing after pressing Stop Start 1 This Treadmill is for Home Use Onl...

Страница 20: ...l please note the ERROR CODE above and Contact CUSTOMER SUPPORT by any of the means listed on the back page of this manual if you are unable to reset the Treadmill OPERATION INSTRUCTION 1 PREPARATION BEFORE START 1 1 Plug in the power cord and press the power key at the down front part of the machine If the machine is not operated or moved for a long time please turn off the power 1 2 Nip the safe...

Страница 21: ...e and user weight it will be necessary periodically to lubricate the underside of the Running Belt To ensure that this is done successfully take the 5mm Allen Wrench and adjust the Rear Roller Location Bolts which are accessible through the Rear Frame Caps Rotate each bolt a full 4 turns ANTI CLOCKWISE to slacken off the belt Lift the sides of the belt and run a small bead of lubricant onto the Ru...

Страница 22: ...Assembly Page 22 ...

Страница 23: ...or 1 28 M8 x 20mm Hex Bolt 4 29 M8 Spring Washer 2 30 M8 x 12mm Allen Bolt 2 31 Control Board 1 32 Drive Belt 1 33 Wire Clip 1 34 Power Switch 1 42 Rear End Cap L R 1 35 Fuse Set 1 1 36 Front Roller 37 M8 x 55mm Allen Bolt 3 38 Lock Washer 3 39 Running Deck 1 40 M6 x 30mm Self Tapping Screw 8 41 Rear Roller 1 43 Side Rail 2 44 Running Belt 1 45 Motor Cover 1 8 46 M5 x 15mm Screw 47 Side Rail Fixin...

Страница 24: ...Sports Co UK Ltd CUSTOMER SUPPORT is open from 9 00am to 5 00pm from Monday to Friday Tel 01535 637711 E mail support benysports co uk Fax 01535 637722 Unit 8 Riparian Way The Crossings Cross Hills West Yorkshire BD20 7BW Website www benysports co uk ...

Отзывы: