background image

22 


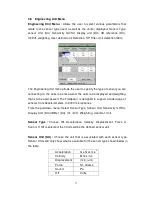
Zoom  : 

Select either On  or Off. The Zoom  FFT allows you to  put the 

resolution lines in a specified band for greater resolution. 


Start Freq :

 Input the desired starting frequency of the Zoom FFT in the input 

box. You must have the Zoom FFT feature turned on to activate this feature. 
Select this by pressing the [

OK

] button of the [

Navigation Keypad

].   

Note : when Zoom FFT is Off the start frequency is zero. 


Average :


Average Type : 

Select Off, Linear,  Exponential, Peak Hold or Time. 

Note  : Time  average  does  averaging  in  the  time  domain.  If  the  time  signal  is 
not synchronized by an appropriate triggering, the result will be incorrect. 


Average Number :

 Select 1,3,5, 10, 20, 30, 50, or 100, 200, 500, 1,000, 2,000, 

or 5,000. 


Overlap :

 Select 0%, 25%, 50%, 75%, Maximum. 


Select  the  ratio  for  the  overlapping  of  time  block  data  during  a  averaged 
measurement. 

Note  :  when  maximum  is  selected,  the  Fieldpaq

  will  perform  the  maximum 

overlap  available  at  the  time  of  measurement.  This  is  done  automatically,  as 

the Fieldpaq

  is a real time instrument and will allocate as many resources as 

possible based on the setup parameters. 


Preview :

 Select either On or Off. When preview is on, the FFT program  will 

pause and show you the acquired time domain data for your preview. You will 
then have to accept or reject it. For example, this is usually used for an bump 
test. It enables you to preview the time waveform and screen out the bad data, 
which might be caused by a double-hitting or overloading signal. 


Overload/ Rejection : 

Select On or Off. When Overload/Rejection is on, data 

that is overloaded will automatically be rejected during an averaging process. 


Содержание Fieldpaq II

Страница 1: ...aqⅡ Ⅱ Ⅱ Ⅱ Dynamic Signal Analyzer User Manual Edition December 2013 Benstone Instruments Inc 32905 Northland Court St Paul MN 55045 Telephone 651 257 6500 www benstone com Copyright 2005 6 all rights reserved ...

Страница 2: ... NAVIGATING THE DISPLAYS 15 4 3 SOFT KEY MENU FILE 17 4 4 SOFT KEY MENU SETUP 20 4 5 MODE MENU 20 4 6 MEASUREMENT MENU 21 4 7 CHANNEL MENU SETTING UP THE PARAMETERS OF INPUT CHANNELS 24 4 8 ENGINEERING UNIT MENU SETTING UP THE ENGINEERING UNITS 27 4 9 ENVELOPE SETUP 31 4 10 SOFT KEY MENU DISPLAY 34 4 11 TRACE SETUP 39 4 12 SELECTING A FUNCTION FROM TRACE SETUP MENU 39 4 13 SELECTING THE TYPE OF Y ...

Страница 3: ...AM 58 5 1 RUN BALANCER PROGRAM 58 5 2 MAIN DISPLAY 58 5 3 EXIT 59 5 4 PREFERENCE 61 5 5 TOOLS 61 5 6 BALANCING 61 5 7 SINGLE PLANE 62 5 8 DUAL PLANE 67 5 9 OVERHUNG 67 5 10 3 BALANCERS SINGLE PLANE 68 5 11 3 BALANCERS DUAL PLANE 70 5 12 CONTINUE A SAVED JOB 72 5 13 REDO A SAVED JOB 73 5 14 BALANCERS Mass 77 ...

Страница 4: ...e Benstone Instruments Dynamic Signal Analyzer is very flexible Your system may have come with only one software feature but the FieldpaqⅡ is designed for easy upgrade of software features as needed by the user 1 1 System Contents Your system includes this manual the analyzer battery charger Lithium ion battery a SD card USB cable a hard carrying case an utility program CD and other optional acces...

Страница 5: ... can do please feel free to call or Email us Telephone 651 257 6500 Fax 651 357 4004 Service or Calibration support benstone com General information info benstone com Or you can visit our website at www benstone com The website is the first place to look for product updates application notes or technical tips ...

Страница 6: ...ard ware features Detail of the individual operation of each function will be described in later chapters 2 1 Layout of the FieldpaqⅡ Ⅱ Ⅱ Ⅱ ò Storage card and USB 1 1 connector ò Connectors ò Color TFT touch screen ò Fold able stand ò Main keypad ò Function keypad ò Logo and power indicator ò Battery compartment cover Shoulder strap Hand strap ...

Страница 7: ...e following operations Escape or abort from a menu Backspace when entering a string ò OK key Use this key for the following operations Enter or confirm a selection Call out the trace setup menu ò Start Stop key Use this key to start or stop a measurement ò On off key use this key to turn the instrument on or off ò Plus key Zoom in or user define ò Minus key Zoom out or user define ò Dot key Change...

Страница 8: ...ypad is easier or prefer using the touch screen display Either way you can choose the method that best fits your needs 2 4 Connectors On top of the FieldpaqⅡ is a series of connectors to provide an interface to accept external signals usually from your sensors power supply or to output communications with external devices like a computer DC DC power supply AUX Tacho input TTL output and RS 232C in...

Страница 9: ...l show the icons of programs installed You may only have one program or may have several programs depending on what was purchased At the lower right corner you can see the clock and the battery power gage To run a program move the focus to the program icon with navigation keys and press OK key to run it You can also run a program by double tapping the icon with your finger Double tap the icon to r...

Страница 10: ...red color It is normal that the casing of the instrument gets a little bit warm during charging 100 200 Vac You can also charge the battery or a backup battery via an optional charging station You can extend the operational hour in the field by replacing the battery with a backup one Optional charging station and backup battery Handle battery packs carefully This product contains a Li ion battery ...

Страница 11: ...al Memory SDHC Card Card up to 16 GB memory Battery Li Po 7 4V 5400 mA hr Rechargeable PC Interface USB 1 1 Mini B type USB Connector LCD Display 480X800 color TFT Display 5 inch touch screen Operating Temp 10 degrees C to 50 degrees C Safety Certifications CE Sealing IP 65 dust and splash proof Housing material ABS and TPR dual material injection Weight 2 8 lbs 1 3 kg Size 9 6 in x 5 2 in x 2 5 i...

Страница 12: ... system information programs installed on this instrument and setting up the system parameters Use cancel key to leave program In the Utility software there are three main menus System Menu Option Menu and Program List 3 1 System Menu The system menu displays information about the internal components of your FieldpaqⅡ ...

Страница 13: ...f the touch screen panel to the instrument 3 3 Program List This display will show a list of programs currently installed and active on your FieldpaqⅡ The FieldpaqⅡ has a built in time lock for certain programs If you have a demo version of a particular software the time lock will display how much remaining time is left If you need to get a demo program for evaluation please contact Benstone Instr...

Страница 14: ...tall a new program or a demo program you ll have to get a key code from Benstone Instruments first Then you can tap the Install button to conduct the installation which will guide you through the install process ...

Страница 15: ...y below shows the measured data in up to two windows i e Pane A and Pane B respectively You may select one of these data windows as active while the other window is inactive The active window has a deep blue title bar while the inactive window has a light blue title bar This window is active because the title bar is in deep blue color Plot area Plot area Y scale label Trace Setup Title bar X scale...

Страница 16: ...ess Cancel key to make the title bar of the active window turn red And then use the navigation keys to move the red focus to the desired window Press OK to confirm your selection Use Touch Screen Tapping in a different window will make this area active Maximize or Restore an Active Window The user can tap the title bar of an active window to maximize it or restore it ...

Страница 17: ...een or press F1 key to open the file menu Press cancel key or tap the file button again to close the window Exit Exits this program About Displays the software and firmware version Filename Options When you save a data file the system will automatically assign a filename for it You can choose the optional items for generating a default filename ...

Страница 18: ...o another directory if desired Note You can always remove the memory card from the FieldpaqⅡ and then perform these functions from your PC File Manager View Menu Selecting View allows you to arrange the icons by Name Type Size or Date Open Setup Selecting Open Setup to open a setup file fs2 and apply its setup parameters to the FFT program Save to Default Saves the current setup parameters to the ...

Страница 19: ... Save Data to save the measured data as well as the associated setup parameters to a data file fd2 The program will assign a file name which is defined in the filename option menu You can press OK button or tap on the file name to edit the file name Save Layout Selecting Save Layout to save the current display format into a file flo You can reload the saved display format from Display menu for qui...

Страница 20: ...ocal Soft keys Return return to the submenu selection Save to Default save the current setup parameters to the default fs2 file Load Default Load the setup parameters from the default file fs2 4 5 Mode menu Selecting single block power spectrum waterfall or Envelope Single Block The program offers all the available functions like time waveform complex spectrum auto power spectrum etc It shows only...

Страница 21: ...urement and how to set up the measurement Frequency Band Band Lines Zoom Start Frequency Average Average type Average number Overlap Preview Overload Reject Trigger Trigger On Off channel level slope delay Tachometer Pulses rev hold off time show RPM Frequency Band Band Select 50 Hz 100 Hz 200 Hz 500 Hz 1 kHz 2 kHz 5 kHz 10 kHz 20 kHz 40 kHz via the pull down panel Lines Select 100 200 400 800 160...

Страница 22: ...rlap Select 0 25 50 75 Maximum Select the ratio for the overlapping of time block data during a averaged measurement Note when maximum is selected the FieldpaqⅡ will perform the maximum overlap available at the time of measurement This is done automatically as the FieldpaqⅡ is a real time instrument and will allocate as many resources as possible based on the setup parameters Preview Select either...

Страница 23: ... to setup other parameters for this channel However if you select one of the analog channels i e Ch1 Ch4 then you must set up Level Slope and Delay Level input a voltage value as the trigger level Slope Select either positive or negative slope Delay This is an input screen where you can enter an integer for a delay between 99 to 99 Tacho Pulses Revolution Via the Navigation Keypad press OK You wil...

Страница 24: ...ing window and other parameters for making a good measurement ON OFF Turns on off each channel Input Range Select from 5V or 20V input range This should match the output of the device that you are connecting to Coupling Select AC DC IEPE or 0V Mic Window Select Rectangle Hanning Flattop Force Exponential Force Factor Enter the desired force input box and then press OK The width of the force window...

Страница 25: ... ID for modal testing or ODS testing Point number Enter a value between 0 and 999 Direction You can select one of the directions from a pull down menu X X Y Y Z Z R R T T P P These point ID s and direction labels are used for modal or ODS testing work The point ID s will be stored in the data file for identifying the points Auto Advance ON OFF Auto advance is a feature that is useful for taking ma...

Страница 26: ...ents You can show the channel ID s as the legend of data trace in the main display Select from the menu to create a new name Local Soft Key Menu Return Selecting the Return function returns you to the Setup menu Selecting return again returns you to the live display Assign Single This feature speeds up the entry requirements for channel setup Assign single will assign that parameter selected for t...

Страница 27: ...d weighting that is to be used as well The FieldpaqⅡ is designed to support a wide range of sensors from Accelerometers to 200V microphones From the pull down menu Select Sensor Type Sensor Unit Sensitivity mV SU Display Unit DU dB Ref DU Int Diff Weighting User Def Unit Sensor Type Choose Off Acceleration Velocity Displacement Force or Sound If Off is selected then Volts will be the defined senso...

Страница 28: ...equency domain functions For time waveform it is always displayed in SU dB Ref DU Input a number DU to define the reference value of the dB scale dB value 20 log A A0 where A is the linear value and A0 is the dB reference value When A A0 dB value is equal to 0dB so the dB reference value also defines the position of 0 dB For an acoustic signal the dB reference is set at 2e 05 PA Note This only cha...

Страница 29: ...lecting the desired unit There may be a time where you need to display units in a different format other than the ones listed Detection Select P P 0 P or RMS By selecting Peak to Peak you are showing values peak to peak Likewise 0 P shows values zero to peak HP Filter Select 0Hz 2Hz 5Hz or 10Hz from the pull down menu Note When you enable an integration once or twice by making the unit conversion ...

Страница 30: ...ur measurement It should be cautioned that inaccurate scaling factors will result in bad test data You can also add Sensor units and Display units to the FieldpaqⅡ via the Add SU or Add DU function key for the function selected Local Soft Key Menu Return Returns you to the previous engineering unit menu Add Sensor Unit Add a new sensor unit to the table Add Display Unit Add a display unit to the t...

Страница 31: ... analysis Because Envelope spectrum is calculated from Hilbert transform which takes over a lot of CPU time this algorithm will slow down the realtime performance of your analyzer Select Envelope On only when it is necessary Envelope Filter Select a band pass filter for envelope calculation When a bearing is developing defects on its components we usually can observe high frequency vibration which...

Страница 32: ...r that applied to the natural frequencies of bearing components so that we can derive the envelope spectrum In this example the envelope filter can be centered at 2 6 kHz 6 59 kHz or 12 49 kHz for example reference to 4 20 envelope scanning Filter Select a band pass filter from 500 2kHz 1kHz to 2 5 kHz 2 kHz to 5 kHz 5 kHz to 10 kHz or custom Center Display the center frequency of the envelope fil...

Страница 33: ... BPFO Ball passing frequency of outer race frequency of outer race BPFI Ball passing frequency of inner race frequency of inner race You may select the bearing maker bearing model number and add it to the quick list for displaying the frequency on the spectral plot Note that it is very important that you need to input the rotation speed of machine to create proper bearing frequencies Acquire measu...

Страница 34: ...the arrow button on the left hand side of the window to display the menu too Detailed instructions about the trace setup menu will be given in the following paragraphs Band Limit Select this option will enter the Band Limit menu The user can select a band limit file from the drop down menu When a band limit file is selected the line of limit will be shown on the spectrum display A band limit file ...

Страница 35: ... Fix X Define a fixed range for X Axis When you select this function a screen will pop up prompting you to enter X1 and X2 to determine the desired range of the X Axis Fix Y Define a fixed range for Y Axis When you select this function a screen will pop up prompting you to enter Y1 and Y2 to determine the desired range of the Y Axis Full Scale Set the range for Y axis to the maximum value which is...

Страница 36: ...ou to highlight certain frequencies for more detailed analysis Off Turns off the cursor Note When the cursor is off it will show the overall value in the cursor table Single Displays a single cursor You can use the Navigation Keypad Left Right to move the cursor to the desired selection Harmonic Displays the harmonic orders of the cursor position Harmonic Single Displays initial harmonic of origin...

Страница 37: ...ows move together This is useful when you are viewing frequency domain functions in both data windows Note that this function is effective only when the X axes of both windows are in the same unit Same X This function makes the X axes of both windows remained the same scale when you are zooming X scale in the active window Legend Select the type of data legend displayed in the window For example y...

Страница 38: ... the bearing fault frequencies on the spectral plot Add layout Add a previously saved layout file to the list Delete layout Delete a layout file from the list After adding some layout files to the list you can select the layout setup for quick switching the display format to a previously defined format ...

Страница 39: ...nd side of the window to display or close the Trace Setup menu Then use the navigation keys or tap the menu on to display the available options 4 12 Selecting a function from Trace Setup menu Tap the icon to select a function for display in this window Available functions in the Function Menu Time x t Time waveform that is displayed in Sensor Unit Tap the arrow to display the menu Tap the arrow to...

Страница 40: ...rum is a real function that preserves the amplitude of the Linear Spectrum and removes its Phase Although its unit is the power of the engineering unit by definition the cursor displays its value in engineering unit for convenience Cross Spectrum Sxy f This is the short form of Cross Power Spectrum Cross Power Spectrum is the cross product of Spectrum Sx f and Sy f Sxy f Sx f Sy f This function is...

Страница 41: ...it function is a XY plot of two time waveform Usually the orbit function is used to describe the vibration tracks of a rotating shaft Note that the orbit function always shows channel 1 and channel 2 data as a pair Envelope Spectrum SExx f Fourier Hilbert X t 2 Envelope spectrum is the power spectrum of the enveloped or demodulated time waveform The time waveform data is subjected to a band pass e...

Страница 42: ... will show what is available for each selected function Function Available selections for each function Spectrum Linear Log dB Real Imaginary Phase Auto Spectrum Linear Log dB Time Real Windowed FRF Linear Log dB Real Imaginary Phase Cross Linear Log dB Real Imaginary Phase Coherence Linear Log Number display the data in tabular format with numbers ...

Страница 43: ...ndently i e only look at Channel 2 for example You may also hold a data trace for overlapping and comparison purpose The hold trace feature will be preserved even when you start a new measurement or open an old data file such that the hold data can be overlapped with the others for comparison However if the displayed function is changed the hold data trace will automatically be changed as well suc...

Страница 44: ... connect all your IEPE sensors to the input sensors Select Verify to conduct the checking and then the system will show the result in a window which may indicate one of the following conditions Ò Short circuit low bias This phenomenal usually indicates a bad cable with short loop Ò Normal normal bias The IEPE circuit is working normally Ò Open circuit high bias If there is no sensor connecting to ...

Страница 45: ...d a TTL signal out via the auxiliary channel to another device such as a strobe This feature is based on the cursor position in the frequency domain function such as spectrum Auto Power Spectrum or FRF This feature requires an optional TTL out cable An example of application is when you have two rotating devices at similar frequencies and by strobing each device with a precise frequency you can de...

Страница 46: ...l time measurement see Section 4 10 Engineering Unit Menu Setting up the Engineering Units However after the measurement is stop you can use this function to show your time waveform data in Display Unit You can turn this function off to recover the time domain data Original time data in SU g Converted time data in DU mm s ...

Страница 47: ...n also use the note for generating a default file name in the file name option menu With the Note tool you can identify your data file easily among many files The Note that you created will be saved in your instrument Drop down the menu and select one from the options Tap the sign to create a new one Edit the note with the keyboard panel ...

Страница 48: ...ure below to calibrate the sensitivity of your microphone Illustration Example Calibration of an acoustic microphone Endevco EM46AE Preamplifier Serial NO 137357 Nicrophone Serial No 134396 Sensitivity from the calibration sheet 51 26 mV Pa Note The illustrating displays for this example are from the 4 channel analyzer impaq Elite They are slightly different from that of Fieldpaq II 1 Enter Channe...

Страница 49: ...type of channel 1 as Sound 3 From the main display select Tools Calibration 4 Select Unit as dB input Calibration frequency as 1000 Hz 5 Turn on the calibration signal of the calibrator and then select Acquire signal In this example we got Test Amp 67 988 dB ...

Страница 50: ...erives the calibrated sensitivity as 50 052 mV Pa You can acquire the calibration signal again to see if the calibration result is correct or not Press OK to leave calibration menu and then the calibrated sensitivity will be saved to the Engineering Unit table Press Cancel will abort the procedure and nothing will be saved ...

Страница 51: ...ursor Select Undo Mark Cursor to cancel the previous cursor label Clear All Marks Select Clear All Marks to delete all the cursor labels 4 16 Status Bar The Status bar displays the status of the system When the channel icon shows abnormal conditions please stop measurement and correct the problem Green OK Blue ICP circuit failure Red Overload Clear Channel turned off 1 2 ...

Страница 52: ...select the way of controlling measurement steps Armed by RPM When the user chooses Armed by RPM the program takes measurements according to the rpm reading of tacho input Start RPM Set the rotation speed when the measurement begins Stop RPM Set the rotation speed when the measurement stops Delta RPM Set the increment of rotation speed for each measurement step For example if the user sets the Star...

Страница 53: ...step No of counts Define the total number of measurements Stop by Count No The measurement stops as the number of counts reaches the defined number Manual The measurement stops only when the user pressed Stop button Delta Second Define the span of time between each measurement 4 19 Navigating the Display of Waterfall Plot Because the File and Setup menus in waterfall mode is the same as that of Si...

Страница 54: ... screen at one time you can choose the channel data for display from this menu Adjust View Angle Select this option to adjust the view angle of waterfall plot And then use navigation keys to adjust the view angle Press OK to confirm the change or press Cancel to exit ...

Страница 55: ...e floor you may use these options to hide the unwanted noise from the plot For example the following figure shows a waterfall plot with dB scale in Y axis After tuning the bottom up the dominating signal becomes easier to be identified Note You can use Navigation keys to move up or down for quick access to this function Fixed Select this option to specify the range of Y axis When you tap this icon...

Страница 56: ...sition Z view Select to display the Z axis in count number time or RPM Legend Select the type of data legend displayed in the window BG Color Select black or white back ground color for the data window 4 20 Envelope Scanning The quality of envelope spectrum is affected by the location of envelope filter significantly If you are not sure if your envelope filter is properly selected you may conduct ...

Страница 57: ... quality 4 21 Tools The first 3 options of Tools menu have been discussed in the previous paragraph Please reference to Section 4 16 The other two options are used to acquire a trace horizontal or a slice vertical for display in the trace plot Add To Trace Plot Select this option to acquire a data trace or slice which is highlighted by the cursor for display in the trace plot You can add up to 8 t...

Страница 58: ... We have developed several balancing programs that will quickly and easily balance the rotors through a step by step process that the user follows To begin simply select the rotor type you wish to balance and then follow the instructions within the program 5 2 Run Balancer program Move the focus to highlight the Balancer software program and then press OK to run this program Or double tap the prog...

Страница 59: ...erence or Tools Single Plane Balancing Select this icon to begin single plane balancing on a new rotor including the trial weight process and calculating balancing coefficients Dual Planes Balancing Select this icon to begin Dual plane balancing on a new rotor including the trial weight process and calculating balancing coefficients Overhung Balancing Select this icon to begin Overhung rotor balan...

Страница 60: ...ocess and calculating the balancing coefficients 3 Balancers Select this icon to begin your new balancing job on three permanently mounted balancing weights as shown in the picture including trial weight process and calculating the balancing coefficients Continue a saved job This option allows you to open a saved file and continue an unfinished balancing job with saved coefficients and historical ...

Страница 61: ...choose unit in Metric or in Imperial 5 6 Tools About Show the Software and Firmware Version IEPE Check Check the IEPE Power or IEPE BIAS This utility is used to check the condition of the sensor and cables If the IEPE bias is abnormal it usually is a bad cable or a bad sensor ...

Страница 62: ... should be pointed out that the sensor positions CH1 CH2 CH3 CH4 as shown on each display must be mounted on the machine as shown in the picture for accurate results Placing the sensor in the wrong position will generate incorrect balancing coefficients and could potentially be dangerous Setup page for Single plane balancing Setup page for Dual plane balancing Setup page for overhung rotor Setup p...

Страница 63: ...plane balancing or 4 points in dual or overhung rotor you are now in multi point balancing mode Multi point balancing mode When you select more than the minimum points to balance the balance algorithm will minimize all the vibration measured with the least square approach This means that when both horizontal and vertical directions are measured in single plane balancing the program will try to min...

Страница 64: ...easurement procedure once decreasing rotation speed is detected and then show the results on the polar plots The point of this function is to show the heavy spot 1X on the polar plot With the polar plots of the coast down procedure you can find out the location of heavy spot easily Resolution Set the resolution of the tracking filters as Low Normal High 0 03 Order 0 015 Order 0 008 Order 0 004 Ord...

Страница 65: ...balance quality of a rotor is graded from G0 4 the best to G4000 the worst or user defined The balance grade is a calculation by the rotor s maximum operational speed and the rotor s eccentricity where the eccentricity can be derived from the total rotor weight the radius for balancing and the residual imbalance mass When user define is selected you can only change the value for Tolerance for P1 T...

Страница 66: ...ing the Maximum allowable unbalance according to ISO 1940 Residual Unbalance Residual unbalance is the allowable unbalance value remaining after the balancing job is completed as defined in the ISO 1940 standard Rotor Mass kg Enter the weight of the rotor Diameter P1 Enter the diameter of Plane 1 ...

Страница 67: ...is able to measure the absolute physical phase of the vibration signals If you are going to measure 1X vibration during coast down process it is necessary to input the locations of sensor correctly Note If 1X coast down measurements is not selected the input for sensor locations will be disabled 5 9 Sensor setup Setup the information of the vibration sensors ...

Страница 68: ...s 100 mV g Display Unit DU Select mGs mm s2 mm s um in s2 in s or mil The vibration levels will be displayed in Display Unit in the vibration measurement page Detection Select RMS peak or P P Couple Select IEPE AC or DC 5 10 Vibration measurements After you press the Next button from the sensor setup page you should see a display as follows Notice in the window that the instructions are to Start r...

Страница 69: ...t step Notice the rotation speed is now displayed In this example it is 3565 RPM The bottom window shows reading rotation speed press OK to accept Press OK via the Navigation Keypad After you have pressed OK notice that the amplitude phase and overall readings are displayed and the 1X vibration data is shown in the polar plots Press Next to continue or Redo to repeat the test ...

Страница 70: ...lancing job is conducted at a speed which is close to the resonance frequency In such cases the balancing coefficients may lead to poor balancing results because the vibration phase becomes unstable at or close to the resonance frequency The 1x polar plot is very useful to identify resonance at or near the balancing rpm It is recommended in this situation to use the 1x heavy spot from the polar pl...

Страница 71: ...w speed indicates the location of the heavy spot Above the 1st resonance example When rotational speed is higher than the 1st resonance of the structure the 1X coast down trace would look like a curve with some circles as illustrated by the following figure As the machine coasts down to a lower speed the phase becomes constant once again This constant phase at low speed indicates the location of t...

Страница 72: ...physically attaching a weight to the rotor If you are removing weight you are physically removing the weight or material from a rotor This could be removing a set screw or by drilling a hole Method Select Add or Cut Trial Mass Enter the weight of the trial mass Position Enter the degree of trail mass After Choose Remove or Remain trial weight 180 270 0 90 Operational speed 180 270 0 90 ...

Страница 73: ...surement and trial weight vibration measurements the balancing program then derives two balancing coefficients one balancing coefficient from point one and the other balancing coefficient from point two Case A Balancing with coefficient from point one If we balance the rotor by using coefficient from point one we expect to reduce the vibration of point one from A to A1 as shown in the plot below w...

Страница 74: ...uares means that the overall solution minimizes the sum of the squares of the errors made in the results of every single equation Essentially the Least squares calculation is a method in balancing to reduce the larger vibration more quickly than the smaller vibration signals By conducting least squares calculations with both the balancing coefficients from point one and point two we derive optimum...

Страница 75: ...the final result some data are adjusted to contribute more than others Note Weighting factors are a number from 0 1 For example in our Case C suppose that you are not satisfied with the result and you wanted to reduce the vibration more at point one than at point two With weighting the user can apply a larger weighting factor to reduce the vibration more and achieve the desired effect In this exam...

Страница 76: ... applied With 0 5 weighting applied Weighting applied to point 1 Weighting applied to point 2 Least Squares Calculation Multi point balancing Case A Not applicable Not applicable No No Case B Not applicable Not applicable No No Case C 1 1 Yes Yes Case D 1 0 5 Yes Yes 0 90 180 270 0 90 180 270 A A3 B B3 ...

Страница 77: ...e direction of the polar plots as counter clockwise or clockwise Edit Allow you to edit the balancing information if you need to Restore Restore the balancing information with the original data Selecting restore will show the original balancing masses from least square calculation You may edit it to derive different results Select Restore to reload the data from original least square calculation ...

Отзывы: