background image

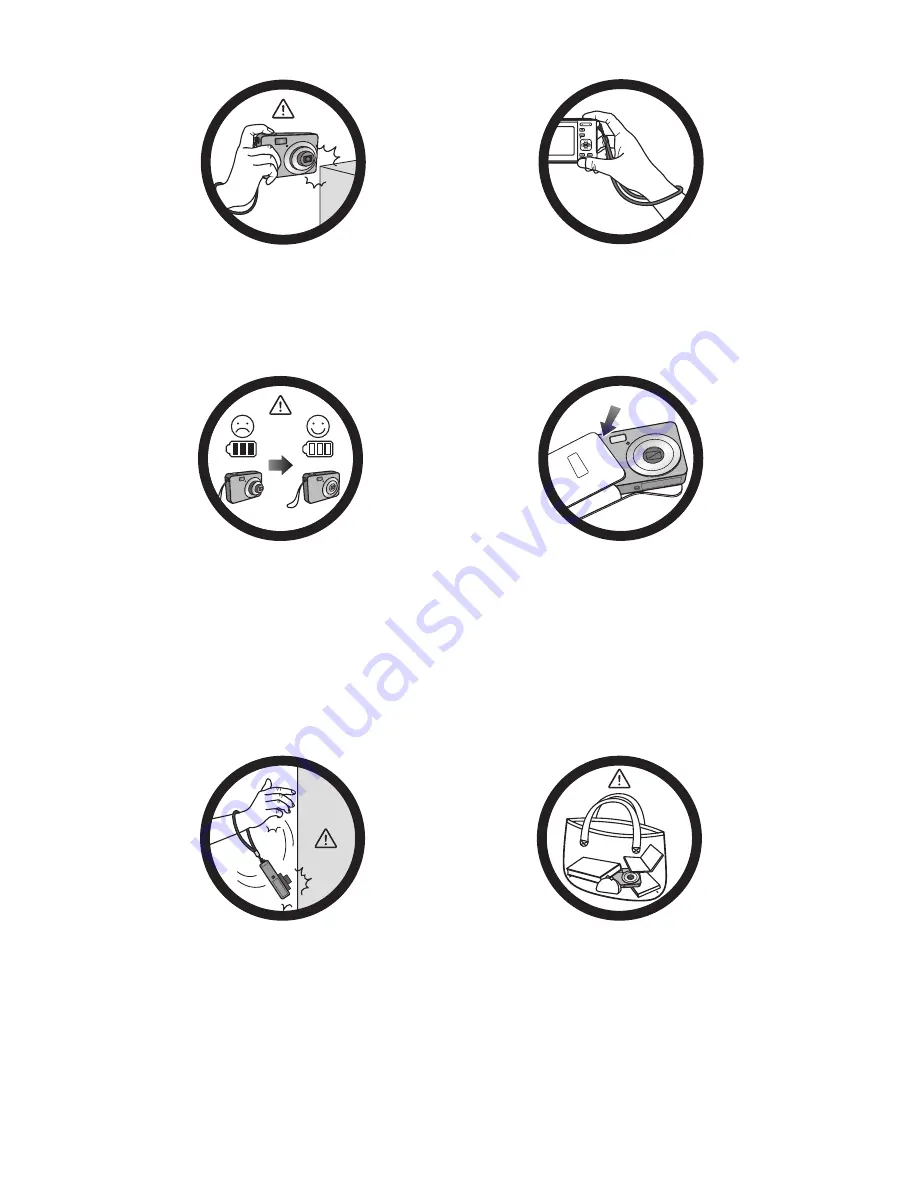
Do not hold the camera by excessive 
force. Plus, be sure to protect the 
camera from strong impacts.

To avoid accidental falling, please attach 
the hand strap to the camera and always 
hold the camera by keeping the hand 
strap around your wrist.

If the battery suddenly depleted and 
caused the lens fail to retract, please 
carefully protect the lens to avoid 
collision and insert a battery with full 
power ASAP.

When the camera is not in use, always 
turn the power off and make sure the 
lens has retracted successfully before 
storing the camera in its case. If you do 
not intend to use the camera for a long 
time, please remove the battery 
from the camera and store the battery 
carefully.

Keep your camera away from sharp 
objects and avoid collision.

When the camera is not in use, please 
place it in a steady place. Plus, always 
keep your camera away from pressure 
or any other similar environment 
(for example, in a pant pocket) to 
avoid possible damage.

Содержание LM100 Series

Страница 1: ...LM100 Series Digital Camera User Manual ...

Страница 2: ...re used for informational purposes only Disclaimer BenQ Corporation makes no representations or warranties either expressed or implied with respect to the contents hereof and specifically disclaims any warranties merchantability or fitness for any particular purpose Further BenQ Corporation reserves the right to revise this publication and to make changes from time to time in the contents hereof w...

Страница 3: ...initiatives further to incorporate life cycle design in the aspects of material selection manufacturing packaging transportation using and disposal of the products BenQ ecoFACTS label lists key eco friendly design highlights of each product hoping to ensure that consumers make informed green choices at purchase Check out BenQ s CSR Website at http csr BenQ com for more details on BenQ s environmen...

Страница 4: ...ation This equipment generates uses and can radiate radio frequency energy and if not installed and used in accordance with the instructions may cause harmful interference to radio communications However there is no guarantee that interference will not occur in a particular installation If this equipment does cause harmful interference to radio or television reception which can be determined by tu...

Страница 5: ...ren In particular small parts such as memory cards and batteries could be easily dismantled and swallowed by them Use only the original accessories to avoid possible risks to health and property and thus meet all related legal regulations Do not dismantle the camera under any circumstances When using the flash do not go too close to human eyes particularly for babies toddlers and children or anima...

Страница 6: ... camera may damage the internal electronic circuit board deform the lens shape or make the lens unretractable Do not use harsh chemicals cleaning solvents or strong detergents to clean the camera Finger grease may be left on the camera lens and will result in unclear images or videos To avoid this problem be sure to clean the camera lens before taking pictures or recording videos You should also c...

Страница 7: ...mptied Storage at too high or low temperatures will also result in a gradual capacity loss As a result the operating time of your camera may be considerably reduced It is normal for the camera to become warm during operation because the camera casing might conduct heat Precautions for use The accessories that came with the camera are not water resistant Before use The front of the camera lens is p...

Страница 8: ...ra body immediately with a damp cloth After use Remove any foreign objects on the camera in particular the water resistant seals and their adjacent surfaces Do not use liquid soaps detergents alcohol and other similar cleaners to avoid possible damage to the camera s water resistance ability After using the camera in water or any foreign objects have entered the camera clean the camera by rinsing ...

Страница 9: ...sert a battery with full power ASAP When the camera is not in use always turn the power off and make sure the lens has retracted successfully before storing the camera in its case If you do not intend to use the camera for a long time please remove the battery from the camera and store the battery carefully Keep your camera away from sharp objects and avoid collision When the camera is not in use ...

Страница 10: ... Memo ...

Страница 11: ...g date and time 21 Operating the camera 22 Capture mode 24 More capture options in the Function menu 25 Flash mode 26 Face Tracking 27 Focus mode 27 Image size 28 Image quality 28 Setting EV 29 White Balance 29 ISO 30 AE metering 30 Effect 31 Shooting mode 33 Aperture Priority 38 Shutter Priority 38 Manual mode 39 Drive mode 39 Auto Exposure Bracketing AEB 40 AF area 40 Using Assist Lamp 40 Settin...

Страница 12: ...Viewing multiple files at a time 53 Playing back video clips 54 Adjusting the playback volume 54 Slideshow 55 Deleting files 55 Protecting files 56 Red eye Removal 56 Voice memo 56 Photo Effect 57 Trimming 58 Resizing 58 Startup image 59 DPOF 59 Radial Blur 60 Working with computer and AV system 60 Bundled software 60 Connecting the camera to a computer 60 Connecting the camera to an AV system 61 ...

Страница 13: ...l camera 3 USB cable 4 Battery 5 Hand strap 6 Software User Manual CD 7 Pouch 8 AC power adapter All pictures screen captures and icons used in this manual are for illustration only Actual and available products accessories as well as their appearance may vary depending on sales region If any items are missing or damaged contact your dealer Save the packaging for future shipment or storage ...

Страница 14: ...Camera Front and bottom views 1 USB AV port 2 Strap eyelet 3 Shutter button 4 Flash 5 Power button 6 AF Assist Lamp Self timer LED indicator 7 Speaker 8 Microphone 9 Lens 10 Battery card cover 11 Tripod mount 11 10 7 8 6 5 4 3 9 1 2 ...

Страница 15: ...n Activates the function menu Capture mode or delete photos Playback mode 8 MENU button or return to the previous menu Indicator State Description Status LED No light The digital camera is off Solid green The digital camera is ready to capture images The digital camera is powering on or is in the power saving mode Status LED Blinking green The digital camera cannot focus The digital camera is capt...

Страница 16: ...he LCD display may have some light spots or show unusual colors This is normal and does not indicate display malfunction nor will this affect the pictures you take with the camera The LCD monitor looks darker in strong sunlight or bright light This is not a malfunction To prevent your images from being blurred while pressing the shutter button always hold the camera steady This is especially impor...

Страница 17: ...charge the battery via a wall outlet 1 Turn off the camera 2 Insert the battery into the camera 3 Slide to unlock the USB AV port cover A To install the battery 1 Slide to unlock the battery cover A 2 Release and open the battery card cover B 3 Insert the battery in the correct direction by matching the label on the battery slot C 4 Push the battery all the way down 5 Close and lock the battery ca...

Страница 18: ...art charging immediately To charge the battery via a computer 1 Turn on the computer 2 Turn off the camera 3 Insert the battery into the camera 4 Slide to unlock the USB AV port cover 5 Connect one end of the USB cable to the camera 6 Connect the other end of the USB cable to your computer The battery will start charging immediately You need to follow the instructions above to ensure successful ch...

Страница 19: ...e the warranty Ensure that the Li ion battery is inserted into the product with correct polarity Incorrect polarity may damage the camera or cause fire Download all pictures and remove the battery from the camera if you are going to store the camera for a long time Damage caused by the use of an incorrect power adapter is not covered under the warranty The battery may be warm after being charged o...

Страница 20: ...fferent display modes 5 Confirms a chosen setting Using an SD card The camera comes with internal memory for storing captured images video clips or audio files You can also add an SD card to store more files To install an SD card 1 Make sure the camera is turned off 2 Slide to unlock the battery card cover 3 Release and open the battery card cover 4 Insert an SD card in the correct direction 5 Clo...

Страница 21: ... Setting date and time When using the camera for the first time or when the battery has been removed from the camera for a long time you need to set the date and time The date and time is recorded when a video or image is captured To set date and time 1 Press Step 1 is needed only after the initial setting is done 2 Press or to locate Date Time and then press or 3 Press or to select date and time ...

Страница 22: ... down it might result in a blurred photo 5 Press the shutter down fully to capture 6 Release the shutter 7 To switch to Movie mode press Shooting Mode and select Movie Record Next adjust the optical zoom as needed and press the shutter down to start video recording press the shutter again to stop video recording 8 Press the Mode button to switch to Playback mode and view captured images or recorde...

Страница 23: ...Flash is automatically turned off in the Movie Record mode The Movie Record mode records both sound and video The recording time is continuous but recording will stop once the memory card space is full In the Movie Record mode sound is temporarily muted during zoom in out At any time you can press the Power button to turn off the camera In Capture or Playback mode press to decide what information ...

Страница 24: ...4 Drive mode 39 5 AEB 40 6 Number of shots available 7 Image size 28 8 Image quality 28 9 Face Tracking 27 10 ISO 30 11 White Balance 29 12 AE metering 30 13 Exposure value EV 29 14 AF area 40 15 Histogram 16 Battery status 49 17 Camera shake warning ISO 100 100 EV 1 0 A 9999 9999 P 14M 1 2 3 5 4 6 7 8 9 17 16 15 13 14 12 11 10 ...

Страница 25: ...ete none and rule of thirds Use the rule of thirds display mode to improve your composition by placing subjects on at least one of the intersections of these 4 imaginary lines While the shutter is pressed halfway the shutter speed and the aperture are also shown on the screen not available in the Movie Record mode While the shutter is pressed down halfway the AF area color changes to yellow green ...

Страница 26: ... animals in low light conditions Be sure to ask the subject to look at the camera lens or get as close to the camera as possible The flash fires automatically based on the photographic conditions Force On The flash always fires regardless of the surrounding lighting conditions Select this mode when capturing images with high contrast backlighting and deep shadows Slow Sync Fires the flash immediat...

Страница 27: ...utton to switch to Capture mode 2 Keep pressing to toggle between Auto focus and focus modes Due to environmental factors such as lighting the number of detected faces might be different from that of the actual faces To achieve the best result ask your subjects not to turn their faces partially away from the lens Icon Mode Description Auto focus Adjusts focus automatically Super Macro Used when ca...

Страница 28: ...scription Icon Description 14 megapixels 4320 x 3240 3 megapixels 2048 x 1536 3 2 14 megapixels 4320 x 2880 HD 16 9 1920 x 1080 in full HD format 8 megapixels 3264 x 2448 VGA 640 x 480 5 megapixels 2592 x 1944 Icon Mode Description Super Fine Best image quality with the lowest compression rate File size is the largest Fine Better image quality with medium compression rate File size is medium Norma...

Страница 29: ... conditions so white and other colors can display properly when you capture images To select White Balance 1 Press White Balance Icon Mode Description Auto Adjusts white balance automatically Daylight Used in bright daylight conditions Cloudy Used in twilight or shady conditions Tungsten Used when subjects lit by tungsten incandescent lighting Fluorescent H Adjusts for fluorescent lighting Correct...

Страница 30: ... may see more noise in the picture as you increase the ISO value To select an ISO value 1 Press ISO 2 Press or to select an ISO Value 3 Press to confirm setting AE metering Icon Description Automatically sets the ISO value Equivalent to color ISO 100 200 film Used for outdoor photography in bright sunlight Equivalent to color ISO 400 800 1600 3200 6400 film Used it in a low light environment or wh...

Страница 31: ...n Vivid Adds an effect with very clear and bright color tones Sepia Adds an effect with dark reddish brown color tones so the image or video looks as if it is old Color Accent Red Highlights the subjects by keeping the red color domain of an image only while making other regions black and white Color Accent Green Highlights the subjects by keeping the green color domain of an image only while maki...

Страница 32: ...rently selected effect is shown in the middle thumbnail 3 Press to confirm setting Vivid Red The image becomes reddish Vivid Green The image becomes greenish Vivid Blue The image becomes bluish Before After when Color Accent Red is applied After when Color Accent Green is applied After when Color Accent Blue is applied Icon Mode Description ...

Страница 33: ... mode based on the current shooting environment Program You can set the shooting parameters manually Movie Record Record video clips Aperture Priority You can choose an aperture value while the shutter speed is automatically determined by the lighting condition of the subject Shutter Priority You can choose a shutter speed while the aperture value is automatically determined by the lighting condit...

Страница 34: ...n Captures the background first so the helper can use it to take the final shot HDR Increases the dynamic range and enhances the details of dark areas LOMO Creates a lomo like effect by adding over saturated colors dark corners and so on Fisheye Simulates a fisheye lens effect and creates a distorted hemisphere like image Beauty Enhancer Enhances the tone of skin so that the facial skin appears sm...

Страница 35: ...save the image file Portrait Makes the subject usually a person stand out with smooth and natural looking skin tones Night Portrait Shoots night scenes and portraits clearly Please keep the camera steady or use a tripod while using this mode Child Increases sensitivity and emphasizes children s skin tones Sports Uses a high shutter speed to capture objects in motion Food Captures food by enhancing...

Страница 36: ...such as in the evening or at night Fireworks Adds exposure time to shoot firework trails Please keep the camera steady or use a tripod while using this mode Landscape Captures a scene in the distance with the focus area set to infinity and a lower aperture value The maximum depth of view can also be achieved Foliage Takes a clear and vivid picture of flowers or plant leaves by emphasizing their sa...

Страница 37: ...he file size for faster internet upload Text Improves clarity contrast when taking a close up picture of documents Voice Rec Voice Record Captures background sound only no images or videos When listening to the captured audio file later you can see a unique icon that appears on the screen and indicates that this is an audio file ISO Metering and White Balance are not available in some shooting mod...

Страница 38: ...ture mode set the Shooting Mode to Aperture Priority 2 Press 3 Press to adjust the aperture value 4 Press to confirm setting Shutter Priority Shutter priority is often used when shooting moving subjects In general use a shorter shutter speed to catch a fast moving object To adjust shutter speed in Shutter Priority 1 In Capture mode set the Shooting Mode to Shutter Priority 2 Press 3 Press to adjus...

Страница 39: ...ally takes a picture after 2 or 10 second delay This mode is useful when you want to be part of the picture Double Performs delay and capture twice Performs a 10 second delay then captures the image Performs another 2 second delay then captures the image again Burst Continuously takes pictures as long as you keep pressing the Shutter The flash is always off in this mode Speedy Burst Press and rele...

Страница 40: ...urn on off AEB 1 Press the Mode button to switch to Capture mode 2 Press AEB 3 Press or and then select or 4 Press AF area To select an automatic focus area 1 Press AF Area 2 Press or and then select a focusing area 3 Press Using Assist Lamp This feature allows you to add extra light when the lighting is insufficient while capturing images To enable the Assist Lamp 1 Press Assist Lamp 2 Press or a...

Страница 41: ...m enlarges or shrinks the image using a software process To select a digital zoom 1 Press Digital Zoom 2 Press or and then select a digital zoom type or 3 Press Date Stamp Imprints the date when a picture was taken on the picture itself To set the date stamp 1 Press Date Stamp 2 Press or and then select Date Date Time or 3 Press Icon Mode Description Wise Zoom Reduces the image size and thus incre...

Страница 42: ...then select or 3 Press Smart Scene Automatically selects the best shooting mode from Portrait Landscape Sunset Backlight Backlight Portrait Night Portrait Night Scene Snow Text Foliage and Super Macro 1 Press Shooting Mode and select Smart Scene 2 Press the shutter halfway to set automatic focus The selected shooting mode is displayed in the top left corner of the screen 3 Press the shutter to cap...

Страница 43: ... to capture an image If blinking is detected a warning message appears on the screen 3 Press to save or discard the image and then press to confirm Love Portrait Takes a self portrait of at least two faces 1 Press Shooting Mode and select Love Portrait 2 Once faces are detected the camera will automatically take a picture after a two second countdown 3 The camera continues to detect faces and take...

Страница 44: ...tion is automatically set at 1M 1024 x 768 when this mode is selected 1 Press Shooting Mode and select Panorama 2 Press to select how shots will be stitched 3 Press the shutter to capture the first shot Icon Mode Description Left to Right The direction of the succeeding shots will be to the right of the first shot Right to Left The direction of the succeeding shots will be to the left of the first...

Страница 45: ...amera will automatically take the second shot If you will only stitch two shots press to complete the panoramic picture Otherwise proceed to the next step 6 To take the third shot pan the camera to the direction of the guidance arrow Once the screen icon overlaps the green block the camera will automatically take the third shot Guidance bar Panoramic picture preview The camera captures the shot wh...

Страница 46: ...ture The LOMO effect will be applied to this picture immediately Fisheye Simulates a fisheye lens effect and creates a distorted hemisphere like image 1 Press Shooting Mode and select Fisheye 2 Take a picture The Fisheye effect will be applied to this picture immediately When the LOMO effect is applied color shift changes in colors might occur Before After Before After ...

Страница 47: ... captured background image to frame the composition and press the shutter to capture the final image Web Auction Combines a maximum of 4 shots into one single image on a VGA 640 x 480 size so it can be quickly used in situations such as Internet auctions 1 Press Shooting Mode and select Web Auction 2 Press or to move to the number of shots you want to take and then press Icon Mode Description 1 sh...

Страница 48: ...ing will automatically stop when the video file size reaches 4 GB Video recording at HD 720p 16 9 1280 x 720 will automatically stop when the video file size reaches 4 GB or the total recording time is near 29 minutes Recording a video at HD 720p 16 9 1280 x 720 requires a Class 6 or above SDHC card Videos captured in Web mode are stored under the XXXUTUBE directory XXX are numbers with the file s...

Страница 49: ...ee Effect on page 31 for more details Pre record On and Off When Pre record is on the camera repeats recording a short video clip for a 3 second duration before you press the shutter Once you press the shutter the previous 3 second video clip will be combined into the current video you are shooting Only the latest 3 second video clip is stored temporarily on the memory Icon Description Battery pow...

Страница 50: ...period of time Press any key to resume 3 min 5 min Off The camera remains on when idle LCD Saving On For power conservation the LCD screen is automatically dimmed after the camera has been idle for 20 seconds Press any key to resume Off The LCD screen remains bright when the camera is idle Date Time Sets the date and time Language Select a language for display menus and other information File Numb...

Страница 51: ...ghtness Auto The LCD brightness is automatically set based on the surrounding environment High The LCD brightness is increased Normal The LCD brightness remains at the default value Manage Memory Format Formats the internal memory or the memory card Copy to Card Copies files from the internal memory to the memory card Reset All Resets the entire menu and button operation settings to initial defaul...

Страница 52: ...ted 56 3 Indicates this file has a voice memo or the file is an audio file 56 4 Indicates the file is marked for printing 5 Displays the shooting parameters when you took the picture or playback controls Press to toggle between different displayed information 6 Date and time when the file was created 7 File number 8 Histogram 9 File name file size shutter speed and aperture value 10 115 10 115 01 ...

Страница 53: ...return to the normal viewing size Rotating an image You can press to change the orientation of an image at 90 degrees clockwise at a time Viewing multiple files at a time Shows up to 9 files at a time on the screen To view multiple files 1 Press the Mode button to switch to Playback mode 2 Press In this mode maximum 9 files shown in thumbnails are displayed on the screen Press or to select a file ...

Страница 54: ...t a video clip audio clip or voice memo that you want to playback 3 Adjust the volume Press to increase the volume If there are more than 9 thumbnails you can press repeatedly until the scroll bar is highlighted Then you can press to move to the previous 9 thumbnails or to move to the next 9 thumbnails To cancel highlighting the scroll bar just press During video playback press to fast forward or ...

Страница 55: ...zontal transition effect Applies a vertical transition effect Applies a horizontal transition effect by intersecting an image You can set the interval between 1 3 5 10 seconds 4 Select whether you want to repeat the slideshow 5 Select Start and press to play the slideshow Deleting files Removes selected or all files To delete files 1 Press the Mode button to switch to Playback mode 2 Press Delete ...

Страница 56: ...ress the Mode button to switch to Playback mode 2 Press or to move to the image you want to apply Red eye Removal 3 Press Red eye Removal or 4 Press to confirm the change and save the image file Voice memo Inserts a voice annotation to an image file To record a voice memo 1 Press the Mode button to switch to Playback mode 2 Press or to move to the image you want to add a voice memo 3 Press Voice M...

Страница 57: ...Press Photo Effect or 4 Press or to select the effect The preview result based on the currently selected effect is shown in the middle thumbnail Icon Mode Description Normal No effect is added to the image Sepia Recorded image will be stored in a sepia tone B W Convert image to black white Negative Colors become the opposite of what they were in the original image Mosaic Applies a mosaic tile effe...

Страница 58: ...t the target image size 8M 5M 3M VGA to which you want to reduce 5 Press or to locate the area to trim 6 Press to confirm the change and save the image file Resizing Changes an image file to a smaller size and overwrites the image file or saves it as another new file To resize an image 1 Press the Mode button to switch to Playback mode 2 Press or to move to the image you want to resize 3 Press Res...

Страница 59: ... memory card for printing and specify the number of print copies in advance using the camera This is extremely convenient for sending the images to a photo developing service or for printing on a direct print function compatible printer To set up DPOF 1 Press DPOF 2 Press or and select one of the following options To set the DPOF setting for one image in a time select One and press or to select an...

Страница 60: ... to a computer You can connect the camera to a PC or notebook to transfer view print or edit files as well as charge the camera To connect the camera to a computer 1 Slide to unlock the USB AV port cover 2 Connect the end of the smaller plug of the USB cable to the camera 3 Turn on the camera 4 Connect the other end of the USB cable to an available USB port on your computer You cannot use this fun...

Страница 61: ...or projector screen Printing images In addition to printing images by connecting the camera to a printer via a computer or bringing the memory card if available to a photo processing center you can choose to print using PictBridge Printing with PictBridge You can directly print images by connecting your camera to a PictBridge compatible printer without using a computer To print images from a PictB...

Страница 62: ...ect Print All To print all images shown by thumbnails at a time select Print Index 8 Press The above procedure may vary depending on the printer type you are using If you connect the camera to your printer while the printer is still starting up the camera will be automatically turned off Failure to follow the above procedure will make the camera show an error message Please disconnect the camera a...

Страница 63: ...mperature is extremely low Many shots are being captured in dark places requiring a flash The battery or camera is warm The camera or flash was used continuously over a long period of time The flash does not fire or recharge The camera flash is turned off Set the flash to Auto Flash The light source is sufficient Even though the flash fired the image is dark The distance to the subject is greater ...

Страница 64: ...n when pressing the shutter button The battery is running low Replace the battery The camera is not in the Capture mode Switch to the Capture mode The shutter button was not pressed all the way down Press the shutter button all the way down The internal memory or memory card does not have any free space Load a new card or delete unwanted files The flash is recharging Wait until the flash mode icon...

Страница 65: ...20 x 1080 VGA 640 x 480 Movie Mode HD 720p 1280 x 720 VGA 640 x 480 QVGA 320 x 240 30 fps Continuous recording with sound Shutter Speed Auto 1 2000 1 sec Fireworks 2 sec Night Scene 1 2000 15 sec White Balance Auto Daylight Cloudy Tungsten Fluorescent H Fluorescent L Manual Exposure 2 0 2 0 EV 0 3EV step ISO Auto 100 200 400 800 1600 3200 3M or lower 6400 3M or lower Flash Auto Flash Auto Anti Red...

Страница 66: ...tal output USB 2 0 compatible Accessories USB Cable Software User Manual CD Quick Guide Hand Strap Pouch Li ion Battery AC Adapter Available accessories depend on the actual items shipped and may vary from the list above All information designs and specifications are subject to change without prior notice ...

Отзывы: