background image

BenQ DC 5530  User’s Manual

EEEEn

nnng

ggglllliiiis

ssshhhh

Playback

23

5.5

5.5

5.5

5.5

Playing a Movie

Playing a Movie

Playing a Movie

Playing a Movie

Use the following procedure to play back a movie that was recorded in the movie mode.

1.

In the PLAY mode, use [ ] and [ ] to scroll through images 
until the movie you want to play is displayed.

2.

Press [SET].

• This starts playback of the movie.
• You can perform the following operations while a movie is 

playing.

5.6

5.6

5.6

5.6

Viewing Pictures in Thumbnail Mode

Viewing Pictures in Thumbnail Mode

Viewing Pictures in Thumbnail Mode

Viewing Pictures in Thumbnail Mode

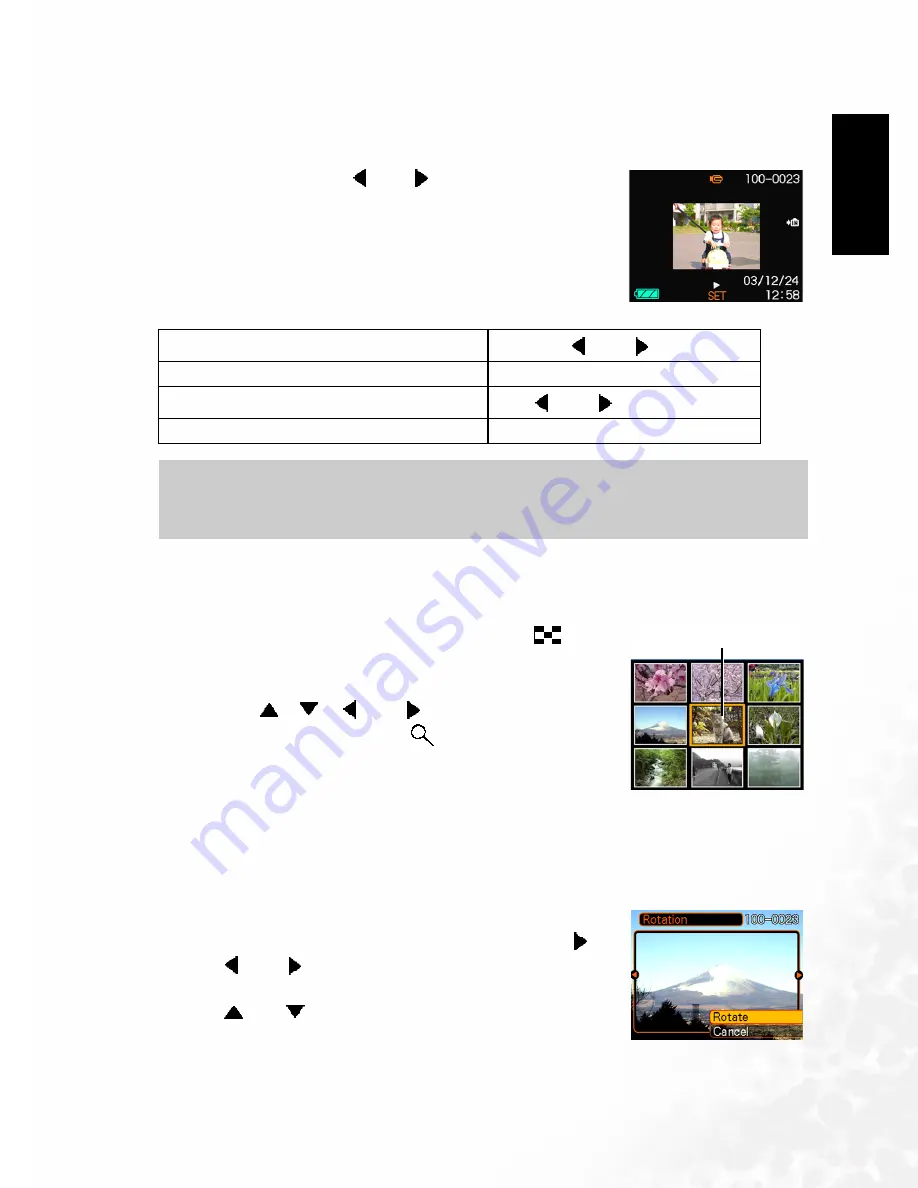
The Thumbnail mode allows you to view up to nine images at a time on the LCD monitor.

1.

 In the PLAY mode, slide the zoom controller left (

briefly, and then release it.

2.

The selected image is highlighted.

3.

Press the [

], [

], [ ] and [ ] to select an image.

4.

Slide the zoom controller right (

) to display the selected 

image in full screen size.

5.7

5.7

5.7

5.7

Rotating the Display Image

Rotating the Display Image

Rotating the Display Image

Rotating the Display Image

Use the following procedure to rotate the image 90 degrees and register the rotation 
information along with the image. After you do this, the image is always displayed in its rotated 
orientation.

1.

In the PLAY mode, press [MENU].

2.

Select the "PLAY" tab, select "Rotation", and then press [ ].

3.

Use [ ] and [ ] to scroll through images until the one you 
want to rotate is on the monitor screen.

4.

Use [

]and [

] to select "Rotate", and then press [SET].

• This rotates the image 90 degrees to the right.

Fast forward or fast reverse the movie

Hold down 

[ ]  and  [ ]

.

Pause movie playback

Press [SET].

Skip forward or back one frame while paused

Press 

[ ]  and  [ ]

.

Cancel playback

Press [MENU].

Important!

Important!

Important!

Important!

• 

You cannot repeat play a movie. To play a movie more than once, repeat the steps of the 
above procedure.


Selection boundary 


Содержание DC C62

Страница 1: ...Welcome DC C62 Digital Camera DC C62 Digital Camera DC C62 Digital Camera DC C62 Digital Camera User s Manual User s Manual User s Manual User s Manual ...

Страница 2: ...era Do not use your camera at temperatures below 0 C or above 40 C Do not use or store your camera in the environments listed below Direct sunlight High and dusty places Next to an air conditioner electric heater or other heat sources In a closed car that is directly under the sun Unstable locations If your camera becomes wet wipe it with dry cloth as soon as possible Salt or seawater may cause se...

Страница 3: ... Setting the Date and Time 8 3 3 3 3 B B B BA A A AS S S SI I I IC C C C I I I IM M M MA A A AG G G GE E E E R R R RE E E EC C C CO O O OR R R RD D D DI I I IN N N NG G G G 9 9 9 9 3 1 Recording an Image 9 3 2 Using Zoom 9 3 2 1 Optical Zoom 9 3 2 2 Digital Zoom 10 3 3 Using the Flash 10 3 4 Using the Self timer 11 3 5 Specifying Image Size and Quality 12 3 5 1 To specify the image size 12 3 5 2 T...

Страница 4: ... S SE E E ET T T TT T T TI I I IN N N NG G G GS S S S 28 28 28 28 7 1 Specifying the File Name Serial Number Generation Method 28 7 2 Setting the Beep Sound 28 7 3 Specifying an Image for the Startup Screen 28 7 4 Formatting Built in Memory 29 8 8 8 8 U U U US S S SI I I IN N N NG G G G A M A M A M A ME E E EM M M MO O O OR R R RY Y Y Y C C C CA A A AR R R RD D D D 30 30 30 30 8 1 Installing an SD...

Страница 5: ...he package includes the following items If anything is missing or appears damaged contact your dealer Save the packaging in the event you need to ship your camera for service 1 2 1 2 1 2 1 2 DC C62 DC C62 DC C62 DC C62 Components Components Components Components 1 2 1 1 2 1 1 2 1 1 2 1 Front View Front View Front View Front View 1 DC C62 digital camera 2 User s manual 3 DC C62 software CD ROM 4 So...

Страница 6: ...nology however the display may have some light spots or show unusual colors This is normal and does not indicate display malfunction nor will this affect the pictures you take with the camera 8 Viewfinder 9 Operation lamp 10 Play mode 11 REC mode 12 Zoom controller 13 Terminal cover 14 DC IN 3V terminal 15 Strap ring 16 Multi controller 17 DISP button 18 SET button 19 MENU button 20 LCD Monitor 21...

Страница 7: ...reen 1 Flash Mode indicator 2 Focus Mode indicator 3 White balance indicator 4 Self timer 5 REC modes 6 Metering Mode 7 Memory capacity 8 Image size 9 Quality 10 Memory selected for data storage 11 Date and time 12 EV value 13 Battery capacity 14 Focus frame The monitor screen uses various indicators and icons to keep you informed of the camera status 1 Digital zoom indicator 2 Shutter speed value...

Страница 8: ...Indicators on Histogram on Indicators off LCD off 1 4 1 4 1 4 1 4 Attaching the Wrist Strap Attaching the Wrist Strap Attaching the Wrist Strap Attaching the Wrist Strap Important Important Important Important You cannot use the DISP button to change the contents of the monitor screen while a movie is being recorded Important Important Important Important Be sure to keep the strap around your wris...

Страница 9: ...echargeable nickel metal hydride batteries Two AA size lithium batteries FR6 Two AA size alkaline batteries LR6 Proper operation cannot be guaranteed if you use any other type of battery other than that noted above When being powered by AA size alkaline batteries LR6 the camera may not operate at all at temperatures of 5 C 41 F or lower 2 1 2 2 1 2 2 1 2 2 1 2 Inserting the Battery Inserting the B...

Страница 10: ...ery power is used The indicator means that remaining battery power is low Note that you will not be able to record images while the battery indicator is Immediately replace or charge the batteries whenever either of these indicators appears 2 2 2 2 2 2 2 2 Turning the Camera On and Off Turning the Camera On and Off Turning the Camera On and Off Turning the Camera On and Off 2 2 1 2 2 1 2 2 1 2 2 1...

Страница 11: ...is used to select choices images and menus on the LCD monitor and confirm the selection The following shows an example menu procedure in the REC mode Note Note Note Note Pressing REC to turn on the camera enters the REC mode while pressing PLAY enters the PLAY mode Pressing PLAY while in the REC mode switches to the PLAY mode The lens retracts about 10 seconds after switching modes Important Impor...

Страница 12: ...cursor from the tab to the settings 4 Use to select the Language and then press SET 5 Use and to change the language setting and then press SET 2 5 2 5 2 5 2 5 Setting the Date and Time Setting the Date and Time Setting the Date and Time Setting the Date and Time 1 Press the power button or the REC button 2 Press MENU 3 Press to select the Setup tab and then press SET 4 Use to select the Date Styl...

Страница 13: ...utton half way to focus the image The camera s Auto Focus feature automatically focuses the image one beep will sound when the camera has finished metering and the indicator beside the viewfinder will light green The shutter speed and aperture value show on the LCD monitor The green indicator will blink if the subject is difficult to focus on 4 After making sure that the image is focused properly ...

Страница 14: ...photo to change the zoom factor The lens will zoom to the maximum optical telephoto setting and stop Release the lever and press it toward again to further zoom the image digitally The zoom indicator shows the current approximate zoom factor 6 Record the image 3 3 3 3 3 3 3 3 Using the Flash Using the Flash Using the Flash Using the Flash Perform the following steps to select the flash mode you wa...

Страница 15: ...he Self timer Using the Self timer Using the Self timer Using the Self timer The self timer lets you select either a 2 second or 10 second delay of the shutter release after you press the shutter button 1 In the REC mode press MENU 2 Use and to select the REC tab 3 Use and to select Self timer and then press 4 Use and to set the self timer time and then press SET 5 Record the image None Auto The f...

Страница 16: ...the image size 1 In the REC mode press MENU 2 Use and to select the REC tab 3 Use and to select Size and then press 4 Use and to select the setting you want and then press SET 3 5 2 3 5 2 3 5 2 3 5 2 To specify the image quality To specify the image quality To specify the image quality To specify the image quality 1 In the REC mode press MENU 2 Use and to select the REC tab 3 Use and to select Qua...

Страница 17: ...s of cycles thorough the focus mode settings shown below on the LCD monitor 4 1 1 4 1 1 4 1 1 4 1 1 Specifying the Auto Focus Area Specifying the Auto Focus Area Specifying the Auto Focus Area Specifying the Auto Focus Area You can use the following procedure to change the Auto Focus area used in the Auto Focus Mode and the Macro Mode 1 In the REC mode press MENU 2 Use and to select the REC tab 3 ...

Страница 18: ...e 4 1 4 4 1 4 4 1 4 4 1 4 Using Manual Focus Using Manual Focus Using Manual Focus Using Manual Focus With the Manual Focus mode you can adjust the focus of an image manually The following shows focus ranges in the Macro mode for two optical zoom factors 1 Keep pressing until the focus mode indicator shows MF At this point a boundary also appears on the display indicating the part of the image tha...

Страница 19: ...to center weighted metering Returning the EV shift value to 0 0 causes the metering mode to change back to multi pattern metering The settings can be adjusted in 1 3 steps in the range of 2EV to 2EV 4 3 4 3 4 3 4 3 Adjusting White Balance Adjusting White Balance Adjusting White Balance Adjusting White Balance When the white balance mode is set to match the light source the camera reproduces colors...

Страница 20: ...ss SET 4 4 4 4 4 4 4 4 Using the NICESHOT Mode Using the NICESHOT Mode Using the NICESHOT Mode Using the NICESHOT Mode Selecting one of the 19 NICESHOT scenes automatically sets up the camera for recording a similar type of image 4 4 1 4 4 1 4 4 1 4 4 1 Example Sample Scene Example Sample Scene Example Sample Scene Example Sample Scene 1 In the REC mode press MENU 2 Use and to select the REC tab 3...

Страница 21: ...m About the Histogram The histogram is a graph that allows you to judge the brightness of the recorded image The greater the bias toward the left in the graph the darker the image The greater the bias toward to the right the brighter the image If the image is dark adjust the exposure compensation to a positive number Similarly adjust the exposure compensation to a negative number if the image is b...

Страница 22: ...and measures the light in each section for a balanced exposure reading The camera automatically determines shooting conditions according to the measured lighting pattern and makes exposure settings accordingly This type of metering provides error free exposure settings for a wide range of shooting conditions Center weighted Center weighted Center weighted Center weighted Center weighted Center wei...

Страница 23: ...ess MENU 2 Select the REC tab select Saturation and then press 3 Use and to select the setting you want and then press SET 4 6 6 4 6 6 4 6 6 4 6 6 Specifying Contrast Specifying Contrast Specifying Contrast Specifying Contrast Use this procedure to adjust the relative difference between the light areas and dark areas of the image you are recording 1 In the REC mode press MENU 2 Select the REC tab ...

Страница 24: ... Default Settings Specifying Power On Default Settings Specifying Power On Default Settings The camera s mode memory feature lets you specify the power on default settings individually for the REC mode flash mode focus mode white balance mode ISO sensitivity AF Area metering mode flash intensity digital zoom mode manual focus position Turning on mode memory for a mode tells the camera to remember ...

Страница 25: ...ay Image Zooming the Display Image Perform the following procedure to zoom the image currently on the monitor screen up to four times its normal size 1 In the PLAY mode use and to display the image you want 2 Slide the zoom controller towards to enlarge the image This displays an indicator that shows the current zoom factor You can toggle between the zoomed image and normal image by pressing DISP ...

Страница 26: ...splay the one you want to crop 2 Press MENU 3 Select the PLAY tab select Trimming and then press This causes a cropping boundary to appear 4 Use the zoom controller to make the cropping boundary larger or smaller The size of the cropping boundary depends on the size of the image on the display 5 Use and to move the cropping boundary up down left or right until the area of the image you want to ext...

Страница 27: ...Press the and to select an image 4 Slide the zoom controller right to display the selected image in full screen size 5 7 5 7 5 7 5 7 Rotating the Display Image Rotating the Display Image Rotating the Display Image Rotating the Display Image Use the following procedure to rotate the image 90 degrees and register the rotation information along with the image After you do this the image is always dis...

Страница 28: ... 2 5 8 2 Deleting a All Files Deleting a All Files Deleting a All Files Deleting a All Files The following procedure deletes all unprotected files currently in memory 1 In the PLAY mode press 2 Use and to select All File Delete and then press SET 3 Use and to select Yes To exit the file delete operation without deleting anything select No 4 Press SET to delete all the files 5 9 5 9 5 9 5 9 File Ma...

Страница 29: ...nds on the image quality settings capacity of the card etc 5 9 2 5 9 2 5 9 2 5 9 2 Protecting Files Protecting Files Protecting Files Protecting Files Once you protect a file it cannot be deleted You can protect files individually or you can protect all files in memory with a single operation 5 9 2 1 5 9 2 1 5 9 2 1 5 9 2 1 To protect a single file To protect a single file To protect a single file...

Страница 30: ...select DPOF and then press 3 Use and to select Select Images and then press 4 Use and to display the image you want 5 Use and to specify the number of copies You can specify up to 99 for the number of copies Specify 00 if you do not want to have the image printed 6 To turn on date stamping for the prints press DISP so is displayed To turn off date stamping for the prints press DISP so is not displ...

Страница 31: ...er that supports USB DIRECT PRINT you can select images to be printed and start the print operation directly from the camera Use of the optional Alkaline batteries or a AC adaptor is recommended when printing with USB DIRECTPRINT 1 Use the DPOF procedure on page 31 to specify the images in file memory that you want to print 2 Load Alkaline batteries or connect the AC adaptor to the camera 3 Use th...

Страница 32: ...n the REC mode or the PLAY mode press MENU 2 Select the Set Up tab select Beep and then press 3 Use and to set beep sound on off and then press SET 7 3 7 3 7 3 7 3 Specifying an Image for the Startup Screen Specifying an Image for the Startup Screen Specifying an Image for the Startup Screen Specifying an Image for the Startup Screen You can specify an image you recorded as the startup screen imag...

Страница 33: ...he Set Up tab select Format and then press 4 Use and to select Format and then press SET To exit the format operation without formatting select Cancel Important Important Important Important Selecting a new startup image overwrites anything that is already stored in startup image memory Because of this if you want to return to a previous startup image you need to have a separate copy of that image...

Страница 34: ...cessing speeds SD memory cards have a write protect switch which you can use to protect against acci dental deletion of image data Note however if you write protect an SD memory card you must remove write protection whenever you want to record to it format it or delete any of its files 8 1 8 1 8 1 8 1 Installing an SD Card Installing an SD Card Installing an SD Card Installing an SD Card 1 Turn of...

Страница 35: ...operation and displays the message Busy Please wait After the copy operation is complete the monitor screen shows the last file in the folder 8 4 2 8 4 2 8 4 2 8 4 2 To copy a file from a memory card to built in memory To copy a file from a memory card to built in memory To copy a file from a memory card to built in memory To copy a file from a memory card to built in memory With this procedure yo...

Страница 36: ...that came with the DC C62 9 1 9 1 9 1 9 1 Installing the Digital Camera Software Installing the Digital Camera Software Installing the Digital Camera Software Installing the Digital Camera Software It s recommended that you set up the driver and software before connecting the digital camera to your PC Normally a software installation menu appears automatically after this installation CD is inserte...

Страница 37: ...mplete photo project software for digital images Acquire photos effortlessly from digital cameras or scanners Edit and enhance images using easy to use editing tools and cool photographic filters and effects Assemble creative photo projects and share results via e mail and multiple print options 3 Ulead Photo Explorer Ulead Photo Explorer provides an efficient way to transfer browse modify and dis...

Страница 38: ... a PC 1 Turn on the computer 2 Turn on the camera 3 Before connecting the camera C62 to your PC please install the C62 driver first 4 Connect the camera to the PC with the included USB cable Ensure that the connection is secure 5 A new disk appears in Windows Explorer labelled Removable Disk See note below 6 Stored photos and movie clips can be found in the directory Removable Disk DCIM 100DCPIC C...

Страница 39: ... of Image is blurry or out of Image is blurry or out of focus focus focus focus You are using the Manual Focus Mode and have not focused the image You are trying to use the Macro Mode when shooting a scenery or portrait shot You are trying to use Auto Focus or the Infinity Mode when shooting a close up shot Focus the image Use Auto Focus for scenery and portrait shots Use the Macro Mode for close ...

Страница 40: ...etting Shutter speed is different for the following NICESHOT scenes Night Scene 4 to 1 2000 second Fireworks 2 seconds fixed Aperture Aperture Aperture Aperture Wide angle F2 8 4 8 auto switching Telephoto F4 9 8 4 auto switching Exposure Exposure Exposure Exposure Metering Spot Center Weighted Average Average Exposure compensation 2 EV 0 3 EV step ISO Equivalent ISO Equivalent ISO Equivalent ISO ...

Отзывы: