background image

En
gli

sh

PC Dependent Features

17

4

PC D

EPENDENT

 F

EATURES

4.1

Bundled software

The camera is supplied with the following software. To install the software, refer to the 
information supplied with respective CDs.

4.2

Transferring files to your computer

After using USB cable to establish a USB connection between the camera and your computer, 
you can use your computer to share captured images or recorded video clips with your family 
or friends via e-mail or post them on the Web. Note that before you begin, you need to check 
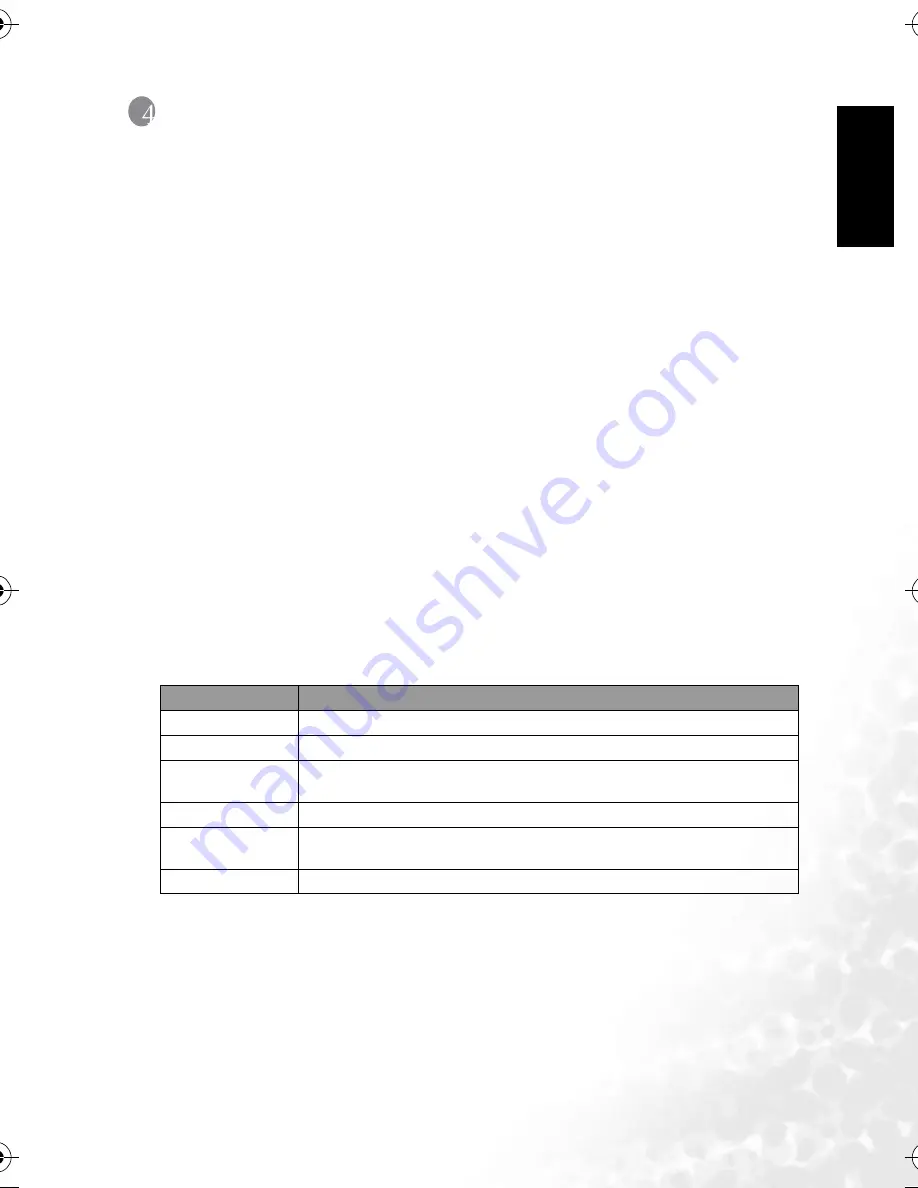
your system according to the table as shown below.

Ulead Photo 
Express

Ulead® Photo Express™ 5.0 SE is a complete photo project software 
for digital images. Acquire photos effortlessly from digital cameras 
or scanners. Edit and enhance images using easy-to-use editing tools 
and cool photographic filters and effects. Assemble creative photo 
projects and share results via e-mail and multiple print options.

Ulead Photo 
Explorer

Ulead® Photo Explorer™ 8.0 SE Basic provides an efficient way to 
transfer, browse, modify and distribute digital media. It is an all-in-
one tool for owners of digital cameras, webcams, DV camcorders, 
scanners, or for anyone who strives to effectively handle digital 
media.

System Requirements (Windows)

CPU

Pentium III 600 MHz processor or higher

Operating System

Windows Me / 2000 / XP

RAM

32 MB
(64 MB RAM recommended)

Hard Disk Space

128 MB hard disk space

Required Devices

A CD-ROM drive
An available USB port

Display

Color Monitor (800 x 600, 24-bit or higher recommended)

DC_C630_UM.book  Page 17  Tuesday, February 14, 2006  10:01 AM

Содержание DC C530

Страница 1: ...Welcome DC C630 Digital Camera User s Manual ...

Страница 2: ... below 0 C or above 40 C Do not use or store your camera in the environments listed below Direct sunlight High and dusty places Next to an air conditioner electric heater or other heat sources In a closed car that is in direct sunlight Unstable locations If your camera becomes wet wipe it with a dry cloth as soon as possible Salt or seawater may cause severe camera damage Do not use solvents such ...

Страница 3: ...4 3 2 LCD monitor information camera mode 5 3 3 Getting started 6 3 3 1 Turning the power on off 6 3 3 2 Choosing the screen language 6 3 3 3 Setting the date and time 6 3 3 4 Using the flash 7 3 3 5 Using the self timer 7 3 3 6 Using the zoom function 8 3 3 7 Burst 8 3 3 8 Auto exposure bracketing AEB 9 3 4 Menu options 9 3 4 1 Camera menu 9 3 4 2 Video mode 11 3 4 2 1 LCD monitor information vid...

Страница 4: ... 4 Playback menu 14 3 4 4 Set up mode 15 3 4 4 1 Set up menu 15 4 PC Dependent Features 17 4 1 Bundled software 17 4 2 Transferring files to your computer 17 4 2 1 Step 1 Connect the digital camera to your computer 18 4 2 2 Step 2 Download images or video clips 18 4 3 Print Mode 19 5 Troubleshooting 20 6 Specifications 22 7 Service Information 23 ...

Страница 5: ... or appear to be damaged contact your dealer Save the packaging in case you need to ship your camera for service 1 2 Camera components 1 2 1 Front view 1 User s Manual 2 Digital camera 3 USB cable 4 AA batteries 5 Hand strap 6 Software CD ROM 7 Pouch 8 AV cable 1 Shutter button 2 Built in flash 3 Power button 4 Mode dial 5 Self timer LED 6 Lens 7 Beeper 8 PC USB AV Out terminal 9 Microphone ...

Страница 6: ... Solid green The digital camera is powering on or is ready to capture images or record video clips Blinking red The camera flash is charging or the USB communication trans fer is in progress Self timer LED Blinking blue The self timer function is activated 1 W Thumbnail button Zoom out button 2 T Zoom in button 3 Strap eyelet 4 Rec play button 5 Menu button 6 Delete button 7 Arrow button Up Macro ...

Страница 7: ... the memory capacity by using an optional SD Secure Digital memory card to store more files 1 Always make sure the camera is turned off before inserting or removing a memory card 2 Insert an SD memory card in the correct orientation as shown in the illustration 3 Close the battery SD memory card cover To remove the SD memory card make sure the camera is turned off Press lightly on the edge of the ...

Страница 8: ...by letting most set tings automatically controlled by the camera 4 Video Select this mode to record video clips 5 Portrait Select this mode to make people stand out with the background out of focus even in a dark environment In this mode higher ISO value and lower image resolution are used 6 Landscape Select this mode to take photographs of distant scenery or landscapes 7 Shake Free Select this mo...

Страница 9: ...0 sec delay 10 2 sec delay 4 Focus indicator AUTO MACRO PF PAN FOCUS INFINITY 5 Focus area 6 Possible number of shots 7 Internal memory SD memory card indicator Status of the internal memory Status of the SD memory card 8 Remaining battery status Full battery power Medium battery power Low battery power No battery power 9 Image size 2816 x 2112 2272 x 1704 1600 x 1200 640 x 480 10 Image quality FI...

Страница 10: ...era 2 Under the Set up 1 menu use to select Language and press OK 3 Use or to select the language you want 4 Press the OK button to confirm 3 3 3 Setting the date and time Follow the steps below to set the date display style current date and time 1 Rotate the mode dial to mode and then press the button to turn on your camera 2 Under the Set up 1 menu use to select Date Time and press OK 3 If you w...

Страница 11: ...il the desired self timer mode appears on the LCD monitor 4 Compose your image and press the shutter button The self timer function is activated The image is then captured after the preset time To cancel the self timer at any time press the shutter or button switch the mode dial to another mode or press to disrupt the sequence If you wish to capture another image using the self timer repeat these ...

Страница 12: ...tivate the digital zoom To exit the zoom photography press the W button continuously The zoom indicator is shown at the lower left corner of the LCD monitor and is divided into two bars by a separator The green bar to the left of the separator shows the optical zoom status while the orange bar to the right shows the digital zoom sta tus The digital zoom function can be disabled by pressing and the...

Страница 13: ...automatically 3 4 Menu options 3 4 1 Camera menu This menu is for the basic settings to be used when capturing still images 1 Rotate the mode dial to A P or and then press the button to turn on your camera 2 Press and then use to select Mode 1 Mode 2 or Mode 3 In A Mode press to access menu directly 3 Press or to select the desired setting and then press the OK button 4 To exit from the menu press...

Страница 14: ...me possible even in dark locations but the more pixilated grainer the image will appear Auto 64 100 200 Mode 2 Item Functional Description Metering You can select the metering mode that sets which part of the subject to measure to determine the exposure Center weighted Spot Digital Zoom This option sets whether the digital zoom will be activated at the time of photogra phy On Off Quick View This o...

Страница 15: ...the shutter button 3 To stop recording press the shutter button again The zoom function of optical zoom 3X can be activated before you start to record video clips Pressing switches the LCD monitor display mode Saturation To capture an image your camera offers you three different degrees of color to match with your preference Your images will demonstrate different impression by selecting different ...

Страница 16: ...SD memory card indicator if present 3 Battery power indicator 4 Playback information 3 4 3 2 LCD monitor information video playback 1 Playback mode 2 Video mode 3 SD memory card indicator if present 4 Battery power indicator 5 Playback indicator 6 Playback information 3 4 3 3 Playback mode the basics 3 4 3 3 1 Viewing images You can display the still images you have just captured at a time 1 Press...

Страница 17: ...button 2 Adjust the zoom ratio by using the Zoom W T button To enlarge the selected image press the T button To return to the normal image press the W button The magnification factor is displayed on the LCD monitor 3 To view different portion of the images press the button to adjust the display area The magnification factors can be adjusted smoothly from 1x to 8x 4x for a 0 3M image 3 4 3 3 3 Thum...

Страница 18: ...lips are displayed from the first frame image and not played back To stop the slide show press the OK button You can adjust the slide show display interval within the range of 3 SEC 5 SEC 10 SEC 3 4 3 3 5 Resizing an image You can change the image size of a captured image to one of the following sizes 2272 x 1704 pixels 1600 x 1200 pixels and 640 x 480 pixels 1 Select an image in the playback mode...

Страница 19: ...ations Refer to 3 4 3 3 4 Slide show display on page 14 for further details 3 SEC 5 SEC 10 SEC Protect This option sets the data to read only to prevent images from being erased by mistake DPOF This option allows you to select the desired pictures to be printed and set the number of prints and date displayed in DPOF format You can print images easily just by inserting the memory card to a DPOF com...

Страница 20: ...PRINT Video Out This option sets the video output system of the video equipment that you are going to connect to the camera PAL NTSC LCD Bright ness This option sets the brightness of the LCD monitor The adjustment range is from 5 to 5 Auto Shut Down If no operation is performed for a specific period of time the power to the camera is auto matically turned off This feature is useful to reduce batt...

Страница 21: ...ware for digital images Acquire photos effortlessly from digital cameras or scanners Edit and enhance images using easy to use editing tools and cool photographic filters and effects Assemble creative photo projects and share results via e mail and multiple print options Ulead Photo Explorer Ulead Photo Explorer 8 0 SE Basic provides an efficient way to transfer browse modify and distribute digita...

Страница 22: ...to your computer it is considered to be a disk drive just like a floppy disk or CD You can download transfer images by copying them from the Removable Disk to your computer hard drive Windows Open the Removable Disk and double click on the DCIM folder to open it to find more folders Your images are inside these folder s Select the desired still images or video clips and then choose Copy from the E...

Страница 23: ...cify which images you want to print and how many copies of each should be printed To connect the camera to the printer 1 Rotate the mode dial to and then press the button to turn on your camera 2 Press to select the Set up 2 menu and then use to select USB Mode 3 Use or to select PRINT and then press the OK button 4 Connect your camera and the printer via a supplied USB cable The screen turns off ...

Страница 24: ...h was used con tinuously over a long period of time The flash does not fire The flash does not recharge The camera flash is turned off Set the flash to Auto Flash The light source is sufficient The flash is not available in some modes Even though the flash fired the image is dark The distance to the subject is greater than the flash s effective range Get closer to the subject and shoot The image i...

Страница 25: ...ormat the memory card before the initial use or before using with another camera Colors of the images taken are not shown properly White Balance was not set properly when these images were taken Select a suitable White Balance set ting before taking each picture After connecting the camera to a com puter an error mes sage Device not ready or Camera not ready appears The computer runs on Windows 98...

Страница 26: ...ard Zoom Optical 3X Digital 4X Lens F no Wide 3 2 Tele 5 3 Focal length 5 4mm 16 2mm equivalent to 35mm camera 32 96 mm Focus range Normal 50 cm infinity Wide 6 cm infinity LCD monitor 2 4 inch TFT LCD Self timer 10 sec delay 2 sec delay 10 2 sec delay Exposure compensation 2 0EV 2 0EV in 0 3EV increments White balance Auto Daylight Cloudy Tungsten Fluorescent ISO Auto 64 100 200 Interface USB 1 1...

Страница 27: ...ical Support If you have any problem or question regarding the camera you can visit the following web site for further assistance http support BenQ com For free driver updates product information and news releases visit the following web site http www BenQ com ...

Страница 28: ...English Service Information 24 Memo ...

Отзывы: