background image

BenQ DC 4500  User’s Manual

51

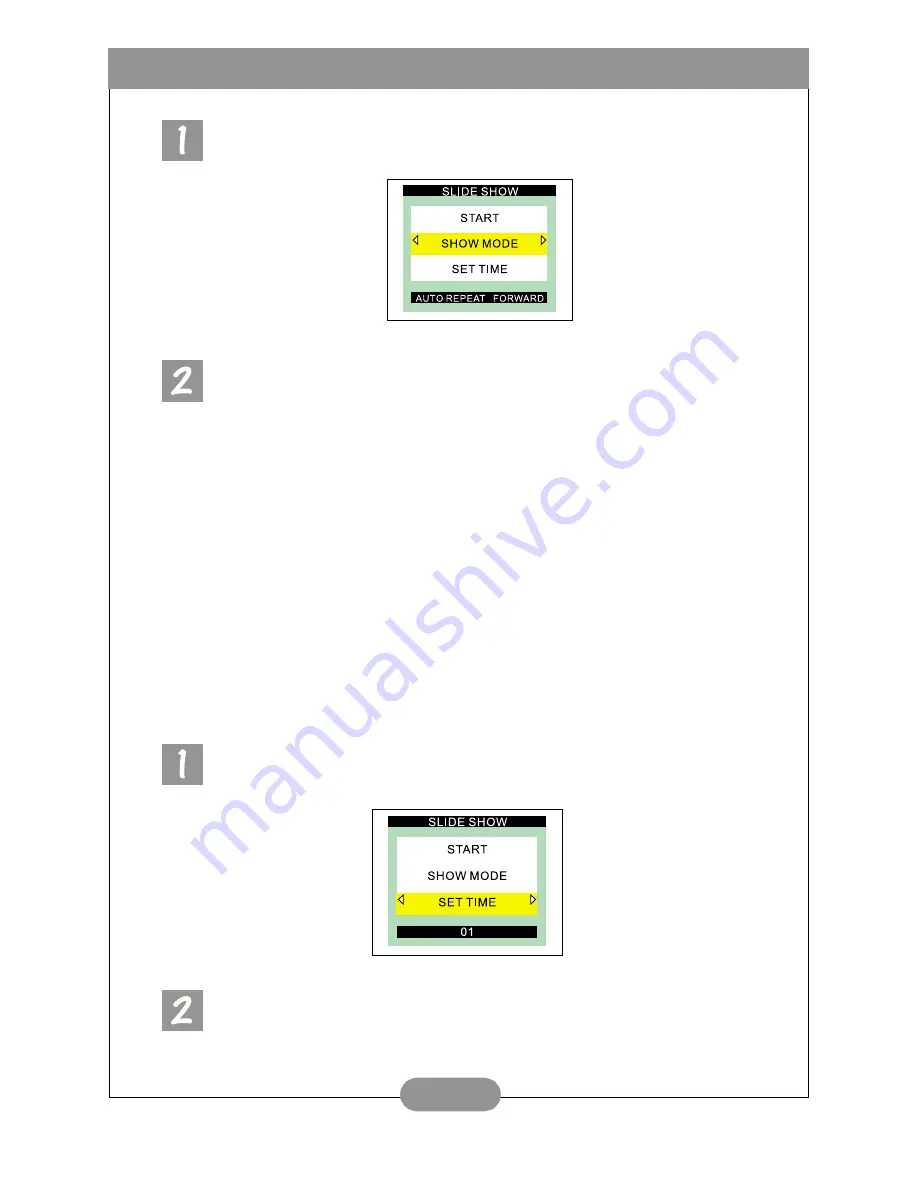
Enter the slide show setting frame and highlight the “SHOW MODE” item. 

Press the right or left key of the navigation button to select slide show mode. 

AUTO REPEAT FORWARD: 

The camera slide shows the photos (videos) forward and repeats automatically.

AUTO REPEAT BACKWARD: 

The camera slide shows the photos (videos) backward and repeats 

automatically.

ONE TIME FORWARD: 

The camera slide shows the photos (videos) forward for one time.

ONE TIME BACKWARD: 

The camera slide shows the photos (videos) backward for one time.

III. To set the interval time of slide show mode:

Enter the slide show setting frame and highlight the “SET TIME” item. 

Press the right or left key of the navigation button to set the desired interval time of 
slide show mode. The interval time setting range is from 1 to 25 seconds.

Содержание 4500

Страница 1: ...Digital Camera 4500 User s Manual ...

Страница 2: ...ty 45 85 Do not use or store your camera in environments listed below Direct sunlight High humidity and dusty places Next to the air conditioner electric heater or the other heat sources In a closed car that is directly under the sun Avoid shaky places If your camera becomes wet wipe it with dry cloth as soon as possible Salt of seawater may cause severe camera damage Do not use organic solvents s...

Страница 3: ... 3 1 2 Taking Photos 8 3 1 2 1 To take photos using the viewfinder 8 3 1 2 2 To take photos using the LCD monitor 9 3 1 3 Hot Keys for taking photos 11 3 1 3 1 Hot key for selecting flash mode 11 3 1 3 2 Hot key for zooming in or out on the object 11 3 1 3 3 Hot key for setting the macro mode 12 13 3 1 3 4 Hot key for setting the self timer mode 13 3 1 3 5 Hot key for changing to playback mode 13 ...

Страница 4: ...ord Menu of Burst Mode 30 3 2 3 1 Adjusting image resolution RESOLUTION 30 3 2 3 2 Setting white balance AWB 31 3 2 3 3 Setting date imprinting modes DATE 31 3 2 3 4 Setting monochrome modes MONOCHROME 31 3 2 3 5 Setting metering modes METERING 32 3 2 3 6 Setting ISO value ISO 32 3 2 3 7 Setting Digital Zoom function DIGITAL ZOOM 33 3 2 3 8 Setting exposure compensation value EV 33 3 2 4 The Setup...

Страница 5: ... 3 5 5 4 Viewing images videos in thumbnail mode THUMBNAIL 49 3 5 5 5 Viewing images videos in slide show mode Slide Show 50 3 5 5 6 Setting Digital Print Order Format DPOF for Print Out Setting 52 3 5 6 The Setup Menu of Playback Mode 53 4 PC dependent features 54 4 1 Preparations 54 4 1 1 Installing digital camera software 54 4 1 2 The Software of this Installation CD 55 4 1 3 DC 4500 Driver ins...

Страница 6: ...BenQ DC 4500 User s Manual IV Memo ...

Страница 7: ...ckage should include the following items 1 2 Parts of the DC 4500 and their names 1 2 1 Front View DC 4500 digital camera Battery charger TV cable USB cable 16MB Compact Flash memory card DC 4500 software CD ROM Hand Strap User s Manaul Strobe Lens Viewfinder Hand Stop Cover USB Video out ...

Страница 8: ...on Close up correction marks Viewfinder Inside viewfinder Strobe charging LED red Auto Focus LED green Viewfinder Menu Cancel button Strap Hitch Memory Card Slot Cover Zoom In Out button DC jack Slot Cover MEGA PIXELS 4 1 Switch Video Nightscene Burst Still Play AF Capture Button Power Button Status Display BATT Battery compartment cover Tripod set ...

Страница 9: ... Display Night Scene Mode Still Mode Burst Mode Video Mode Playback Mode Macro Function Auto exposure Lock Battery Status Flash Status Self timer Function Remaining number of photos you can take It depends on the image resolution compression and image background ...

Страница 10: ...tteries Press the battery cover and then slide the cover in the direction shown Open the cover in the direction shown Place NiMH batteries in the battery compartment until it is totally inserted Close battery compartment cover and slide the cover in the direction shown You will hear a click sound when the cover is firmly closed B AT T ...

Страница 11: ...inish it s accessing then turn off automatically 3 During the camera operation if you open the CF card cover when CF card is not accessing data the camera will buzz and then turn off automatically Press down the memory card slot cover open lever and then open the cover in the direction shown Insert the memory card in the direction shown Fully insert the memory card in the memory card slot until it...

Страница 12: ...ve to press the Power button The camera beeps once and the status of camera will appear on the status display You will see the LCD monitor show a frame of BenQ logo Also the LCD monitor will be activated Then this camera is ready to work Note If the camera is turned on in camera mode the zoom lens will be activated at the same time MEGA PIXELS 4 1 A Press the Power button The status of camera will...

Страница 13: ...rts auto shut down function If the DC 4500 doesn t receive any operation from the user for 3 minutes it will enter auto shut down mode and automatically shut down instantly To wake up the DC 4500 from auto shut down mode you have to press the power button to turn on the power again To turn off the power you have to press the power button again After pressing the power button the camera beep twice ...

Страница 14: ...sing To activate the still mode When the still Mode is activated the LCD screen will show icons as follow 3 1 2 Taking Photos Make sure the mode selection dial has been turned to the position 3 1 2 1 To take photos using the viewfinder Point the camera to the object and make the object appear on the center of the viewfinder Adjust the switch to still mode on the top of the camera Then the still mo...

Страница 15: ...es The AF indicator on the viewfinder is off and the AF mark on the LCD monitor is white 2 When auto focus operates The AF indicator on the viewfinder blinks and the AF mark on the LCD monitor is white 3 After auto focus finishes The camera beeps once and AF indicator on the viewfinder becomes steady green and the AF mark on the LCD monitor turns green 4 When auto focus fails The AF indicator on t...

Страница 16: ...y card The remaining number of images you can take will appear on the LCD screen Note If the subject moves when auto focus operates or the brightness and complexity of the scene you take is not enough the auto focus function will fail 0001 The remaining number of images you can take will appear on the LCD screen Choose a subject and press the capture button half way for auto focus function then pr...

Страница 17: ...bject electronically before the photo is taken This function works when you take photos with the LCD screen and you can simply zoom in or zoom out object by pressing the hot key To zoom in or zoom out Press the right key of the navigation button on the rear part of the camera Press it several times and different flash modes will scroll continuously on the LCD screen Automatic flash mode The camera...

Страница 18: ...u can set the macro mode on or off by simply pressing the hot key To set the macro mode To set the macro mode on Press the down key of the navigation button and you will see the normal mode icon on the LCD monitor become the macro mode icon To set the macro mode off Press the down key of the navigation button again and you will see the macro mode icon on the LCD monitor return to the normal mode i...

Страница 19: ... return to the still mode icon 3 1 3 5 Hot key for changing to playback mode This hot key allows you to change from any record mode to playback mode With this function you can switch to playback mode whenever you want to view the results of the photos you take or the videos you shoot Howevevr if you want to return to the original mode simply press the Cancel button To change to playback mode Press...

Страница 20: ... the icons on the LCD monitor will disappear except the battery icon II To set the LCD monitor display mode off When the LCD monitor icon display mode is set to off press the Disp OK button again and the LCD monotor display mode will be set to off The LCD monitor will become blank and enter suspend mode III To set the LCD monitor icon display mode on When the LCD monitor display mode is set to off...

Страница 21: ... Record menu to Setup menu by pressing the right key of the navigation button Press this button to enter the setting menu Record Menu Record function Items You can press the navigation button to choose desired record function items up and down to switch items right and left to change settings Page Number This shows the current page number of the record menu Record Menu Icon Press the right key of ...

Страница 22: ...ting white balance 4 Imprinting date 5 Setting monochrome modes 6 Setting metering modes 7 Setting AE Lock Automatic Exposure Lock function 8 Setting ISO value 9 Setting digital zoom 10 Setting EV exposure compensation value Press Menu button to enter the record menu and press the navigation button to change different setting functions in turns The menu frame appears on the center of the LCD scree...

Страница 23: ... 2136 resolution Image with 2848 x 2136 resolution 2272 x 1704 resolution Image with 2272 x 1704 resolution 1600 x 1200 resolution Image with 1600 x 1200 resolution 1024 x 768 resolution Image with 1024 x 768 resolution 640 x 480 resolution Image with 640 x 480 resolution 3 1 5 3 Setting white balance AWB Under different environments you can adjust white balance mode to get the best color registra...

Страница 24: ...gsten bulb light Fluorescent light Select this mode if you are taking pictures under fluorescent light Manual Adjust You can adjust the white balance mode manually 3 1 5 4 Setting date imprinting modes DATE To add date imprinting function on the photos you take To set date imprinting function Enter the date imprinting function sub menu Select a date imprint mode Date Imprint Off Mode NONE The date...

Страница 25: ... Color Mode OFF The LCD color will remain colorful Default Sepia Mode The LCD color will become sepia Black and White Mode The LCD color will become black and white 3 1 5 6 Setting metering modes METERING This main item allows you to adjust metering modes The metering system in digital camera is the system which measures the amount of light in the current frame and calculates the best fit exposure...

Страница 26: ...e exposure of the entire frame but gives extra weight to the center 3 1 5 7 Setting AE Lock function AE LOCK This main item allows you to set AE Lock Automatic Exposure Lock function By setting the Automatic Exposure Lock function you are able to lock the cameras calculated exposure settings including aperture and shutter speed over a series of images This fuction is very important for producing p...

Страница 27: ... screen To set sensitivity ISO value Enter the ISO sub menu Select a ISO value Auto adjust AUTO The camera will automatically adjust the ISO value according to the relative light source and environment ISO 100 100 Setting the ISO value to 100 ISO 200 200 Setting the ISO value to 200 ISO 400 400 Setting the ISO value to 400 3 1 5 9 Setting Digital Zoom function DIGITAL ZOOM DC 4500 provides 3x Digi...

Страница 28: ...lso supports promp effect function Higher exposure value will make the captured image brighter while lower exposure value makes it look darker You can use the navigation button to set exposure value when the LCD screen is turned on The exposure value is between 2 0 and 2 0 To set exposure value Enter the EV sub menu Press the left arrow on the navigation button to decrease exposure value or the ri...

Страница 29: ...ring the setup menu you can press the navigation button to change different setup functions in turns The setup menu frame appears on the center of the LCD screen and the items are shown as follows 3 1 6 1 Setting beep sound BEEP You can set the power on beep sound on or off To set beep sound Enter the beep sub menu Choose to set the power on beep sound on or off ON Setting the power on beep sound ...

Страница 30: ...f When the power save mode is on you can setup the time for DC 4500 to enter the suspend mode For example if you set the time to 3 minutes the DC 4500 will automatically enter the suspend mode if you do not use it for 3 minutes Press any button will wake the camera up from suspend mode You are allowed to set the time between 1 10 minutes To set power save mode Enter the power save sub menu Choose ...

Страница 31: ...e LCD bright sub menu Choose to set the LCD brightness NORMAL Setting the LCD brightness to a normal value BRIGHT Setting the LCD monitor brighter than normal 3 1 6 6 Selecting TV format TV FORMAT This item allows you to set the TV video output type to NTSC or PAL To select TV format Enter the TV format sub menu Choose to set the TV format NTSC Setting the TV video output type to NTSC PAL Setting ...

Страница 32: ...nd press Disp OK button then the card will be formatted On the contrary if you don t want to format the CF card choose CANCEL and press Disp OK button then the card will not be formatted Press the Menu Cancel button to return to main menu 3 1 6 8 Reloading the default setting value DEFAULT SETTING This function allows you to reload the default setting value After entering the default setting sub m...

Страница 33: ...on t want to reload the default setting value choose CANCEL and press Disp OK button then the default setting value will not be reloaded Press the Menu Cancel button to return to main menu 3 1 6 9 Software Version VERSION This function shows the software version of the camera operating system To read the software version Enter the version sub menu The LCD screen will prompt the software version of...

Страница 34: ...make adjustments on various photo taking and image saving settings This setting menu contains two main parts Record Menu and Setup Menu To enter the setting menu press the Menu button and you can switch the LCD screen frame from shutter menu to the main setting menu of the burst mode Adjust the switch to burst mode on the top of the camera Then the burst mode will be activated When burst mode is a...

Страница 35: ... items up and down to switch items right and left to change settings Page Number This shows the current page number of the record menu Record Menu Icon Press the right key of the navigation button to switch the menu frame from record menu to setup menu Setup Menu Setup function Items You can press the navigation button to choose desired setup function items up and down to switch items right and le...

Страница 36: ...lution 2 Setting white balance 3 Imprinting date 4 Setting monochrome modes 5 Setting metering modes 6 Setting ISO value 7 Setting digital zoom 8 Setting EV exposure compensation value Press Menu button to enter the record menu and press the navigation button to change different setting functions in turns The menu frame appears on the center of the LCD screen and the items are shown as follows 3 2...

Страница 37: ...de Please refer to 3 1 5 3 Setting white balance AWB on page 17 3 2 3 3 Setting date imprinting modes DATE To add date imprinting function on the photos you take To set date imprinting function Enter the date imprinting function sub menu Select a date imprint mode Please refer to 3 1 5 4 Setting date imprinting modes DATE on page 18 3 2 3 4 Setting monochrome modes MONOCHROME Monochrome mode suppo...

Страница 38: ...e button To set metering modes Enter the metering sub menu Select a metering mode Please refer to 3 1 5 6 Setting metering modes METERING on page 19 3 2 3 6 Setting ISO value ISO In a digital camera the sensitivity depends on the sensor CCD CMOS device With BenQ DC 4500 you can select the ISO sensitivity as you want This ability to quickly switch sensitivity is very convenient for you to take pict...

Страница 39: ...m function DIGITAL ZOOM on page 21 3 2 3 8 Setting exposure compensation value EV This main item allows you to adjust exposure value and it also supports promp effect function Higher exposure value will make the captured image brighter while lower exposure value makes it look darker You can use the navigation button to set exposure value when the LCD screen is turned on The exposure value is betwe...

Страница 40: ...7 Formatting CF card 8 Reloading the default setting value 9 Software version Press Menu button and then press the right key of the navigation button to switch the menu frame from record menu to setup menu After entering the setup menu you can press the navigation button to change different setup functions in turns The setup menu frame appears on the center of the LCD screen and the items are just...

Страница 41: ...hat the focus range of this mode is 4 5m To activate the night scene mode When the night scene Mode is activated the LCD screen will show icons as follow 3 3 2 The Night Scene Mode Setting Menu on LCD screen When in night scene mode the DC 4500 provides a setting menu that allows you to make adjustments on various photo taking and image saving settings This setting menu contains two main parts Rec...

Страница 42: ... items up and down to switch items right and left to change settings Page Number This shows the current page number of the record menu Record Menu Icon Press the right key of the navigation button to switch the menu frame from record menu to setup menu Setup Menu Setup function Items You can press the navigation button to choose desired setup function items up and down to switch items right and le...

Страница 43: ... exposure compensation value Press Menu button to enter the record menu and press the navigation button to change different setting functions in turns The menu frame appears on the center of the LCD screen and the items are just the same as those items in still mode Please refer to section 3 1 3 The Record Menu of Still Mode 3 3 4 The Setup Menu of Night Scene Mode There are 9 different setting fu...

Страница 44: ...on the center of the viewfinder or the LCD screen Then press the capture button and the camera will beep once and start to shoot videos The recording time will keep running and be displayed on the LCD screen while the video is being shot The recording time will stop running when you stop shooting videos To stop your video shooting press the capture button again Adjust the switch to video mode on t...

Страница 45: ... next video When the playback mode is activated you can select the videos by pressing the right or left key of the navigation button on the rear panel the last video taken in the memory card will first appear on the LCD screen Select the video which you want to see then press Disp OK button to play it While playing the video the recording time will be displayed on the LCD screen To stop playing yo...

Страница 46: ...ecord menu to Setup menu by pressing the right key of the navigation button Press this button to enter the setting menu Record Menu Record function Items You can press the navigation button to choose desired record function items up and down to switch items right and left to change settings Page Number This shows the current page number of the record menu Record Menu Icon Press the right key of th...

Страница 47: ...ing functions in the record menu of the video mode 1 Setting white balance 2 Setting monochrome modes 3 Setting metering modes 4 Setting EV exposure compensation value Press Menu button to enter the record menu and press the navigation button to change different setting functions in turns The menu frame appears on the center of the LCD screen and the items are shown as follows 3 4 5 1 Setting whit...

Страница 48: ...ly Please refer to 3 1 5 5 Setting monochrome modes MONOCHROME on page 19 3 4 5 3 Setting metering modes METERING This main item allows you to adjust metering modes The metering system in digital camera is the system which measures the amount of light in the current frame and calculates the best fit exposure All you have to do is select the metering mode point the camera and press the capture butt...

Страница 49: ...ar on the LCD screen instantly 3 4 6 The Setup Menu of Video Mode There are also 9 different setting functions in the setup menu of the video mode 1 Setting beep sound 2 Setting date and time 3 Selecting OSD language system 4 Setting power save mode 5 Setting LCD brightness 6 Selecting TV format 7 Formatting CF card 8 Reloading the default setting value 9 Software version Press Menu button and the...

Страница 50: ...To activate the playback mode Basic Operation You can press the left key on the navigation button to go to the previous image video or the right key to go to the next image video 3 5 2 Viewing Photos or Images on the LCD screen When you are viewing photos or images you took the LCD screen will show icons as follow Turn the mode switch dial to The last picture taken in the memory card will appear o...

Страница 51: ... playing your videos press the Menu Cancel button 3 5 4 The Playback Mode Setting Menu on LCD screen When in playback mode the DC 4500 provides a setting menu that allows you to make adjustments on various image video viewing and saving settings You can view these pictures and videos on the LCD screen and delete protect one or all of them if necessary This setting menu contains two main parts Play...

Страница 52: ...n item press the Right and Left key of the navigation button to select an item Play Menu Play function Items You can press the navigation button to choose desired play function items up and down to switch items right and left to change settings Page Number This shows the current page number of the play menu Play Menu Icon Press the right key of the navigation button to switch the menu frame from p...

Страница 53: ...the LCD screen will prompt a message to ask if you are sure to delete the image or video Choose OK and press Disp OK button then the image or video will be deleted On the contrary if you don t want to delete the image or video choose CANCEL and press Disp OK button then the image or video will not be deleted To delete image or video one at a time Enter the delete one sub menu Press the right key o...

Страница 54: ...f you don t want to delete all the images or videos choose CANCEL and press Disp OK button then all the images or videos in the memory card will not be deleted 3 5 5 3 Locking and unlocking images videos You can lock images or videos to prevent being erased accidentally To set the lock mode to lock images videos Enter the image lock sub menu After entering the image lock submenu press the right or...

Страница 55: ...ltiple images 3 5 5 4 Viewing images videos in thumbnail mode THUMBNAIL If the thumbnail mode is activated in playback mode the camera will show nine minimized photos a time in thumbnails You can review captured photos videos and set image video properties To view images and videos in thumbnails Enter the thumbnail sub menu Press the right key of the navigation button and the LCD screen will show ...

Страница 56: ...tivated in playback mode the camera will playback a slide show of the photos videos you captured In this mode you can review the photos videos and the slide showing speed depends on the file size of each photo videos Besides you can also set the interval time between slide showing each photo video as you like I To view images and videos in slide show Enter the slide show sub menu Press the right k...

Страница 57: ...ra slide shows the photos videos backward and repeats automatically ONE TIME FORWARD The camera slide shows the photos videos forward for one time ONE TIME BACKWARD The camera slide shows the photos videos backward for one time III To set the interval time of slide show mode Enter the slide show setting frame and highlight the SET TIME item Press the right or left key of the navigation button to s...

Страница 58: ... Then press the right key of the navigation button to enter the print out DPOF sub menu The LCD monotor will prompt a function box for you to select the print out settings of the images These choices of print out settings are illustrated as below RESET Reset DPOF settings Choose RESET item and press DISP OK button then you can reset your DPOF setting STD Standard Print Out Mode This STD numbers re...

Страница 59: ...mat 7 Formatting CF card 8 Reloading the default setting value 9 Software version Press Menu button and then press the right key of the navigation button to switch the menu frame from play menu to setup menu After entering the setup menu you can press the navigation button to change different setup functions in turns The setup menu frame appears on the center of the LCD screen and the items are ju...

Страница 60: ...ware before connecting digital still camera to your PC for smooth installation Normally a software installation menu appears automatically after this installation CD is inserted into your CD ROM drive Click on each item to start installing the software program of your choice You can choose Typical Installation for installing all the bundled software programs or you can also choose Custom Installat...

Страница 61: ...n the internet 4 PhotoPrinter Pro Arcsoft Photo Printer 2000 Pro this versatile printing utility lets you print out casually it can be several different images on a single sheet of paper It s as simple as opening your image selecting from an assortment of templates and clicking Print 5 Microsoft DirectX 8 1 Microsoft DirectX 8 1 an all in one and closs platform media tool 6 Acrobat reader Adobe Ac...

Страница 62: ...rage device found and then DC 4500 will be used as a new drive under operating system Press the Power button for 2 seconds to turn on the power of the camera Press the Power button for 2 seconds Open the USB cover in the direction shown After opening the USB cover you will see the USB port as the arrow shows Then connect one end of the USB cable to the USB port on your DC 4500 ...

Страница 63: ...puter and your computer will install DC 4500 to your system as a new drive automatically Double click the newly installed DC 4500 drive and you will see all the photos you captured which are stored in the memory card Then you can use the software which installed by the installation CD to edit or modify your photos ...

Страница 64: ...he package to connect the DC 4500 to the A V port of your TV After connecting to TV all the frames and message appear on LCD screen will be displayed on your TV screen Press the Power button for 2 seconds to turn on the power of the camera Press the Power button for 2 seconds Open the Video out cover in the direction shown After opening the Video out cover you will see the video output port as the...

Страница 65: ...rated Then connect the other two ends of the TV cable to the Audio input port and Video input port of your TV Please note that the yellow header is for Video port and the white header is for Audio port After the connection to your TV you will see the LCD monitor function on your TV screen ...

Страница 66: ...power outlet and you will see the Charge indicator on the charger turn from green to red When the Charge indicator turns to red it means the charger is charging the NiMH battery Note You can also use an AC power adapter to supply electric power to your DC 4500 Please contact your local dealer to buy an AC power adapter for your DC 4500 The specification of the suitable power adapter is 3 3V 2 5A o...

Страница 67: ...the driver has been installed if your operating system is Win 98 4 In Windows 2000 when I unplug the DC 4500 from my computer while the USB mass storage is active the computer freezes You should double click the USB mass storage icon on Windows 2000 system tray to move DC 4500 from the computer OS first then unplug the DC 4500 5 The photos I captured have strange flare on them Usually this is caus...

Страница 68: ... environment of your system to the following addresses USA support sc BenQ com Europe service BenQ eu com Taiwan service tw BenQ com China service_china BenQ com Asia and other countries support BenQ com For free driver program updates product information and news release please visit the fol lowing web address http www BenQ com tw global For questions about the bundled application please consult ...

Отзывы: