background image

11


126305 Rev B 05/22/15


Programming 

(continued...)


Setting choices are:


Option 1 = EPP (not used).


Option 2 = 5x8. Used when utilizing alpha numeric characters 
for credit / fleet operations.


Option 3 = 4x4. (not used).


NOTE:    If  the  keypad  is  programmed  wrong  then  it  may 


not  recognize  the  numeric  buttons  while  being 


pressed.


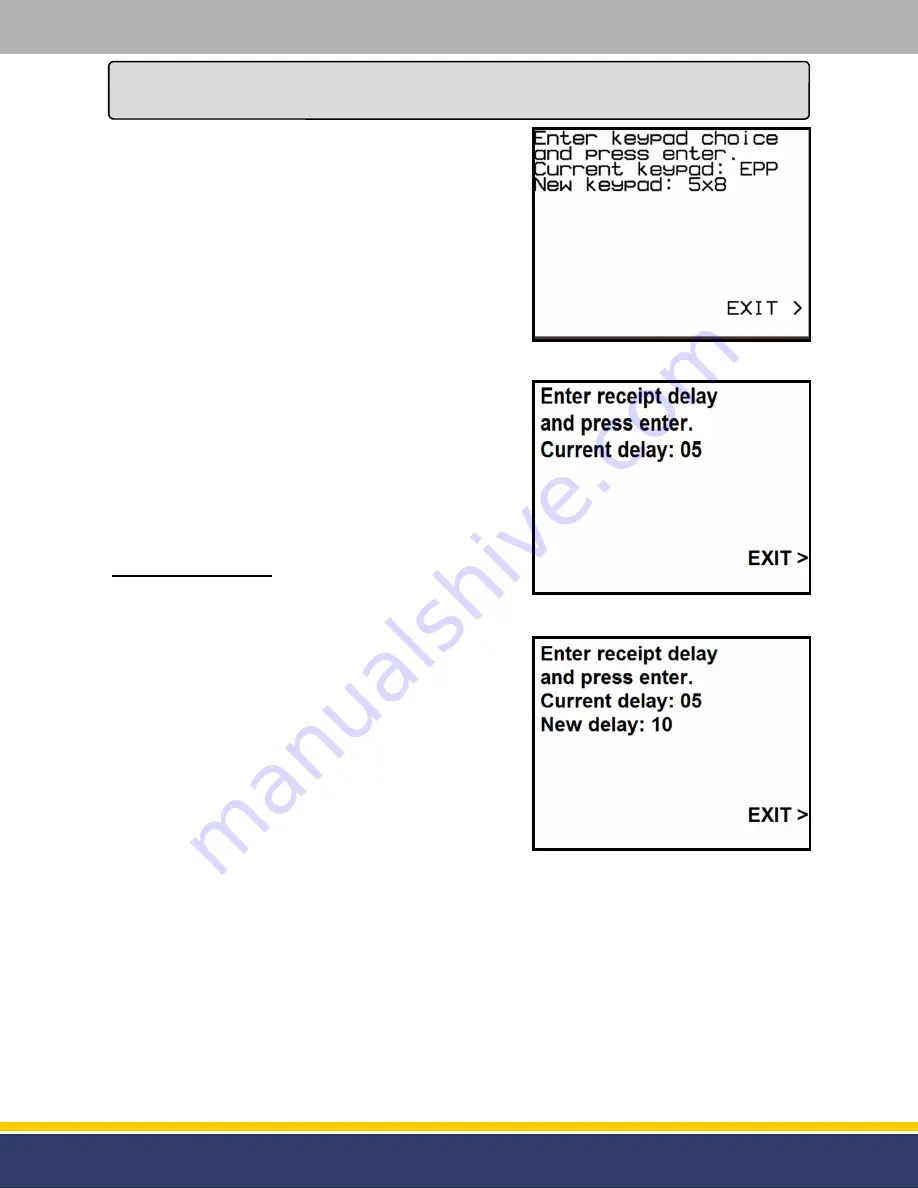
To change programming, once in  Manager’s Mode, press the 
top  left  Soft  Key  until  the  displays  shows  “Manager’s  Mode 
13”.    Then  press  the  key  below  the  top  left  key  until  “5x8”  is 
displayed  (see  figure  3.10).    Then  press  the  top  left  key  to 
save the change.


If  programming  is  complete  press  the  right  Soft  Key  next  to 
“EXIT”  on  the  display  again  and  the  module  will  return  to 
normal operation.


Manager’s Mode 14:


As the POS sends data to the module for the receipts the data 
is  broken  up  in  small  “increments”.    At  times  this  can  cause 
the printer to have slight pauses while printing the receipts.  If 
a location is extremely busy then these pauses could be long 
enough for a customer to  believe that the receipt  is complete 
and they will begin to remove the paper from the printer chute 
before it is complete.  


To prevent this from happening Mode 14  is used to  send  the 
receipt data to the printer in a single burst of data.  The result 
will  be  a  single,  continual  motion  where  the  paper  will  be 
dispensed  at  one  time.    Essentially,  the  module  will  hold  the 
receipt  data  until  all  data  has  been  sent  before  sending  it  to 
the printer.


Once the module is in Manager’s Mode press the numeric [1] 
and [4] keys and then press the function [Enter] key.


Once the function [Enter] key  is pressed  the display  will show the current setting for the  receipt delay 
(see figure 3.11).


To change the setting press the numeric keys to enter the desired time for the delay.  99 seconds is the 
maximum  amount  of  time  allowed.    Once  the  key  is  pressed  then  the  display  will  show  what  the  new 
value will be set for (see figure 3.12).  Press the [Enter] key to save the new value.


If programming is complete press the right Soft Key next to “EXIT” on the display again and the module 
will return to normal operation.


Figure 3.11 

-

 Manager’s Mode 14


Figure 3.12 

-

 New Receipt Delay


Figure 3.10 

-

 New Keypad Selection


Содержание Site Master SP

Страница 1: ...49456 USA 800 235 7618 Outside USA 231 798 1310 sales bennettpump com www bennettpump com READ THIS BOOK This book has important information for safe installation and operation of this equipment Read...

Страница 2: ...ttery 18 Diagnostics 18 Manager s Mode 02 Real Time Clock 18 Manager s Mode 03 Audit Trail Report 19 Manager s Mode 04 Card Reader Diagnostics 21 Manager s Mode 05 Printer Diagnostics 22 Manager s Mod...

Страница 3: ...ore working on the equipment WARNING To prevent electric shock keep the electrical parts of the terminal dry WARNING You must have training in the installation service or maintenance of this equipment...

Страница 4: ...ease Pay Inside message NOTE Please Pay Inside will be displayed only if the module and or POS Point of Sale has not been configured or installed at this time see figure 1 2 The message will return if...

Страница 5: ...he 12vdc voltage source Card Reader Display Backlight Receipt Printer Data The following components use the 24vdc voltage source Receipt Printer Power Display Connector Descriptions All peripherals ar...

Страница 6: ...itting with conductor seals Field connections are done in the Upper Electrical Enclosure Wire must extend 60 inches above base of the unit to make Electrical Connections All conductors are to be stran...

Страница 7: ...7 126305 Rev B 05 22 15 Installation continued FIGURE 2 3 Field Wiring Diagram Power FIGURE 2 4 Field Wiring Diagram Communication...

Страница 8: ...The module has a Manager s Mode used to access programming and diagnostics The following instructions explain how to gain access to the Manager s Mode and how to configure it for operation Using the K...

Страница 9: ...ode press the numeric 1 key and press the function Enter key The function Enter key will be used to enter each mode for programming or diagnostics Once the function Enter key is pressed the display wi...

Страница 10: ...a number larger than the current count number To shorten the receipt enter a number that is lower than the current number As the new count is entered the display will show the new value see figure 3...

Страница 11: ...believe that the receipt is complete and they will begin to remove the paper from the printer chute before it is complete To prevent this from happening Mode 14 is used to send the receipt data to the...

Страница 12: ...d 3 18 If programming is complete press the right Soft Key next to EXIT on the display again and the module will return to nor mal operation Manager s Mode 99 There are thirty six different logos that...

Страница 13: ...s Mode 99 If programming is complete press the right Soft Key next to EXIT on the display again and the module will return to normal operation 00 No Logo 01 76 Logo 02 Air Products Logo 03 Arco Logo 0...

Страница 14: ...gramming Header For Bennett use only J4 Audio Transducer Used to connect the speaker that is used to beep and prompt the user to respond to the module NOTE The 12v on Pins 1 and 2 is the same 12v that...

Страница 15: ...he CPU Board using the 12v supplied on Pins 1 and 2 of J5 J8 COM 1 Receipt Printer This is dedicated to RS 232 used to interface the receipt printer J9 COM 2 Auxiliary Connector Natural Gas Com Hub Bo...

Страница 16: ...v on Pins 1 and 2 is the same 24v from Pins 3 and 4 of J5 NOTE The same 12v on Pin 3 is the same 12v from Pins 1 and 2 of J5 NOTE The 5v is regulated on the CPU Board using the 12v supplied on Pins 1...

Страница 17: ...inks at the rate of 1x per second when in normal run mode D7 Red RS 485 RXD D8 Green RS 485 TXD D11 Red COM 1 Magnetic Card Reader TXD D13 Green COM 1 Magnetic Card Reader RXD D15 Red COM 3 Printer TX...

Страница 18: ...nostics There are ten diagnostic modes available with the module These modes are used to help troubleshoot the software keypad printer card reader or encryption Here is a list of diagnostic modes Mode...

Страница 19: ...rint the date and time that each event happens These reports will tell when each of the Audit Events have taken place Once the module is in Manager s Mode press the numeric 3 key and press the functio...

Страница 20: ...port only reflects the last 25 times that the software reset Notice that the event column left side of report reflects only the software starts event Figure 4 7 is an example of the Clock Change Repor...

Страница 21: ...s Mode 04 After the module detects the card reader insert a card to verify that it is working properly When the card is slid into the reader make sure that it has been inserted completely At this poi...

Страница 22: ...he keys on the module only This mode does not test any other keys on the terminal After entering into Manager s Mode press the numeric 6 key and press the function Enter key After pressing the functio...

Страница 23: ...o exit Manager s Mode 08 If programming is complete press the right Soft Key next to EXIT on the display again and the module will return to normal operation Manager s Mode 09 This mode is used to res...

Страница 24: ...umber of messages started Every time a character causes the start of a new message the FE Counter is incremented see figure 4 18 Valid shows the total number of valid messages received and validated s...

Страница 25: ...25 126305 Rev B 05 22 15 Parts FIGURE 5 1 5x8 Credit Parts Breakdown 1 2 3 4 6 8 9 10 7 14 11 13 5 12 15 16 17...

Страница 26: ...rcuit Board Assembly Side Soft Key 2 6 117416 Bracket Lens Display 1 7 117417 Display Board 1 8 117410 Bracket Display 1 9 117432 Color APM CPU Board 1 10 113558 5x8 Pin Pad Gasket 1 11 113559 5x8 Pin...

Страница 27: ...nesses 2 3 4 5 5 1 Item 2 Card Reader Item 4b Printer Power Adaptor Item 5 Soft Key Item 1 Comm Power Item 3 Printer Comm Item 4a Printer Power Harness Item 6 Display Cable 6 Item 7 Alpha Numeric and...

Страница 28: ...3 113533 Printer Data Cable comes with Printer Kit 1 4a 115407 Printer Power Harness comes with Printer Kit 1 4b 114586 Printer Power Adaptor 1 5 118553 Soft Key Harness 2 6 117827 Display Cable FCC...

Страница 29: ...p Company The above warranties shall not exist if the original identification marks have been removed or altered 2 Bennett makes no warranty with respect to the Bennett equipment or Bennett s performa...

Страница 30: ...30 126305 Rev B 05 22 15 Bennett 1218 E Pontaluna Road Spring Lake MI 49456 USA 800 235 7618 Outside USA 231 798 1310 sales bennettpump com www bennettpump com...

Отзывы: