


3/2/2007
9:08 AM
Oceanis 321
Rev. 00
92
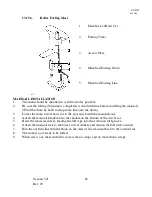
13.15.3.
Tuning
To achieve the best performance from your boat the mast and rigging needs to be tuned correctly,
the initial tuning of your boat should be completed by your Beneteau Dealer. The tuning of your
Beneteau takes a little bit of time and care, but if the mast is correctly setup initially it will require
very little adjustment in the future. (some stretch will occur with new wire and the rig may need
adjustment to compensate for this initial stretch).
1. Keep all turnbuckle threads clean and free of grit. Always apply copper paste or never seize to
the turnbuckle threads before screwing on the turnbuckle bodies.
2. Attach the V2/D3's and D2's to the lower spreader tip turnbuckles.
3. Set the V2/D3's to the length specified in the rigging specs on page 57.
4. Leave the D2's slack.
5. Step the mast and attach the genoa furler first. The headstay is a fixed length, this sets up the
mast rake automatically.
6. Attach and finger tighten the V1's and backstays, attach the fore and aft D1's leaving these
turnbuckles loose.
7. Center the mast in the boat by tightening the V1's alternately until the masthead is centered
athwart ships. (Attach a tape measure to the main halyard and measure to opposite points on
the toerail to check the position)
8. Commence tightening the V1's with equal turns on each side until they become tight. (Be sure
the D2's do not come under any tension during this process.)
9. When the V1's are tight start tensioning the aft D1's equally keeping the mast in column until
they are tight. (Looking up the aft side of the mast, the mainsail track should be straight up
and down. Equalize the tension on the D1's to keep the track straight)
10. Tension the forward D1's equally, again check the mast to maintain it in column.
11. Now go up the mast and tighten the D2's. These do not have to be very tight. They only hold
the mast straight while sailing and do
NOT
require a lot of tension.
12. Tighten the backstays, if you have a furling mast do not induce any bend in the mast by over
tightening the backstays.
13. Pin all turnbuckles and tape around the turnbuckle body with rigging tape only where the pins
go through.
14. The mast should remain straight while sailing on either tack.
15. Do not worry if the leeward shrouds are slightly slack under sail . For most sailing it is quite
acceptable.
Содержание Oceanis 321
Страница 53: ...3 2 2007 9 08 AM Oceanis 321 Rev 00 50 ...
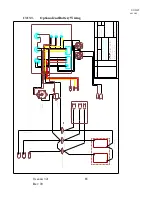
Страница 78: ...3 2 2007 9 08 AM Oceanis 321 Rev 00 75 13 12 4 Lighting Layout ...
Страница 83: ...3 2 2007 9 08 AM Oceanis 321 Rev 00 80 13 12 8 Refrigeration ...
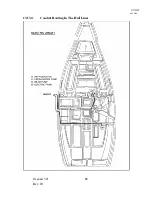
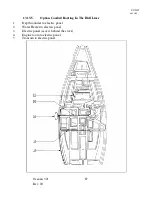
Страница 89: ...3 2 2007 9 08 AM Oceanis 321 Rev 00 86 13 13 4 Conduit Routing In The Hull Liner ...
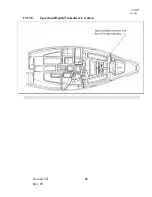
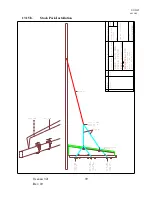
Страница 91: ...3 2 2007 9 08 AM Oceanis 321 Rev 00 88 13 13 6 Speed and Depth Transducer Location ...
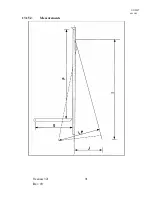
Страница 94: ...3 2 2007 9 08 AM Oceanis 321 Rev 00 91 13 15 2 Measurements ...
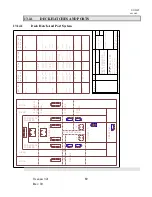
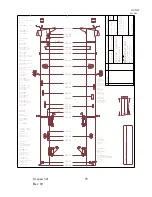
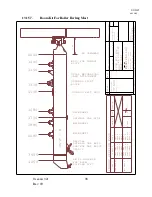
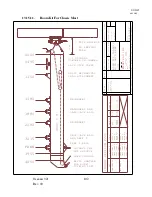
Страница 97: ...3 2 2007 9 08 AM Oceanis 321 Rev 00 94 13 15 5 Roller Furling Mast Drawing ...
Страница 112: ...3 2 2007 9 08 AM Oceanis 321 Rev 00 109 13 15 14 Standing Rigging Specifications ...
Страница 113: ...3 2 2007 9 08 AM Oceanis 321 Rev 00 110 ...
Страница 114: ...3 2 2007 9 08 AM Oceanis 321 Rev 00 111 ...
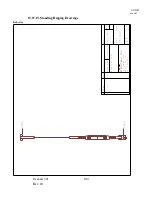
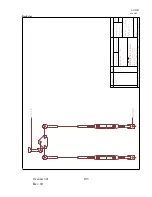
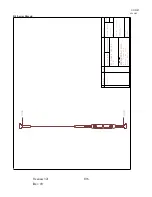
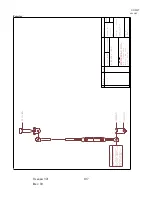
Страница 115: ...3 2 2007 9 08 AM Oceanis 321 Rev 00 112 13 15 15 Running Rigging Specifications ...
Страница 116: ...3 2 2007 9 08 AM Oceanis 321 Rev 00 113 ...
Страница 117: ...3 2 2007 9 08 AM Oceanis 321 Rev 00 114 ...
Страница 118: ...3 2 2007 9 08 AM Oceanis 321 Rev 00 115 ...
Страница 119: ...3 2 2007 9 08 AM Oceanis 321 Rev 00 116 13 15 16 Lifeline Specifications ...
Страница 122: ...3 2 2007 9 08 AM Oceanis 321 Rev 00 119 Classic Mainsail FOOT LEECH LUFF ...
Страница 125: ...3 2 2007 9 08 AM Oceanis 321 Rev 00 122 PICTURE 2 UNDER GALLEY SINK PICTURE 3 UNDER AFT STBD BUNK ...
Страница 126: ...3 2 2007 9 08 AM Oceanis 321 Rev 00 123 PICTURE 4 UNDER STBD HEAD SINK PICTURE 5 UNDER AFT SALON SETTEE ...
Страница 127: ...3 2 2007 9 08 AM Oceanis 321 Rev 00 124 PICTURE 6 STBD HEAD CABINET ABOVE SINK ...