background image

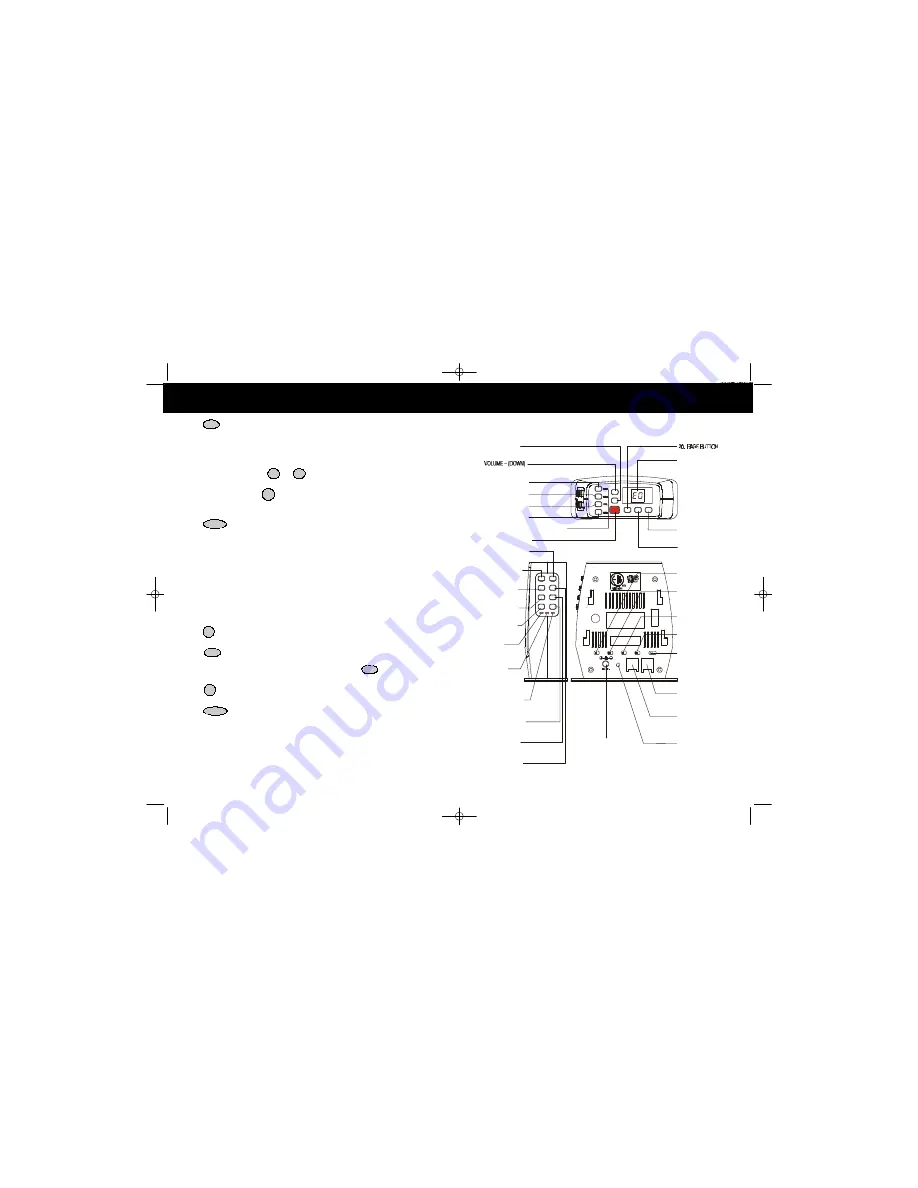
BASE UNIT Controls

11.

  OGM BUTTON

       Pg. 31, 32

19.

  MEMO BUTTON

     Pg. 33, 35

10.

  ERASE BUTTON

       Pg. 35

12.

  TIME BUTTON

       Pg. 30

9.  


ANSWER FUNCTION 

     ON/OFF BUTTON  Pg. 32

18.

  CODE BUTTON

       Pg. 36

22.

  SPEAKERPHONE

       BUTTON  


Pg. 38

21.

  LED MESSAGE

       DISPLAY

       Pg. 32, 34, 35

17.  


REPEAT BUTTON

       Pg. 30, 34, 36

8.

  PLAY BUTTON  Pg. 34

13.

  SKIP BUTTON

       Pg. 30, 34, 36

1.

  (UP)

     BUTTON  Pg. 38

7.

  MAILBOX LED INDICATORS  Pg. 31~34

4.

  MAILBOX 3 BUTTON


5.

  MAILBOX 2 BUTTON


6.

  MAILBOX 1 BUTTON

3.

  MAILBOX 4 BUTTON


23.

  STOP BUTTON  

       Pg. 32, 34

25.

  ANNOUNCE ONLY/

       INCOMING MESSAGE

       SWITCH  Pg. 32, 42

26.

  MESSAGE ALERT

       SWITCH  Pg. 33

27.

  RINGER ON/OFF

       SWITCH  

28.

  RING SELECT

       SWITCH  Pg. 33

32.

  POWER-IN

       CONNECTION JACK

       Pg. 6, 7

30.

  TELEPHONE LINE

       CONNECTION JACK

       Pg. 6, 7, 9, 41

31.

  RESET BUTTON

       Pg. 30, 42

24.

  TONE-PULSE SELECT 

       SWITCH  Pg. 7, 41


R

USE ONLY WITH CLASS 2 POWER SOURCE

TEL LINE

TS  5R  3R

RING SELECT

RESET

 ON  OFF

RINGER

  ICM  ANNC

SELECT

 ON  OFF

MSSG ALERT

 TONE/PULSE

DATA

M 1

V OL

+

V OL

-

P AG

E

S TO

P

S PK

PL

AY

M 2

M 3

M 4

ON/OFF

ANS

OGM

TIME

SKIP

RPT

CODE

MEMO

A

N

S

O

N

/

O

F

F

I

N


U

S

E

S

P

K

ERASE

BUTTON  Pg. 38

2.


16.

  SPEAKERPHONE

       LED INDICATOR  


14.

  IN USE/

       CHARGE LED 

       INDICATOR


15.

  ANSWER 

       FUNCTION ON/OFF 

       LED INDICATOR

       PG. 32, 42


29.

  DATA CONNECTION 

       JACK

4.

/MENU Button:

(VOLUME) During TALK mode, press to adjust the receiver volume 

to a comfortable listening level. (MENU) Press to access

the special functions operation in

STANDBY mode. (For special functions see pages 21~27.) 

5. HEADSET JACK:

For connecting your headset plug to enjoy hands-free communication. 

(See page 12 for detail.)

6. TELEPHONE KEYPAD          to          Buttons

: Allows you to make a call depending on 

pressed button. (For TELEPHONE KEYPAD characters, see page 18.)

7. TEMPORARY TONE           Button:

Press to temporarily change the DIALING mode from 

PULSE to TONE for Rotary Service Users. (Press once before entering numbers to access
the answering system or electronic banking services, etc.)

8.

Button:

(EDIT) Press to edit listed items. (FLASH) Press to answer a call if you

have Call Waiting.

9. HANDSET ANTENNA 

10. NEW CALL/MSG WTG (MESSAGE WAITING) LED Indicator:

(NEW CALL) Blinks RED to

indicate that you have a new Caller ID call stored in memory. (MESSAGE WAITING) Blinks
GREEN when receiving a Message Waiting signal, if you have subscribed to a Voice Mail 
message service from your local telephone company. (See page 14.)

11. BATTERY CHARGE INDICATOR:

Indicates the battery charge condition as:

- Battery Full (4 bars shown)
- Low Battery Level (2 bars blinking). See page 39 for detail.
- Battery Charging (4 bars progression)

12.

DIRECTORY (PHONE BOOK) Button:

Press to access names and numbers stored 

in the DIRECTORY (PHONE BOOK). (See pages 16 to 20 for details.)

13.

/RE (REDIAL)/PA (PAUSE) Button:

(SAVE) Press and hold down to save the 

changes on the listed items. (REDIAL) Press to redial the last number you dialed. (PAUSE)
Press to insert a pause while dialing. (You will need the        

/RE/PA

button to dial 

numbers which use an alternative Long Distance Access Code.)

14.

/OPTION Button:

(OPTION) Press to change the displayed telephone number to 

7, 10, or 11 digit DIALING mode during Caller ID callback. 

15.

(DELETE/INTERCOM) Button:

(DELETE) - Press and hold down to delete items

or individual characters. (INTERCOM) Press to make an INTERCOM CALL to another 

HANDSET

.

16. CHARGE CONTACTS:

For charging the BATTERY PACK inside the 

HANDSET

. We 

recommend cleaning the CHARGE CONTACTS periodically with a damp cloth.     

1

0

*

EDIT/FLASH

DIR

SAVE

#

DEL/INT

VOL

SAVE

HANDSET Controls

DSST~2801~A.qxd  1/25/2003  6:46 PM  Page 6

Содержание XG2801

Страница 1: ...del XG2801 OWNER S MANUAL INSTALLATION AND OPERATING INSTRUCTIONS PLEASE READ THIS MANUAL CAREFULLY BEFORE USE KEEP FOR YOUR REFERENCE For installation information please see Getting Started instructi...

Страница 2: ...se the BELT CLIP to hang your HANDSET on your belt EDIT FLASH TALK C CALLER ID SYSTEM Multi Function Large LCD Screen Shows the number you are dialing and with Caller ID service available through subs...

Страница 3: ...y Digital Answering System Provides a full range of answering functions without using cassette tapes Digital Memory Allows recording of memos and messages Two Digit LED Message Display Indicates the n...

Страница 4: ...characters see page 18 7 TEMPORARY TONE Button Press to temporarily change the DIALING mode from PULSE to TONE for Rotary Service Users Press once before entering numbers to access the answering syste...

Страница 5: ...after the third ring 5R System answers a call after the fifth ring TS TOLL SAVER System answers after the third ring only if you have new messages Otherwise the system will answer after the fifth rin...

Страница 6: ...rom the Caller List 15 Caller List 14 Viewing Caller Information During Incoming Calls 13 Caller ID with Call Waiting 14 Preparing for Use 10 Placing Calls 11 Viewing the Caller List 15 Storing Caller...

Страница 7: ...ntilation is provided 11 Do not place anything on the power cord Install the telephone where no one will step or trip on the cord 12 Do not overload wall outlets or extension cords as this can increas...

Страница 8: ...the network interface 19 Use caution when installing or modifying telephone lines Battery Safety CAUTION Danger of explosion if BATTERY PACK is incorrectly replaced Replace only with the same or equi...

Страница 9: ...have a rotary dialing system set the TONE PULSE Select Switch to the PULSE position C If you are not sure which system you have set the TONE PULSE Select Switch to the TONE position Press the button o...

Страница 10: ...LK Receiving Calls When a call is received all of the HANDSETSregistered to the system will ring with the RINGER LEVEL and MELODY selected by the user The first HANDSET to respond will get the call NO...

Страница 11: ...he button Talk will display and the Call Timer starts to count 2 Wait until you hear a dial tone and then dial the phone number 3 When you have finished your call press the but ton again or place the...

Страница 12: ...ally stores the last 50 calls received It records call information such as the caller s name and telephone number together with the date and time of the call The NEW CALL LED indicator will blink red...

Страница 13: ...call press the SCROLL UP or DOWN button again to display the Caller ID records 2 Any unviewed new calls will be displayed first The information on the call will be displayed with the name number date...

Страница 14: ...splay Phone book 2 Press the TELEPHONE KEYPAD ABC to WXY button that corresponds to the first letter of a Caller s name a triple beep will sound if no entries are stored under those letters Press the...

Страница 15: ...ing call is a long distance call and the service is provided by your local telephone company Caller ID System Operation 19 Placing Calls from the DIRECTORY PHONE BOOK 1 Press the button The LCD Screen...

Отзывы: