background image

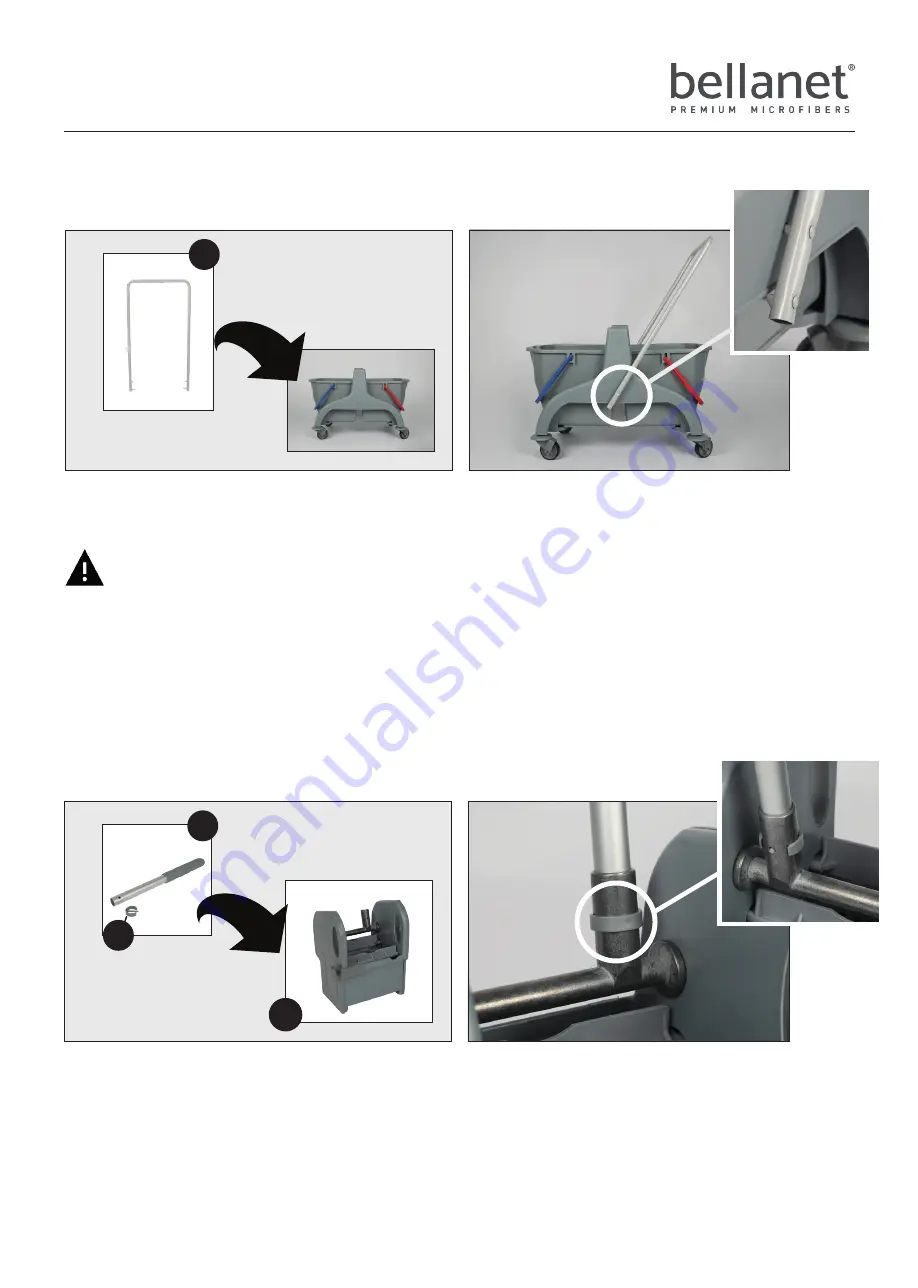
Schritt 3

step 3

Nehmen Sie nun den Metallbogen (Nr. 3) und befestigen Sie ihn an der Wagenvorrichtung (Nr.1). Schieben 

Sie dafür auf beiden Seiten jeweils den oberen der beiden Stifte des Metallbogens in die dafür vorgesehene 

Bohrung der Wagenvorrichtung.

Now take the metal bow (# 3) and attach it to the carriage assembly (# 1). Push the upper of the two pins of the metal 
sheet into the hole provided on the carriage assembly on both sides.

Achtung! Sollten die Stifte sich aus der Bohrung lösen / herausfallen oder zu locker sitzen, biegen 

bzw. krümmen Sie den gesamten Metallbogen ein wenig nach innen.

Attention! If the pins come loose / fall out of the hole or sit too loosely, bend the entire metal arch slightly inwards.

3

- 4 -

Schritt 4

step 4

Nehmen Sie den Griff (Nr. 5), um ihn an der Mopp-Presse (Nr. 4) zu befestigen. Stecken Sie den Griff dafür 

in die Halterung an der Mopp-Presse. Achten Sie bitte darauf, dass die Löcher übereinander liegen, sodass 

Sie den Ring mit dem Stift (Nr. 5a) einstecken können. Ein leichtes Klicken signalisiert den richtigen Halt.

Take the handle (# 5) to attach it to the mop press (# 4). To do this, insert the handle into the holder on the mop press. 
Please make sure that the holes are on top of each other so that you can insert the ring with the pin (# 5a). A slight 
click signals the correct hold.

5

4

5a

Содержание Eco Cleaning Trolley Small

Страница 1: ...AUFBAUANLEITUNG ECO REINIGUNGSWAGEN klein Assembly instructions for the eco cleaning trolley small 50455 00 Enthaltene Teile contained parts 1x 4x 1x 1x 1x 1 2 3 4 5 1x 6 1x 7 ...

Страница 2: ... the underside of the basic frame 1 Please make sure that the rollers are really stuck 3 2 1 Schritt 2 step 2 Nehmen Sie die beiden Eimer Nr 7 und stellen diese mit dem Rücken zueinander in dieWagenvorrichtung Nr 1 Achten Sie bitte darauf das beide Eimer fest und sicher in der Wagenvorrichtung stehen Take the two buckets 7 and place them back to back in the carriage assembly 1 Please make sure tha...

Страница 3: ...ie den gesamten Metallbogen ein wenig nach innen Attention Ifthepinscomeloose falloutoftheholeorsittooloosely bendtheentiremetalarchslightlyinwards 3 4 Schritt 4 step 4 Nehmen Sie den Griff Nr 5 um ihn an der Mopp Presse Nr 4 zu befestigen Stecken Sie den Griff dafür in die Halterung an der Mopp Presse Achten Sie bitte darauf dass die Löcher übereinander liegen sodass Sie den Ring mit dem Stift Nr...

Страница 4: ... angebracht werden Now take the dark grey basket 3 and hang it on top of the metal bow of the car For optimal use this basket should be mounted in the direction of the user 6 3 Schritt 5 step 5 Um die Mopp Presse Nr 4 5 am Wagen zu montieren hängen Sie sie so ein dass sie sicher auf der vorhandenen Metallstange in der Mitte einrastet To mount the mop press No 4 5 on the trolley hang it so that it ...

Отзывы: