background image

1

2

3

Overview


Computer & Bracket


Computer Sensor


Magnet

NOTe:

 Follow 

instructions 
carefully. Proper 
installation and 
adjustment may 
take up to 30 
minutes.

Содержание 1000849

Страница 1: ...Bell Wireless Speedometer with calorie counter ...

Страница 2: ...1 2 3 Overview 1 Computer Bracket 2 Computer Sensor 3 Magnet NOTE Follow instructions carefully Proper installation and adjustment may take up to 30 minutes ...

Страница 3: ... battery 3 0V CR2032 in unit with positive side facing up and replace battery cover NOTE Sensor comes with same type of battery pre installed Directions provided for battery replacement For optimal performance we recommend changing the sensor battery when ever you change the speedometer battery 3 0V CR2032 3 0V CR2032 ...

Страница 4: ...Remove the adhesive tape shield and position the bracket on the handle bar Secure the bracket using two of the zip ties provided Insert the computer into the bracket Make sure bracket tab is facing toward bike as shown in illustration ...

Страница 5: ...mpartment faces away from the bike B The sensor is as close to the spokes as possible You can adjust the positioning up or down the fork as necessary Secure the sensor using 1 zip tie Do not tighten completely as further adjustments to the sensor position will be necessary CORRECT CORRECT INCORRECT INCORRECT ...

Страница 6: ...ll Magnet STEP 4 Secure the magnet to a spoke on the right side of the front wheel Clamp will work with both A thick and B thin spokes Screw to tighten Make sure magnet faces toward the outside of the wheel ...

Страница 7: ...arrow when the wheel rotates B There is no more than 1 8 3mm clearance between the sensor and the magnet Now lift spin the front tire The computer display will change with the spinning tire if the sensor and magnet are installed correctly If the computer display remains constant further adjustment of the sensor and magnet location is necessary 3mm 1 8 MAX ...

Страница 8: ...tery will erase the wheel value Step 2 Set KM or Mile Selection After setting the wheel value the KM M selection will appear Press the left or right MODE button to choose kilometer or mile selection Press the SET button to confirm Step 3 Input Age and Weight After setting the KM M selection two numbers will appear Enter your age as the large number above the horizontal line Press the left or right...

Страница 9: ... flashing Step 5 Set the Clock Press and hold the SET button for two seconds You will see a 12 or 24 hour digital clock with a flashing colon at the bottom of computer display To switch between the 12 and 24 hour format press the left or right MODE button Press the SET button to confirm Next the hour digits will start to flash Use the right or left MODE buttons to select the hour and press the SET...

Страница 10: ...ottom line The Trip Meter is activated automatically with speedometer input comes on automatically when you begin riding turns off when you stop To reset DST to zero press and hold the SET button for 2 seconds Note that TM Trip Time AVS Average Speed will also be reset at that time Now press either MODE button to advance to the MXS mode Maximum Speed MXS Maximum speed is indicated by MXS and is di...

Страница 11: ...comes on automatically when you begin riding turns off when you stop It records only the time actually spent riding To reset TM to zero return to DST Trip Meter mode and reset to zero per the instructions above Return to TM mode and press either MODE button to advance to the Temperature mode Temperature TEMP Your computer has a thermometer to measure outdoor temperature To select between Celsius C...

Страница 12: ...vance to the FAT mode Fat Burned FAT This function estimates the number of fat grams burned while riding based on the age and weight inputed by the user To reset FAT press and hold the SET button for 2 seconds Now press either MODE button to advance to the SCAN mode Scan The Scan mode conveniently rotates DST MXS AVS and TM readings on the computer screen without the need to press any buttons Now ...

Страница 13: ...n allows you to keep the impor tant data of total distance ODO even after battery replacement by pressing either MODE button To set ODO after battery replacement and wheel size setting press right MODE button to ODO mode and then hold the SET button for 2 seconds until the last digit flashes To adjust number press the MODE button and then press the SET button to confirm and select digit to be inpu...

Страница 14: ...rage speed speed Tendency A cyclist symbol appears to the left of the speed The wheel turns forward to indicate acceleration The wheel turns backward to indicate deceleration EL Backlight The EL backlight illuminates the computer screen for easier viewing in dark or low light settings It can be turned on in two ways 1 Hold the left or right MODE button for 2 seconds 2 The EL backlight will illumin...

Страница 15: ...Poor battery contact or low dead battery Temperature too hot or display exposed to sunlight too long Computer damaged or dropped Recommended Action Move computer to different area Ensure speedometer sensor and magnet are properly installed and aligned p 3 Replace Battery Only use computer when temperature is within operational limits Replace battery Only use computer when temperature is within ope...

Страница 16: ...nst harmful interference in a residential installation This equipment generates uses and can radiate radio frequency energy and if not installed and used in accordance with the instructions may cause harmful interference to radio communications However there is no guarantee that interference will not occur in a particular installation If this equipment does cause harmful interference to radio or t...

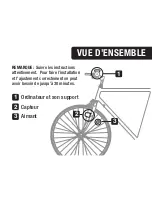
Страница 17: ... 1 Ordinateur et son support 2 Capteur 3 Aimant REMARQUE Suivre les instructions attentivement Pour faire l installation et l ajustement correctement on peut avoir besoin de jusqu à 30 minutes Vue d ensemble ...

Страница 18: ...ie 3 0V CR2032 dans l appareil en orientant le contact positif vers le haut puis replacer le couvercle REMARQUE le capteur est fourni avec le même type de pile mais pré installée Les instructions fournies sont pour le remplacement de la pile Pour obtenir des perfor mances optimales nous recommandons de changer la pile du capteur à chaque remplacement de pile du compteur kilométrique ...

Страница 19: ...protection de la bande adhésive et positionner le support sur le guidon Assurer le support en utilisant deux des atta ches zip fournies Insérer l ordinateur sur le support S assurer que l ergot du support pointe vers la bicyclette comme le montre l illustration ...

Страница 20: ...st aussi proche que possible des rayons On peut ajuster le placement en remontant des cendant le long de la branche de fourche selon le besoin Fixer le capteur avec une attache zip Ne pas serrer à fond car il y aura peut être besoin de réglages supplémentaires CORRECT CORRECT INCORRECT INCORRECT ÉTAPE 3 Installation du capteur de l ordinateur ...

Страница 21: ...r un rayon sur la droite de la roue avant La pince s accroche aussi bien sur les rayons épais A ou fins B Visser pour serrer S assurer que l aimant fait face vers l extérieur de la roue ÉTAPE 4 Installation de l aimant ...

Страница 22: ...apteur flèché quand la roue tourne B La distance entre l aimant et le capteur lorsque l aimant passe devant le capteur ne dépasse pas 3mm Ensuite soulever l avant de la bicyclette et faire tourner la roue avant Si le capteur et l aimant sont bien installés l affichage de l ordinateur doit varier Si l affichage reste constant il faut améliorer l ajustement conjoint du capteur et de l aimant ...

Страница 23: ... droite pour modifier le chiffre jusqu à ce qu il atteigne sa valeur correcte pour une avance rapide maintenir enfoncé le bouton MODE de droite ou de gauche Une fois que le chiffre correct apparaît appuyer sur le bouton CONFIG SET pour passer au chiffre suivant Recommencer l opération jusqu à ce que les quatre chiffres aient la valeur de la longueur de circonférence correcte de la roue de la bicyc...

Страница 24: ...intervalle des interventions d entretien soit 200 400 600 ou 800 km ou milles puis appuyer sur le bouton CONFIG SET pour confirmer Quand le compteur kilométrique ODO atteindra la distance correspondant à l intervalle choisi une icône de clé anglaise apparaîtra en clignotant pour rappeler qu il faut effectuer l entretien de la bicyclette vérifier les pneus et autres pièces pour le graissage l usure...

Страница 25: ... dans le compteur kilométrique activation automatique quand on commence à rouler et désactivation quand on s arrête de rouler Pour remettre le totalisateur DST à zéro appuyer sur le bouton CONFIG SET et le maintenir enfoncé pendant deux secondes Il faut noter que les valeurs de la durée de la course Trip Timer TM et de la vitesse moyenne Average Speed AVS sont également remises à zéro à ce stade l...

Страница 26: ... et désactivation quand on s arrête de rouler Le chronomètre n enregistre que la durée effective du pédalage Pour remettre le chronomètre TM à zéro repasser en mode Totalisateur partiel DST et remettre à zéro selon les instruc tions ci dessus Repasser en mode TM et appuyer sur l un ou l autre des boutons MODE pour passer au mode Température TEMP Température TEMP L ordinateur comporte un thermomètr...

Страница 27: ...rûlée FAT Cette fonction estime le nombre de grammes de graisse brûlés pendant le pédalage en fonction de l âge et du poids configurés par l utilisateur Pour remettre le mode FAT à zéro appuyer sur le bouton CONFIG SET et le maintenir enfoncé pendant deux secondes Appuyer ensuite sur l un ou l autre des boutons MODE pour passer au mode Balayage SCAN Balayage SCAN Le mode Balayage fait passer commo...

Страница 28: ...es telles que la distance totale ODO même après le remplacement de la pile en pressant l un des deux boutons MODE Pour configurer la fonction ODO après remplacement de la pile et configuration de la valeur de référence longueur de la circonférence de la roue appuyer sur le bouton MODE de droite puis maintenir le bouton CONFIG SET enfoncé pendant deux secondes jusqu à ce que le dernier chiffre clig...

Страница 29: ...aît à gauche de la vitesse La roue tourne en avant pour indiquer l accélération Elle tourne en arrière pour indiquer la décélération Rétroéclairage EL Le rétroéclairage EL permet d illuminer l écran de l ordinateur de manière à faciliter la lecture lorsque la lumière est faible ou que l on se trouve dans l obscurité On peut le configurer de deux façons 1 Tenir le bouton MODE de droite ou de gauche...

Страница 30: ...ature trop élevée ou écran exposé trop longtemps au soleil Ordinateur endommagé ou ayant subi une chute Action Recommandée Placer l ordinateur à un autre endroit Vérifier que le capteur de l indicateur de vitesse et l aimant sont correctement installés et alignés voir page 29 Remplacer la pile Utiliser l ordinateur uniquement lorsque la tem pérature se trouve dans les limites opérationnelles Rempl...

Страница 31: ...surer une protection raisonnable contre les brouillages nuisibles aux installations résidentielles Cet équipement génère utilise et peut rayonner de l énergie en radiofréquence et s il n est pas installé ou utilisé conformément aux instructions il peut causer des brouillages nuisibles aux communications par radio Cependant il n existe aucune garantie comme quoi des brouillages ne surviendront pas ...

Страница 32: ...Printed in China Imprimé en Chine 2006 Bell Sports Inc Rantoul IL 61866 Tel 1 800 456 BELL www bellbikestuff com Part 5000677600 For Item s 1000849 1001618 ...

Отзывы: