Action and Event Tables
98
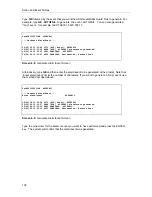
8.6.3 Change Action Item – CA Command
The Change Action Item command allows you to modify an existing action item. Type CA at the
system prompt and press the ENTER key to display the Change Action Item screen.
Site123>CA
--- Change Action Item ---
Alarm: Routine: Parameters: Comments:
1) .DAILY PHONHOME 2
Alarm .DAILY
Action Routine PHONHOME
Routine Parameters 3
Comment
07/17/97 10:36:30 [A] .DAILY Action item added
07/17/97 10:36:30 [A] .DAILY Action item modified
Screen 8-5. Change Action Item Screen
When CA is issued with no modifiers, the complete list is displayed. To specify a search string,
add one or more characters, separated by a space, after the CA command. For example, to
change action items starting with .D, type:
>CA .D
and press the ENTER key. The system will only display those action items beginning with .D. If
the list contains more than 18 action items, you are prompted to press the ENTER key to view
additional action items. If the action item you wish to change is not displayed, then press the
ENTER key to see more action items.
You are prompted to enter the number corresponding to the action item you wish to change.
After you type in a number and press the ENTER key, the system will display that Action Routine
and it’s associated parameters. The Action Table is updated immediately as changes are made to
it.
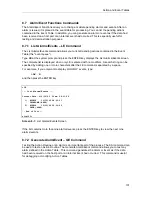
8.6.4 Schedule Action Item – SAI Command
The Schedule Action Item command schedules the occurrence of an Action Item. This command
is usually used for remote installation and testing of new Action Routines. It lets you execute an
Action Routine when there is no event associated with that action.
To display the Schedule Action Item screen, type SAI at the system prompt and press the
ENTER key. Initially the Action Routine field is blank. Use the SPACE BAR to scroll through the
list of Action Routines. Select an Action Routine by pressing the ENTER key when the Action
Routine you want appears in the field. The cursor will then advance to the Parameters field.
Continue through the fields by typing in your data and pressing the ENTER key. Pressing the
ENTER key when the cursor is in the Comment field completes the process.
Содержание Lucent Technologies Access Security Gateway Guard
Страница 12: ...x Page intentionally left blank ...
Страница 28: ...ASG Guard Overview 16 Page intentionally left blank ...
Страница 36: ...Physical Connections 24 Page intentionally left blank ...
Страница 60: ...Modem Port Setup 48 Page intentionally left blank ...
Страница 82: ...Modifying the User Database 70 Page intentionally left blank ...
Страница 106: ...Action and Event Tables 94 ACTION TABLE WORKSHEET Alarm Message or Internal Event Action Routine Routine Parameters ...
Страница 120: ...Action and Event Tables 108 Page intentionally left blank ...
Страница 158: ...User Connectivity 146 Page intentionally left blank ...
Страница 188: ...Log Functions 176 Page intentionally left blank ...
Страница 236: ...Troubleshooting 224 Page intentionally left blank ...
Страница 252: ...Internal Battery Replacement 240 Page intentionally left blank ...
Страница 258: ...Glossary of Command References 246 Page intentionally left blank ...


