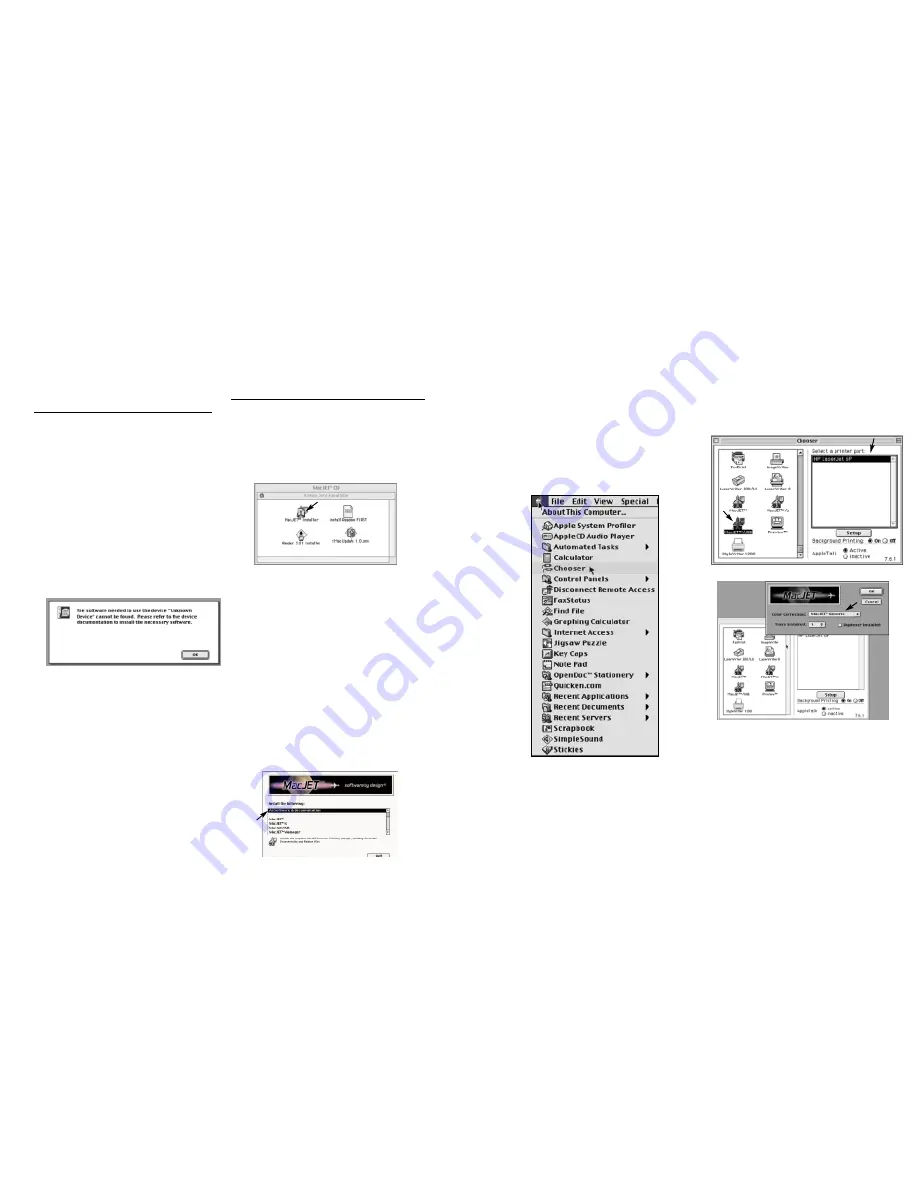
6. MacJET
™
will prompt you to restart
the computer after installation is
completed. Select Yes and your
Mac
®
/iMac
®
will restart. You must
restart for correct installation.
7. After your computer has restarted,
click on the Apple menu located in
the top left corner of your screen.
Select Chooser from the Apple menu.
8. Select the MacJET
™
USB printer icon
from the printer icons box on the left
side of the chooser screen. Scroll
down if it does not appear in the box
A) Select the appropriate printer from
the Select a printer port on the top
right side of the chooser screen.
Section 1:
Parallel Printer
Adapter Installation
1. Turn off all equipment and completely
reboot your system before installation
of the Belkin USB Parallel Printer
Adapter for iMac
®
.
2. After the system has completely
rebooted, make sure your printer is on
and connect the Parallel Printer
Adapter centronics connector into
your PCL printer. Then connect the
USB connector into an available USB
port on the iMac
®
/Mac
®
. You will see
the following message after connecting
the adapter:
Section 2:
MacJET
™
Software Installation
1. Insert the MacJET
™
CD-ROM and open
the CD after the icon appears on the
desktop.
2. Open the MacJET
™
CD-ROM and
then open the MacJET
™
Installer
within the CD-ROM.
This means that your iMac
®
/Mac
®
has
automatically detected the adapter.
This does not mean that
there is an error.
Click Ok. The adapter will be
automatically configured.
3. The next screen provides MacJET
™
technical support information. Choose
Continue unless you would like to save
or print the technical support screen. If
you select Cancel but want to continue
with the installation, go back to
instruction #2.
4. Please read the software license. If you
agree to the terms and conditions, click
Continue to complete the installation.
5. The installation screen will ask you to
select the software and documentation you
wish to install. Select “All Software &
Documentation”. MacJET
™
should
automatically choose this. Click Install.
B) Go to the Setup button located at the
right corner of the chooser screen and
make sure that MacJET
™
Generic
appears in the color correction pop-up
box.
Click OK and then close the Chooser by
clicking the top left corner of the chooser
screen. The MacJET
™
printer icon is
created and will appear on your desktop.
Once the MacJET
™
printer icon has
appeared, you can drag documents to the
printer or print from the File menu to print.
You should now be able to print to your
printer. However, if you are printing to an
HP DeskJet printer, it is recommended to
turn on RET (Resolution Enhancement


