background image

Fr

39

Windows

®

95 / 98 and NT

®

(suite)

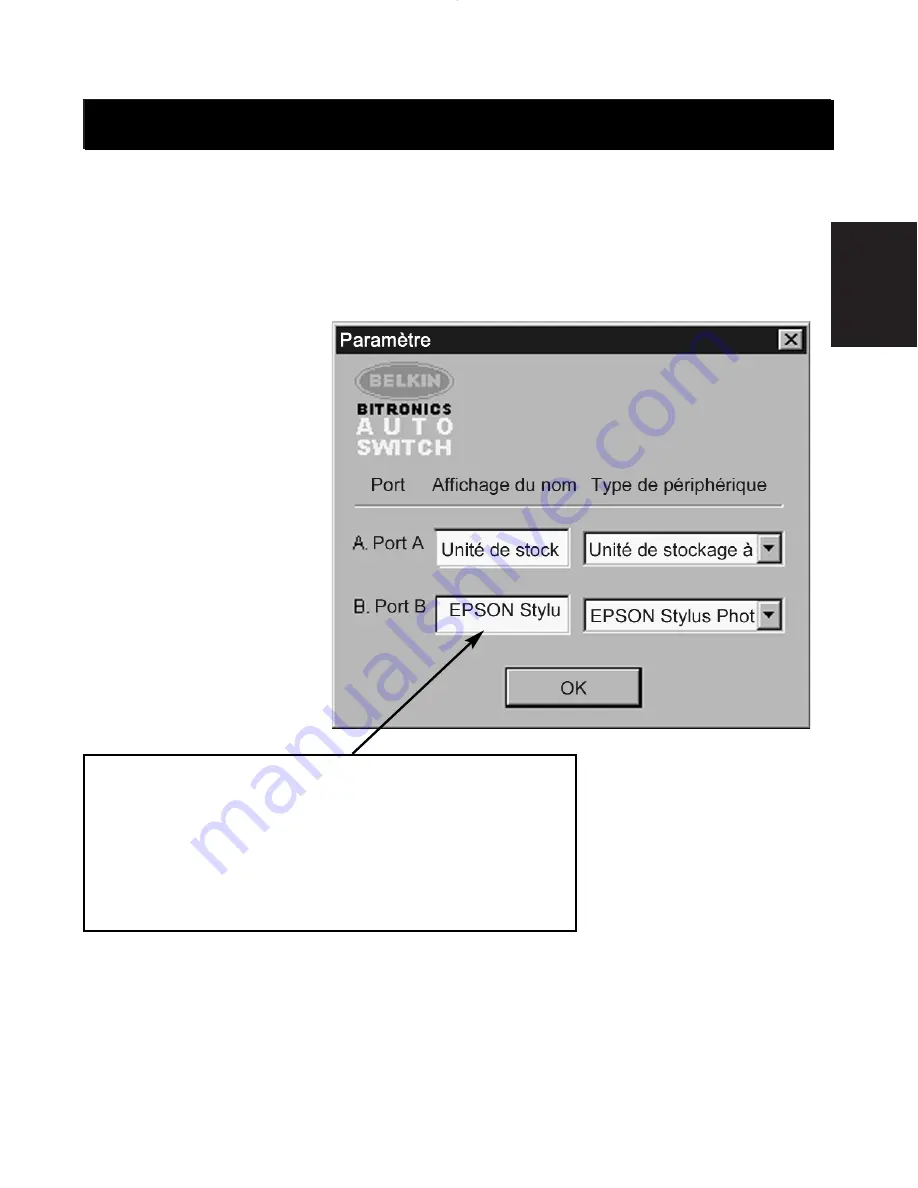
Dans cet exemple, comme nous avons un lecteur Zip

®

sur le port A, nous

choisissons « Mass Storage Device » pour le port A. L’imprimante Epson
est installée sur le port B et nous avons donc choisi ce pilote dans le type
de périphérique correspondant au port B. Cliquez sur OK lorsque vous
avez terminé.

Cliquez sur « OK » lorsque vous avez terminé.

« Display Name » (Nom d’affichage) est un champ
de texte libre. Vous pouvez décrire ici les
périphériques raccordés. Par exemple, le port A
est relié au lecteur Zip

®

‚ et le port B à l’imprimante

à jet d’encre. Vous pouvez renommer ces champs
en écrivant « My Zip Drive » (Mon lecteur Zip) ou 
« Color Printer #2 » (Imprimante couleur numéro). 

P73121/F1U126-KIT/f/EU/man.qxd  4/28/00  1:07 PM  Page 39

Содержание Bitronics AutoSwitch F1U126

Страница 1: ......

Страница 2: ...KIT Bitronics AutoSwitch Kit User Manual Guide de l utilisateur du kit de l autocommutateur Bitronics Bitronics AutoSwitch Set Benutzerhandbuch Handleiding Bitronics AutoSwitch Kit Manuale utente Kit...

Страница 3: ......

Страница 4: ...Table of Contents En Fr De Ne It English 1 Fran ais 29 Deutsche 59 Nederlands 89 Italiano 119...

Страница 5: ......

Страница 6: ...matic printer selection through Windows 95 98 and Windows NT File transfer feature between two PCs compatible with Windows Direct Cable Connection LapLink and DOS Interlink Includes 1 8m IEEE 1284 com...

Страница 7: ...trical Input Voltage 9VDC Max Input Current 600mA Max Power Consumption 5 4W Max Heat Dissipation 0 31 BTU min Environmental Storage Temperature 10 C to 50 C Working Temperature 0 C to 40 C Relative H...

Страница 8: ...nnector Port activity LEDs DC power jack side SW2 and SW3 TimeOut Setting TimeOut is the amount of time the switch remains locked on a PC port after data transfer Use a longer TimeOut when connecting...

Страница 9: ...evious page for more info For 4 to 1 mode DIP switch 1 is set to OFF For 1 to 4 mode DIP switch 1 is set to ON Set DIP switches 2 and 3 to your preference See previous page Next connect the computer s...

Страница 10: ...al models of computers The BIOS setup routine prompt is displayed a few seconds after you turn on your computer and hear its first beeps Again this varies from PC to PC Please consult the Appendices a...

Страница 11: ...operating system The software and drivers of the device to be shared i e printer scanner etc is also loaded on both computers This is necessary for each computer to access and use the shared device pr...

Страница 12: ...ile transfer mode example A to B computers C and D still have access to the shared device See the examples below for the different operating systems A Windows 95 98 and Windows NT To do this double cl...

Страница 13: ...fer mode before you can run your file transfer program Hence you must repeat the above procedure on the other computer When both LEDs are green you are all set to run your file transfer program The ca...

Страница 14: ...to one device at a time only and does not know which device to connect to unless instructed by the user Through the use of the Bitronics software the AutoSwitch receives commands from the computer in...

Страница 15: ...you are using a printer use the printer driver used for that particular printer on that port of the Bitronics switch If it does not show up in this menu that means the printer drivers have not been in...

Страница 16: ...Epson printer installed so we chose that driver in the Device Type for Port B Click OK when finished Display Name is a free text field You can enter any description here for the attached devices For i...

Страница 17: ...a printer you must follow the procedure below to reconfigure the port connected to the printer If none of the devices are printers then you can skip to page 17 Click on Start select Settings and doub...

Страница 18: ...ics switch LPx1 PA autoswitch Select this if the printer is connected to Port A of the Bitronics switch LPx1 PB autoswitch Select this if the printer is connected to Port B of the Bitronics switch The...

Страница 19: ...ngs and then click on Start printing after last page is spooled If NOT grayed out click on Disable bi directional support for this printer Otherwise ignore Click OK in the Spool Settings window Click...

Страница 20: ...the software and restarting the computer go the printer properties and select the PORTS tab To find the correct ports to be used with the Bitronics switch you must scroll down the list until the LPT1...

Страница 21: ...ndows NT continued 16 To set the spool settings correctly click on the Scheduling tab Make sure Start printing after last page is spooled is selected Also set Priority to Highest Click OK when finishe...

Страница 22: ...e handles the switching duties IT S FULLY AUTOMATIC How does it work With the Bitronics Software loaded and the ports properly configured for the printers as shown previously when you print in Windows...

Страница 23: ...r on Port A of the Bitronics switch All you have to do is pick your printer and the software does everything else But remember ALL THE SETTINGS MUST BE CORRECT otherwise you may print garbage out of t...

Страница 24: ...h is defaulted to the Port attached to the Zip Drive It is necessary for the switch to always remain connected to the Zip Drive so that any time you access that drive you will always be connected and...

Страница 25: ...below as you had entered it Click OK Now the Bitronics switch will always keep your computer connected to the Zip Drive That way anytime you access it you will not get any strange errors Then when yo...

Страница 26: ...that has the printer and send the print job However the switch will remain connected to the printer it will not change back to the Scanner unlike the mass storage device mentioned previously This mean...

Страница 27: ...ect to another device Just be sure that the printer driver has its Port set to the correct device port For example if you wish to use 2 printers 1 Zip Drive and 1 scanner connect the Zip Drive to Port...

Страница 28: ...LT DEL 2 Follow the legend directions on how to scroll through the options 3 When you reach the Parallel Port Mode option choose the mode with the highest performance e g ECP 4 Follow the legend direc...

Страница 29: ...rformance e g ECP 5 Follow the legend directions to save the setting and exit Setup Steps for HP Vectra 500 PC Series 1 While the computer is booting follow the directions on the screen Press F2 to En...

Страница 30: ...etup Micron General Steps 1 While the computer is booting follow the directions on the screen Press F2 to enter Setup 2 Select Advanced from the menu bar 3 Follow the legend directions to select Integ...

Страница 31: ...arallel Port Type The default setting is Compatible Press ENTER 7 Select ECP and press ENTER 8 Press ESC twice to get to the Exit screen 9 Press ENTER twice to Exit Saving Changes The system will rest...

Страница 32: ...al default 3 ECP requires IEEE 1284 printer parallel cable 7 Select ECP and click OK to save results and close the window 8 Click Yes to restart the computer Note Changes made in the Sony Notebook Uti...

Страница 33: ...oes not apply if the product has been damaged by accident abuse misuse or misapplication if the product has been modified without the written permission of Belkin or if any Belkin serial number has be...

Страница 34: ...it de l autocommutateur Bitronics de Belkin Components Vous pouvez d sormais choisir entre quatre p riph riques parall les diff rents partir de votre ordinateur de bureau ou partager un p riph rique e...

Страница 35: ...ntr e 600mA Consommation maximale de courant 5 4W Dissipation maximale de chaleur 0 31 BTU min Environmental Temp rature de stockage de 10 C 50 C Temp rature de travail de 0 C 40 C Humidit relative de...

Страница 36: ...n port de PC apr s le transfert de donn es Optez pour un d lai plus long lorsque vous raccordez des scanners et des unit s de stockage grande capacit ou pour des impressions volumineuses Recommand SW2...

Страница 37: ...dente Pour le mode 4 1 l interrupteur DIP n 1 est sur OFF Pour le mode 1 4 l interrupteur DIP n 1 est sur ON Positionnez les interrupteurs DIP 2 et 3 comme vous l entendez Cf page pr c dente Raccordez...

Страница 38: ...avoir allum l ordinateur et entendu les premiers bips vous voyez appara tre l invite du programme d initialisation BIOS Une fois encore ceci varie d un PC l autre Veuillez consulter les annexes le mo...

Страница 39: ...u p riph rique partager c est dire de l imprimante du scanner etc sont galement charg s sur les quatre ordinateurs Il s agit l d une tape indispensable pour que chaque ordinateur puisse acc der au p r...

Страница 40: ...de de transfert de fichiers par exemple A et B les ordinateurs C et D auront toujours acc s au p riph rique partag Les exemples suivants se r f rent aux diff rents syst me d exploitation A Windows 95...

Страница 41: ...e transfert de fichiers Vous devez donc r p ter la proc dure ci dessus sur l autre ordinateur Lorsque les deux voyants DEL sont verts cela signifie que vous tes pr t lancer le programme de transfert d...

Страница 42: ...l autocommutateur communique uniquement avec un p riph rique la fois et ne sait pas quel p riph rique se raccorder si l utilisateur ne le lui dit pas Gr ce au logiciel Bitronics l autocommutateur re...

Страница 43: ...z le pilote d imprimante utilis pour cette imprimante sur ce port du commutateur Bitronics S il n appara t pas dans ce menu cela signifie que les pilotes de l imprimante n ont pas t install s Dans ce...

Страница 44: ...e type de p riph rique correspondant au port B Cliquez sur OK lorsque vous avez termin Cliquez sur OK lorsque vous avez termin Display Name Nom d affichage est un champ de texte libre Vous pouvez d cr...

Страница 45: ...devez suivre la proc dure qui suit afin de reconfigurer le port raccord l imprimante Si aucun des p riph riques n est une imprimante vous pouvez passer la page 45 Cliquez sur Start D marrer Settings...

Страница 46: ...mutateur Bitronics LPx1 PA autoswitch S lectionnez cette option si l imprimante est reli e au port A du commutateur Bitronics LPx1 PB autoswitch S lectionnez cette option si l imprimante est reli e au...

Страница 47: ...ncer l impression apr s la derni re page Cliquez sur Disable bi directional support for this printer D sactiver le support bidirectionnel pour cette imprimante si cette option N EST PAS d j s lectionn...

Страница 48: ...l le logiciel et red marr l ordinateur allez aux propri t s de l imprimante et s lectionnez l onglet Ports Pour trouver les ports appropri s qu il convient d utiliser avec le commutateur Bitronics vou...

Страница 49: ...aram tres du spouleur cliquez sur l onglet Scheduling V rifiez que l option Start printing after last page is spooled Commencer l impression apr s la derni re page est s lectionn e Optez pour la plus...

Страница 50: ...occupe de la commutation C EST ENTIEREMENT AUTOMATIQUE Comment cela fonctionne t il Une fois que le logiciel Bitronics est charg et que les ports sont d ment configur s pour les imprimantes comme indi...

Страница 51: ...itronics Vous n avez qu choisir l imprimante et le logiciel se charge du reste N anmoins n oubliez pas que TOUS LES PARAMETRES DOIVENT ETRE CORRECTS Faute de quoi peut tre imprimerez vous des donn es...

Страница 52: ...r d faut reli au port raccord au lecteur Zip Le commutateur doit rester raccord au lecteur Zip pour que vous soyez toujours raccord et ne receviez pas de messages d erreur chaque fois que vous acc dez...

Страница 53: ...vous l aviez saisi Cliquez sur OK Le commutateur Bitronics fera en sorte que votre ordinateur reste toujours connect au lecteur Zip afin d viter toute erreur lorsque vous y acc dez Ensuite lorsque vou...

Страница 54: ...impression N anmoins le commutateur restera raccord l imprimante et ne reviendra pas au scanner contrairement l unit de stockage grande capacit mentionn e pr c demment Vous devez donc utiliser cette...

Страница 55: ...Bitronics pour vous raccorder un autre p riph rique V rifiez simplement que le port du pilote de l imprimante est sur le bon port de p riph rique Par exemple si vous souhaitez utiliser deux imprimant...

Страница 56: ...l cran d initialisation AST 1 Lors du d marrage de votre ordinateur suivez les instructions qui s affichent l cran To enter Setup press CTRL ALT ESC Pour acc der l cran d initialisation appuyez sur C...

Страница 57: ...illion PC 1 Sur l cran HP Blue Screen appuyez sur F1 pour acc der l cran initialisation 2 Dans la barre de menu s lectionnez Advanced 3 En suivant les instructions s lectionnez Peripheral Configuratio...

Страница 58: ...z les instructions pour enregistrer les param tres et quitter l cran d initialisation 5 Ajoutez le programme Ecpon com au fichier Autoexec bat de l ordinateur Vous trouverez ce fichier sur le CD ROM o...

Страница 59: ...d marrage de votre ordinateur suivez les instructions qui s affichent l cran Press F2 to enter Setup Appuyez sur F2 pour acc der l cran d initialisation 2 Allez Connectivity 3 Remplacez le port AT par...

Страница 60: ...e La valeur par d faut est Compatible Appuyez sur Enter Entr e 7 S lectionnez ECP et appuyez sur Enter Entr e 8 Appuyez deux fois sur ESC Echap pour acc der l cran Exit 9 Appuyez deux fois sur Enter E...

Страница 61: ...D marrer 2 S lectionnez Tool Center 3 S lectionnez Sony Utilities 4 S lectionnez Sony Notebook Setup 5 S lectionnez l onglet Printer FDD 6 V rifiez que Use as printer connector est s lectionn et chois...

Страница 62: ...ECP n cessite un c ble imprimante parall le IEEE 1284 6 S lectionnez ECP et cliquez sur OK pour enregistrer les modifications et fermer la fen tre 7 Cliquez sur Yes Oui pour red marrer l ordinateur RE...

Страница 63: ...ommag par accident abus usage impropre ou mauvaise application si le produit a t modifi sans autorisation crite de Belkin ou si un num ro de s rie Belkin a t sup prim ou rendu illisible LA GARANTIE ET...

Страница 64: ...98 und NT Mit Windows Direct Cable Connection LapLink und DOS Interlink kompatible File Transfer Funktion f r zwei PCs Enth lt IEEE1284 konformes Kabel 1 8 m Einstellbares Timeout Packungsinhalt Bitr...

Страница 65: ...g 9 VDC Max Eingangsstrom 600 mA Max Leistungsaufnahme 5 4 W Max W rmeableitung 0 31 BTU Min Umgebungsbedingungen Lagertemperatur 10 C bis 50 C Betriebstemperatur 0 C bis 40 C Relative Luftfeuchtigkei...

Страница 66: ...ten bertragung auf einem PC Anschlu eingerastet bleibt F r Verbindungen mit Scannern Massenspeicherger ten und f r gro e Druckauftr ge sollte ein l ngerer TimeOut eingestellt werden Empfohlen SW2 ON O...

Страница 67: ...zt In der 1 4 Konfiguration wird DIP Schalter Nr 1 auf ON gesetzt Stellen Sie die DIP Schalter 2 und 3 entsprechend dem gew nschten TimeOut ein N heres dazu siehe vorherige Seite Verbinden Sie als n c...

Страница 68: ...puter zu Computer unterschiedlich Bitte sehen Sie im Anhang und oder im Handbuch zu Ihrem Computer nach wie die BIOS Setup Routine aufgerufen wird oder wenden Sie sich an den Kundendienst des Computer...

Страница 69: ...ystem installiert ist Die Software und Treiber des Ger ts das gemeinsam genutzt werden soll z B Drucker Scanner usw wird ebenfalls auf beiden Computern geladen Dies ist notwendig damit jeder Computer...

Страница 70: ...von A nach B k nnen die Computer C und D nach wie vor auf das gemeinsam verwendete Ger t zugreifen Im folgenden sind Beispiele f r die verschiedenen Betriebssysteme aufgef hrt A Windows 95 98 NT Doppe...

Страница 71: ...us eingestellt werden damit Sie Ihr File Transfer Programm ausf hren k nnen Daher m ssen Sie mu diese Einstellung auch am anderen Computer vornehmen Leuchten beide LEDs gr n sind die Computer bereit z...

Страница 72: ...t die Information mit welchem Ger t eine Verbindung hergestellt werden soll durch den Benutzer Beim Einsatz der Bitronics Software hingegen erh lt der AutoSwitch Anweisungen vom Computer der ihm mitte...

Страница 73: ...ng eines Druckers w hlen Sie den Druckertreiber der f r diesen Drucker am betreffenden Port des Bitronics AutoSwitch genutzt wird Ist dieser Druckertreiber nicht in diesem Men aufgef hrt bedeutet dies...

Страница 74: ...d als Device Type Ger tetyp f r Port B der betreffende Treiber ausgew hlt Klicken Sie auf OK wenn Sie fertig sind Klicken Sie auf OK wenn Sie fertig sind DISPLAY NAME ist ein Feld f r wahlfreien Text...

Страница 75: ...isungen um den f r diesen Drucker eingestellten Port umzukonfigurieren Ist keines der Ger te ein Drucker k nnen Sie diesen Abschnitt berspringen und mit Seite 76 fortfahren Klicken Sie auf START EINST...

Страница 76: ...Px1 PA auto switch W hlen Sie diesen Anschlu aus wenn der Drucker an Port A des Bitronics Datenumschalters installiert ist LPx1 PB auto switch W hlen Sie diesen Anschlu aus wenn der Drucker an Port B...

Страница 77: ...tionale Unterst tzung deaktivieren falls diese Option NICHT ausgeblendet ist andernfalls brauchen Sie diesen Punkt nicht zu beachten Klicken Sie im Fenster Spool Einstellungen auf OK und dann im Fenst...

Страница 78: ...omputers die Druckereigenschaften auf und klicken Sie auf die Registerkarte Anschl sse Ports Um die Anschl sse zu finden die in Verbindung mit dem Bitronics Datenumschalter zu verwenden sind m ssen Si...

Страница 79: ...ften klicken Sie auf die Registerkarte Zeitplanung der Druckauftr ge SCHEDULING Stellen Sie sicher da Drucken beginnen nachdem letzte Seite gespoolt wurde ausgew hlt ist Au erdem mu die h chste Priori...

Страница 80: ...ch dann um alle Umschaltaufgaben Sie arbeitet VOLLAUTOMATISCH Funktionsweise Wenn die Bitronics Software installiert ist und die Anschl sse ordnungsgem f r die Drucker konfiguriert wurden so geht jede...

Страница 81: ...enumschalters gesendet Sie m ssen also nur den Drucker ausw hlen und die Software erledigt den Rest Voraussetzung ist jedoch da alle EINSTELLUNGEN korrekt sind Andernfalls wird m glicherweise auf dem...

Страница 82: ...ig auf dem Port steht an dem das Zip Laufwerk angeschlossen ist Dies ist wichtig damit Sie stets auf das Laufwerk zugreifen k nnen und keine Fehlermeldungen erhalten 1 Als Device Type Ger tetyp f r de...

Страница 83: ...Der Bitronics Datenumschalter h lt nun stets die Verbindung zwischen Ihrem PC und dem Zip Laufwerk aufrecht Auf diese Weise treten keine Fehler auf wenn Sie auf das Zip Laufwerk zugreifen Wenn Sie da...

Страница 84: ...Drucker ausdrucken wollen wechselt der Datenumschalter automatisch auf den Anschlu an dem sich der Drucker befindet und leitet den Druckauftrag durch Anschlie end bleibt jedoch die Verbindung zum Dru...

Страница 85: ...t verwenden Achten Sie aber darauf da als Anschlu f r den Druckertreiber der richtige Ger teanschlu eingestellt ist Beispiel Wenn Sie zwei Drucker ein Zip Laufwerk und einen Scanner nutzen m chten sch...

Страница 86: ...reicht haben w hlen Sie dort ECP aus 4 Folgen Sie den Anleitungen zur Speicherung der Einstellung und beenden Sie das Setup Programm AST 1 W hrend der Computer hochf hrt erscheint am Bildschirm die Au...

Страница 87: ...CP als Modus f r die Parallelschnittstelle Parallel Port Mode aus 5 Folgen Sie den Anleitungen zur Speicherung der Einstellung und beenden Sie das Setup Programm Hewlett Packard HP Pavillion PCs 1 Dr...

Страница 88: ...s Setup Programm 5 F gen Sie der Datei Autoexec bat auf dem PC das Programm Ecpon com hinzu Sie finden dieses Programm auf der CD ROM oder auf Disk 1 des Diskettensatzes IBM Aptiva Allgemeine Schritte...

Страница 89: ...uter hochf hrt erscheint am Bildschirm die Aufforderung Press F2 to enter Setup bei manchen Modellen m glicherweise auch Press F1 to enter Setup Dr cken Sie die angegebene Taste 2 W hlen Sie Advanced...

Страница 90: ...rt Bildschirmanzeige Boot Screen aufzurufen 3 Dr cken Sie F1 um das BIOS Setup aufzurufen 4 Gehen Sie mit der Pfeil nach rechts Taste zum Men Advanced 5 Rollen Sie nach unten markieren Sie Peripheral...

Страница 91: ...tional Standardwert 3 ECP erfordert IEEE 1284 Drucker Parallel kabel 7 W hlen Sie ECP aus klicken Sie auf OK um die Ergebnisse zu speichern und schlie en Sie das Fenster 8 Klicken Sie auf Yes um den C...

Страница 92: ...ch Unfall mi br uchliche unsachgem e oder fehlerhafte Verwendung oder Anwendung Ebenso ist die Gew hrleistung unwirksam wenn das Produkt ohne schriftliche Genehmigung durch Belkin ver ndert wurde oder...

Страница 93: ...ndows 95 98 and NT Mogelijkheid voor bestandsoverdracht tussen vier PC s en compatibel met Windows Direct Cable Connection LapLink en DOS Interlink Inclusief 1 8 m IEEE 1284 kabel Instelbare time out...

Страница 94: ...Ingangsstroom max 600 mA Opgenomen vermogen max 5 4 W Warmtedissipatie 0 31 BTU min Omgevingscondities Opslagtemperatuur 10 C tot 50 C Bedrijfstemperatuur 0 C tot 40 C Relatieve vochtigheid 0 tot 95 N...

Страница 95: ...issie op een PC poort vergrendeld blijft Gebruik een langere time out voor aansluitingen van scanners massageheugens en zware printertaken Aanbevolen SW2 AAN AAN 5 seconden AAN UIT 10 seconden UIT AAN...

Страница 96: ...oor positie 1 op 4 zet u dipswitch nr 1 op AAN Stel de dipswitches 2 en 3 in volgens eigen inzicht Zie de vorige pagina Verbind vervolgens de computer s het apparaat of de apparaten en de Bitronics Au...

Страница 97: ...pieptonen hoort verschijnt de BIOS prompt voor de setuproutine Nogmaals dit verschilt van computer tot computer Zie het aanhangsel van deze handleiding en of de handleiding van uw computer voor infor...

Страница 98: ...gebruikte besturingssysteem Ook moeten de software en de stuurprogramma s van het samen te gebruiken apparaat printer scanner enz op alle vier computers ge nstalleerd zijn Alleen dan kunnen alle compu...

Страница 99: ...omputers met bestandsoverdracht bijvoorbeeld A naar B bezig zijn blijft het gedeelde apparaat toe gankelijk voor computers C en D Zie onderstaande voorbeelden voor de verschillende besturingssystemen...

Страница 100: ...kunt draaien moet ook de andere computer in de stand File Tranfer staan Hieruit volgt dat u de bovenstaande procedure bij de andere computer moet herhalen Wanneer beide leds groen zijn bent u klaar om...

Страница 101: ...n apparaat tegelijk en weet niet op welk apparaat hij zich moet aansluiten tenzij de gebruiker hem dat vertelt Door middel van Bitronics software krijgt de AutoSwitch commando s van de computer om ov...

Страница 102: ...kies dan het printerstuurprogramma dat bestemd is voor die printer op die poort van de Bitronics switch Staat dit niet in dit menu dan zijn de printerstuurprogramma s niet ge nstalleerd Installeer in...

Страница 103: ...d en daarom hebben dat stuurprogramma in de DEVICE TYPE voor poort B gekozen Klik op OK als u klaar bent Klik op OK als u klaar bent DISPLAY NAME Weergavenaam is een vrij tekstvakje Hierin kunt u voor...

Страница 104: ...volg dan de onderstaande procedure om de met de printer verbonden poort opnieuw te configureren Is geen van de apparaten een printer ga dan door naar pagina 106 Klik op START SETTINGS instellingen PRI...

Страница 105: ...witch is aangesloten LPx1 PA auto switch Kies dit als de printer verbonden is met poort A van de Bitronics switch LPx1 PB auto switch Kies dit als de printer verbonden is met poort B van de Bitronics...

Страница 106: ...de laatste pagina in wachtrij geplaatst is Klik op Disable bi directional support for this printer Bi directionele ondersteuning voor deze printer uitschakelen als het keuzevakje NIET grijs is Anders...

Страница 107: ...are en het herstarten van de computer naar het menu Printer Properties en kies het tabblad Ports Poorten Om de juiste poorten die gebruikt moeten worden met de Bitronics switch te vinden doorloopt u d...

Страница 108: ...lanning voor een correcte instelling van de wachtrij instellingen Kies Start printing after last page is spooled Met printen beginnen nadat de laatste pagina in wachtrij geplaatst is Zet Priority Prio...

Страница 109: ...zijn rekening ALLES VOLLEDIG AUTOMATISCH Hoe gaat dit in zijn werk Wanneer de Bitronics software geladen is en de poorten zoals u hiervoor hebt gezien op de juiste wijze voor de printers zijn geconfi...

Страница 110: ...ch gestuurd U hoeft slechts uw printer te kiezen en de software doet de rest Bedenk echter dat ALLE INSTELLINGEN CORRECT MOETEN ZIJN of het resultaat is waarschijnlijk rommel uit de verkeerde printer...

Страница 111: ...eschakeld staat op de poort die met de Zip Drive verbonden is De switch moet continu op de Zip Drive aangesloten zijn zodat u telkens als u dat station wilt openen u inderdaad verbonden wordt en geen...

Страница 112: ...erschijnt Klik op OK De Bitronics switch zorgt nu dat uw computer permanent met de Zip Drive verbonden blijft Hierdoor vermijdt u foutmeldingen bij overschakelen naar de Zip Drive Wilt u nu gebruik ma...

Страница 113: ...verstuurt de afdruktaak De switch blijft echter met de printer verbonden anders dan het hiervoor besproken apparaat voor massaopslag schakelt hij niet naar de Scanner terug U moet deze manier van ove...

Страница 114: ...iting van een ander apparaat Zorg wel dat het printerstuurprogramma zijn poort op de juiste apparaatpoort heeft ingesteld Wanneer u bijvoorbeeld vier printers een Zip Drive en een scanner wilt gebruik...

Страница 115: ...a AST 1 Volg de aanwijzingen op het scherm terwijl de computer opstart Druk op CTRL ALT ESC om het setup programma te activeren Als u een 486 computer bezit moet u wellicht drukken op CTRL ALT DEL 2 V...

Страница 116: ...dus met de hoogste snelheid bijv ECP 5 Volg de aanwijzingen in de legenda om de instelling op te slaan en verlaat het setup programma Stappen voor PC serie HP Vectra 1 Volg de aanwijzingen op het sche...

Страница 117: ...om de setup opties te doorlopen totdat u Input Output Ports bereikt 3 Kies de modus met de hoogste snelheid bijv ECP 4 Volg de aanwijzingen van de legenda om uw keus op te slaan en verlaat het progra...

Страница 118: ...odus met de hoogste snelheid bijv ECP 5 Volg de aanwijzingen in de legenda om de instelling op te slaan en verlaat het setup programma Stappen voor de Force 443 CD AMBIOS BIOS v 1 00 12 1313oe 1 Volg...

Страница 119: ...Kies Enabled en druk op ENTER 10 Druk tweemaal op ESC om het Exit scherm te bereiken 11 Druk tweemaal op ENTER om de wijzigingen op te slaan en het scherm te verlaten Het computersysteem start nu opni...

Страница 120: ...anbrengt worden ook in de BIOS aangebracht Sony PCG 729 1 Open het startmenu in Windows 95 2 Kies Tool Center 3 Kies Sony Notebook Setup 4 Kies het tabblad Printer FDD 5 Zorg dat Use as printer connec...

Страница 121: ...oduct is ontstaan door een ongeval door opzettelijk of onopzettelijk onjuist gebruik door foutieve toepassing of door wijziging van het product zonder de nadrukkelijke toestemming van Belkin dan wel d...

Страница 122: ...o completamente automatico mediante Windows 95 98 e NT Funzione di trasferimento file tra due PC compatibili con la Direct Cable Connection Connessione Cavo Diretta Windows LapLink e DOS Interlink Com...

Страница 123: ...di ingresso max 600 mA Consumo massimo tensione 5 4 W Dissipazione massima calore 0 31 BTU min Ambiente Temperatura di stoccaggio da 10 C a 50 C Temperatura di esercizio da 0 C a 40 C Umidit relativa...

Страница 124: ...to su di una porta del PC dopo il trasferimento dei dati Utilizzare un Intervallo di Sospensione maggiore nel caso vengano collegati scanner memoria di massa e grossi lavori di stampa Consigliato SW2...

Страница 125: ...mazioni Per la modalit 4 a 1 lo switch DIP 1 impostato su SPENTO Per la modalit 1 a 4 lo switch DIP 1 impostato su ACCESO Impostare gli switch DIP 2 e 3 come preferite Si veda la pagina precedente Qui...

Страница 126: ...ato qualche secondo dopo l accensione del computer e dall emissione dei primi segnali sonori Anche in questo caso la modalit cambia da PC a PC Si vedano le Appendici e o il manuale del vostro fornitor...

Страница 127: ...ti i quattro computer anche il software ed i driver del dispositivo da condividere es stampante scanner ecc Questa condizione si rende necessaria affinch ogni computer possa accedere ed utilizzare nel...

Страница 128: ...Se una coppia di computer in fase di trasferimento file ad esempio da A a B il computer C e D hanno ancora accesso alla periferica condivisa Si veda l esempio di seguito per i diversi sistemi operativ...

Страница 129: ...e necessario impostare nella modalit Trasferimento File anche l altro computer Successivamente ripetere la procedura anche per l altro computer Quando entrambi i LED sono verdi siete pronti per avviar...

Страница 130: ...toSwitch comunica con una periferica alla volta soltanto e non sa quale periferica collegare a meno che non venga istruito dall utente Utilizzando il software Bitronics l AutoSwitch riceve i comandi d...

Страница 131: ...te usate il driver stampante utilizzato per quella particolare stampante su quella porta dello switch Bitronics Se non si trova nel menu significa che i driver della stampante in questione non sono st...

Страница 132: ...Epson quindi scegliete il rispettivo driver nel Tipo di Dispositivo per la Porta B Infine cliccate su OK VISUALIZZA NOME un campo di testo libero In esso possibile digitare qualsiasi descrizione dei...

Страница 133: ...eguire la procedura di seguito riportata per riconfigurare la porta collegata alla stampante Se nessuna delle periferiche una stampante potete passare direttamente a pag 135 Cliccate Start Avvio selez...

Страница 134: ...nte collegata sullo switch Bitronics LPx1 PA auto switch Selezionare se la stampante collegata alla Porta A dello switch Bitronics LPx1 PB auto switch Selezionare se la stampante collegata alla Porta...

Страница 135: ...rt printing after last page is spooled Se NON di colore grigio cliccare su Disable bi directional support for this printer Altrimenti ignorare Cliccare su OK nella finestra di Impostazione Spool Clicc...

Страница 136: ...ftware e riavviato il computer andare nelle propriet stampante e selezionare la linguetta PORTE Per trovare le porte giuste da utilizzare con lo switch Bitronics scorrere l elenco fino a quando compar...

Страница 137: ...er impostare i dati di spool in modo corretto cliccare sulla linguetta PROGRAMMAZIONE Accertarsi che sia selezionato Start printing after last page is spooled Quindi impostare Priority sul valore mass...

Страница 138: ...E UNA PROCEDURA COMPLETAMENTE AUTOMATICA Come funziona Una volta caricato il Software Bitronics e le rispettive porte debitamente configurate per le stampanti come precedentemente indicato quando stam...

Страница 139: ...ch Bitronics E sufficiente che selezioniate la stampante il software fa tutto il resto Ma ricordate TUTTI I SETTINGS DEVONO ESSERE CORRETTI altrimenti potreste stampare materiale non corretto dalla st...

Страница 140: ...venga rilevato di default dalla Porta collegata al drive Zip E necessario che lo switch rimanga sempre collegato al drive Zip in modo tale che ogni volta che accedete a tale drive siate sempre collega...

Страница 141: ...ito Cliccare su OK LO switch Bitronics mantiene ora sempre il vostro computer collegato al drive Zip In questo modo ogni volta che vi accedete non ricevete nessuno strano messaggio di errore Quando st...

Страница 142: ...pante ed invia il comando di stampa Tuttavia lo switch rimane collegato alla stampante non cambia per tornare allo Scanner a differenza della memoria di massa prima menzionata Questo significa che dov...

Страница 143: ...Bitronics per collegarlo ad un altro dispositivo E sufficiente accertarsi che il driver della stampante abbia la propria Porta impostata con la porta dispositivo corretta Ad esempio se volete utilizz...

Страница 144: ...ero indicarvi di premere CTRL ALT DEL 2 Seguire la legenda sulle modalit per scorrere le varie opzioni 3 Quando raggiungete l opzione Parallel Mode Port selezionare la modalit con le migliori prestazi...

Страница 145: ...zioni in legenda su come cambiare le opzioni 4 Impostare la modalit di porta con le migliori prestazioni es ECP 5 Seguire le istruzioni in legenda per salvare le impostazioni ed uscire dal Setup Passa...

Страница 146: ...VIO per salvare l impostazione ed uscire dal Setup Micron Passaggi generali 1 Mentre il computer sta caricando seguire le istruzioni sullo schermo Press F2 to enter Setup2 2 Selezionare Advanced dalla...

Страница 147: ...er 3 Premere F1 per accedere al BIOS Setup 4 Utilizzare il tasto cursore destro per raggiungere il menu Advanced 5 Scorrere ed evidenziare Peripheral Configuration e premere Enter Invio 6 Scorrere ver...

Страница 148: ...Printer FDD 6 Accertarsi che Use as printer connector sia selezionato e scegliere la modalit della porta desiderata richiesta dalla stampante Lo schermo presenta tre opzioni disponibili 1 Normal solo...

Страница 149: ...uesta garanzia non viene applicata se il prodotto stato danneggiato involontariamente o in seguito ad un utilizzo eccessivo scorretto o errato se il prodotto stato modificato senza l autorizzazione sc...

Отзывы: