background image

12 

- Belinea 10 60 75

ENGLISH

CONFIGURATION


Monitor setup under Windows

®

 9x/ME/2000 and

XP:

If using the monitor under Windows

®

 9x/ME/2000 or XP

we strongly recommend installing the Belinea settings
file. You can get this file from your Belinea dealer or
download it from the MAXDATA FTP server at

ftp.maxdata.com.

Here, click the “Belinea_Treiber_Driver” directory and
download the Belinea.inf and README_Belinea.TXT
files. Follow the installation instructions in the
README_Belinea.TXT file.

 Monitor setup under Windows

®

 NT 4.0:

Under Windows

®

 NT 4.0 no separate setup file is

required. Select the vertical frequency and the number
of colors directly from within the “Settings”, “Control
Panel”,  “Display”, “Settings” menu.

BASIC SETUP

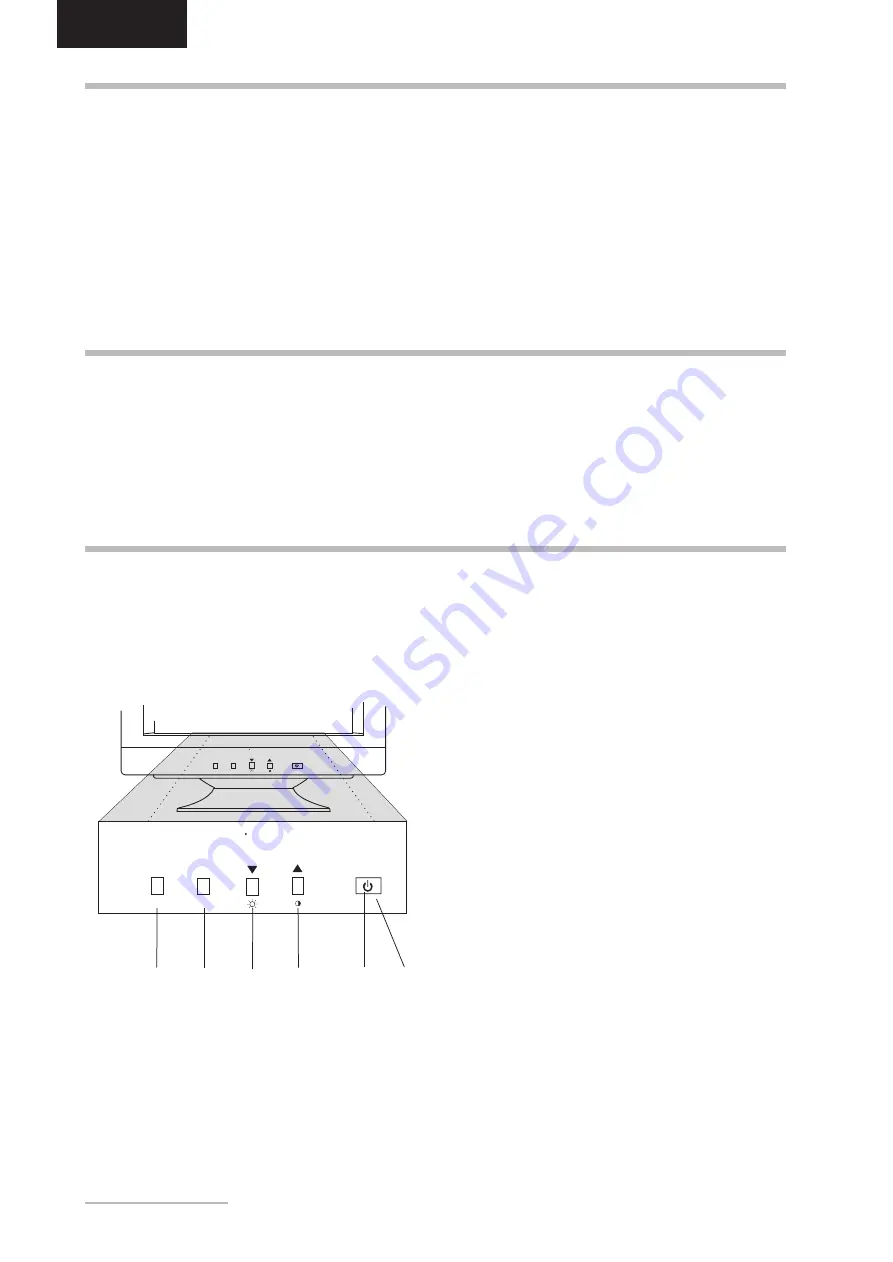
You can adjust the contrast and brightness directly by pressing the


or 

 buttons (

e

 and 

f

 in fig. 4) while the

OSD menu is not displayed. To adjust the brightness directly, press the 


button. To adjust the contrast directly,

press the 

 button.  After the corresponding OSD menu is displayed, press the 


button to increase the brightness

or contrast, or press the


 button to reduce it. Press the 

MENU

 button (

h

 in fig. 4) to close the corresponding menu.


Shortcut for adjusting contrast and brightness 

...........................................................................................

The OSD menu appears in a window on your screen. It
allows you to select the image settings you want to
change.

1.

Press the 

MENU 

button (

h

 in fig. 4) to display the

OSD menu on the screen.

2.

Select the desired function icon using the 

 and

 buttons  (

e

 and 

f

 in fig. 4,  see the following

section “OSD Menu functions”).

3.

Press the 

SELECT 

button (

g

 in fig. 4) to activate

the function.

4.

Enter the desired value by using the buttons 

 and

buttons (

e

 and 

f

 in fig. 4).

5.

To store the setting, press the 

SELECT 

button again.

Repeat steps 2-5 to make further adjustments as
needed.

6.

The OSD menu will automatically disappear if no
changes are made for more than 7 seconds. The
current settings will be saved. You can also close it
manually by pressing the 

MENU 

button.

IMAGE SETTINGS USING THE OSD MENU

Figure 4.

  Monitor features

„

‚

…

ƒ

Belnea

MENU

SELECT

Belnea

MENU

MENU

SELECT



†

Содержание 10 60 75

Страница 1: ...Gevaudan SILIC 1726 F 91017 EVRY Cedex Italy MAXDATA Italia S r l Strada 1 Palazzo F1 I 20090 Milanofiori Assago MI Poland MAXDATA Sp z o o Ursyn w Business Park Ul Pu awska 303 PL 02 785 Warszawa Sp...

Страница 2: ...ur les possibilit s d change gratuit service offert dans de nombreux pays Pour votre appel tenez les num ros de s rie et d article port e de main English Deutsch Fran ais Country Phone number Addition...

Страница 3: ...Belinea 10 60 75 DEUTSCH 2 8 ENGLISH 9 14 FRAN AIS 15 20 Revision 1 0...

Страница 4: ...Er gebnis ist eine hervorragende Bildqualit t und Farbbrillanz bei allen Belinea Modellen Zuverl ssigkeit Die bei Belinea Monitoren eingesetzten Technologien bringen Qualit t und Aktualit t in Einkla...

Страница 5: ...ein und m ssen als solche behandelt werden Umweltschutz ist auch unsere Aufgabe Dieses Handbuch wurde von der ersten bis zur letz ten Seite auf einem Papier gedruckt bei dessen Herstellung keinerlei C...

Страница 6: ...so dass die Bildbrillanz beeintr chtigt wird Hinweise zum Netzanschluss Verwenden Sie ausschlie lich das f r Ihr Land geeignete Netzkabel Die Netzsteckdose sollte sich in direkter N he befinden und le...

Страница 7: ...ate Netzkabel c in Abb 3 an den Monitor und eine Schuko Steckdose an 1 Schalten Sie zuerst den PC und anschlie end den Belinea Monitor mit der Netztaste cin Abb 4 ein Die Betriebsanzeige din Abb 4 leu...

Страница 8: ...k nnen diese ber Ihren Belinea H ndler beziehen oder vom MAXDATA FTP Server ftp maxdata com laden W hlen Sie hier die Rubrik Belinea_Treiber_Driver und laden Sie die Dateien Belinea inf und README_Bel...

Страница 9: ...anguage W hlt die Sprache des OSD Men s Englisch Deutsch Franz sisch Spanisch Italienisch Schwedisch Finnisch D nisch Portugiesisch Niederl ndisch Koreanisch Chinesisch Japanisch Rotation Korrigiert e...

Страница 10: ...pr fen Sie die Helligkeits und Kontrasteinstellung siehe Abschnitt Grundlegende Einstellungen Bei hohen Aufl sungen und Bildwiederholfrequenzen erscheint die Bilddarstellung etwas unsch rfer W hlen Si...

Страница 11: ...e laser printers loud speakers etc must not be placed close to the monitor Do not install this monitor in areas where too much light or sunshine might directly hit the screen otherwise the brightness...

Страница 12: ...ur Monitor Never open the monitor housing yourself There is a danger of electric shock and other hazards The monitor may only be opened and serviced by qualified professionals Notes on ergonomics In o...

Страница 13: ...rd toward the monitor s back Now the base should come off easily Figure 1 Monitor with tilt swivel base Power cord Signal cable built in CONNECTING To connect the monitor to the power source Connect t...

Страница 14: ...ast directly press the button After the corresponding OSD menu is displayed press the button to increase the brightness or contrast or press the button to reduce it Press the MENU button h in fig 4 to...

Страница 15: ...CT OSD button Contrast Controls the picture contrast Brightness Controls the picture brightness OSD MENU FUNCTIONS USER MODE 53 8 K 60 H SIZE 56 OSD OSD i H Size Controls the horizontal image size H P...

Страница 16: ...tup If the vertical frequency is too high the image might be slightly blurred In this case lower the frequency Color problems If the colors are off e g white is not really displayed as white etc you s...

Страница 17: ...sont consid rer comme telles TABLE DES MATI RES Guide des symboles Les symboles illustr s ci dessous sont utilis s dans ce manuel pour indiquer un risque de se blesser ou d endommager les p riph riqu...

Страница 18: ...e mettre hors service Ne placez pas le moniteur proximit d une source de chauffage par exemple un radiateur N exposez pas le moniteur des vibrations m caniques ou des secousses Positionnez le moniteur...

Страница 19: ...BALLAGE Pour raccorder le moniteur la source d alimentation lectrique Connectez le c ble d alimentation lectrique au moniteur d une part et une prise lectrique murale avec mise la terre d autre part c...

Страница 20: ...sirez modifier 1 Appuyez sur le bouton MENU h la fig 4 pour afficher le menu OSD 2 S lectionnez l ic ne de fonction souhait e l aide des boutons ou eet f la fig 4 consultez la section suivante Ic nes...

Страница 21: ...l ic ne et pressez le bouton SELECT de l OSD Contrast Modifie le contraste Brightness Modifie la luminosit FONCTIONS DU MENU OSD USER MODE 53 8 K 60 H SIZE 56 OSD OSD i H Size Permet de r gler la tail...

Страница 22: ...ction Configuration L image est floue V rifiez les r glages de luminosit et de contraste voir la section Configuration de base Si la r solution ou la fr quence verticale sont trop lev es l image peut...

Страница 23: ...ng mode after a certain time beneficial both for the user and the environment Electrical safety Emissions Electromagnetic fields Noise emissions Ecology The product must be prepared for recycling and...

Страница 24: ...Gevaudan SILIC 1726 F 91017 EVRY Cedex Italy MAXDATA Italia S r l Strada 1 Palazzo F1 I 20090 Milanofiori Assago MI Poland MAXDATA Sp z o o Ursyn w Business Park Ul Pu awska 303 PL 02 785 Warszawa Sp...

Отзывы: