background image

P

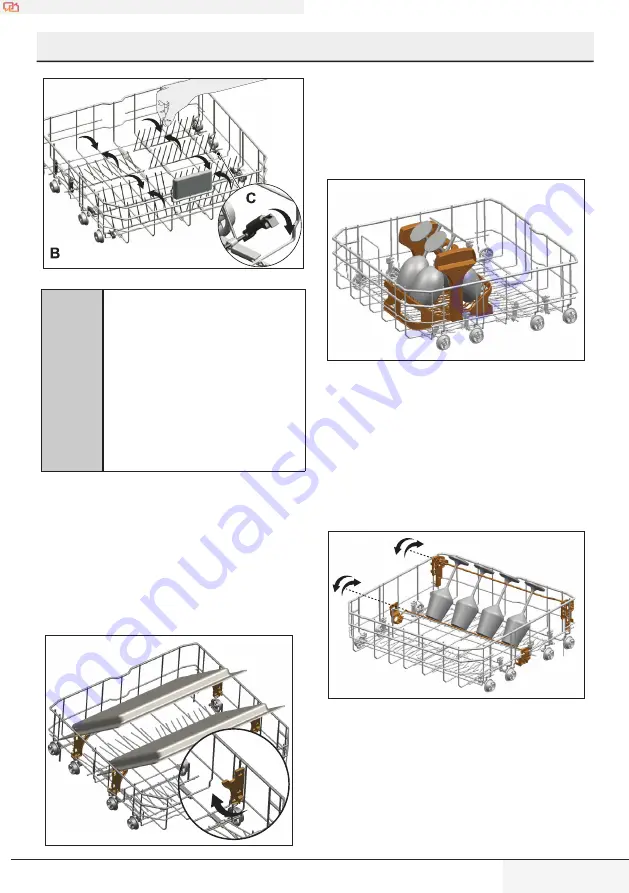
Special Glass Holder

(depending on the model)

The Special Glass Rack found in the lower 
basket of your machine guarantees safe 
washing of your fragile glasses.

VS

Putting the rods in a horizontal 
position by holding them by the 
ends can cause them to bend. 
Therefore, it would be convenient 
to arrange the middle rods in a 
horizontal or vertical position by 
holding them by their sleeves and 
pushing them in the direction of 
the arrow.

Retractable stemware 

holder

(depending on the model)

Retractable Stemware Rack found in 

the lower rack of your machine 

ensures safe washing of your 

oversized glasses and tall glasses.

Drip tray support

(depending on the model)
Use the supports to wash the trays located at 
the bottom of the basket.

Refer to the Additional Functions 

section to select the appropriate 

program or function.

23/44 EN

Translated from French to English - www.onlinedoctranslator.com

Содержание DSN15420X

Страница 1: ...Dishwasher Manual FR Document Number 15 9753 0300_AA_BEKO_A5_FR 16 01 18 8 52 Translated from French to English www onlinedoctranslator com ...

Страница 2: ...ual also corresponds to several other models This manual marks the differences between the models Explanation of symbols Throughout this User Manual the following symbols will be used VSImportant information or useful tips for use AT Warning of hazardous situations in terms of the safety of people and property B Warning in case of electric shock The product packaging is made from recyclable materi...

Страница 3: ...Dishwasher Manual FR Document Number 15 9753 0300_AA_BEKO_A5_FR 16 01 18 8 52 ...

Страница 4: ...ual also corresponds to several other models This manual marks the differences between the models Explanation of symbols Throughout this User Manual the following symbols will be used VSImportant information or useful tips for use AT Warning of hazardous situations in terms of the safety of people and property B Warning in case of electric shock The product packaging is made from recyclable materi...

Страница 5: ...e 29 Selecting programs 29 Additional functions 31 Programming the washing time 31 Starting the program 32 Program Progress Tracking 33 Canceling the program 33 Salt indicator 33 Rinse aid indicator 33 Adjusting the amount of rinse aid 33 End of the program 34 3 INSTALLATION 9 Appropriate installation location 9 Connecting the water supply 9 Adjusting the feet 10 Aquasafe 11 Electrical connection ...

Страница 6: ...askets completely the appliance door supports the entire weight of the baskets Do not put other loads on the door otherwise the appliance may tip over Never leave the appliance door open except during loading and unloading Do not open the appliance door when it is running General Safety Never install the appliance on a floor covered with carpet Otherwise lack of air circulation underneath your app...

Страница 7: ...s in hotels motels and other residential type environments bed and breakfast type environments Only safe dishwasher detergents rinse aids and additives may be used The manufacturer declines all responsibility for any problem arising from incorrect use or transport of the device Genuine spare parts are available for 10 years from the date of purchase of the product This appliance can be used by chi...

Страница 8: ...ean Parliament RoHS Directive 2011 65 EU It does not contain harmful and prohibited materials as specified in the said Directive 1 Unplug the product before transporting it 2 Remove the water inlet and drain connections Description of conditioning 3 Completely drain the remaining water from the unit Product packaging is made from recyclable materials in accordance with our National Environmental R...

Страница 9: ...5 Door 6 Rating label 7 Control panel 8 Detergent dispenser 9 Lower basket 10 Filters 11 Salt reservoir cover 12 Upper rack rail 13 Upper cutlery basket varies by model 14 Tabletop varies by model 15 Ventilation drying system depending on the model 15 Dishwasher Instructions for use 7 44 EN ...

Страница 10: ...ual are schematic and may not correspond exactly to the product VS The values presented on the product labels or in the documentation supplied with the product have been obtained in the laboratory by applying the corresponding standards These values may change depending on the operating conditions and environment of the product Fan drying system depending on the model The fan drying system ensures...

Страница 11: ...ance must be made by the authorized service agent The manufacturer will not be held liable for damage resulting from processes carried out by unauthorized persons Be sure to choose a location that will allow you to charge and unload the dishes in a fast and comfortable way Install the product in a location close to the tap and drain pipe Choose the location considering that it cannot be changed on...

Страница 12: ...htly to prevent the drain hose from moving during product operation VS Use a hose connector wrench to connect the water inlet hose to the water faucet with a 3 4 foot outside wire If necessary use a filter to filter the residue from the pipes VS The drain hose must be connected to the sewer and must not be connected to surface water Leg adjustment If the product door cannot be closed tightly or th...

Страница 13: ...ctions using extension cords or multiple sockets AT As the entire hose contains electrical connections and parts you should not shorten or lengthen the hose with extension cords B Damaged power cables must be replaced by the Authorized Service B If your dishwasher has an internal light have the bulb replaced only by an Authorized Service Agent in the event of any faults involving the bulb Electric...

Страница 14: ...ions and Installation sections To prepare the appliance for washing first run it empty on the shortest program with detergent For the first use fill the salt reservoir with 1 liter of water before filling it with salt AT A small amount of water may remain in the unit after factory quality control testing This poses no danger to the device 12 44 EN Dishwasher Instructions for use ...

Страница 15: ...er softening system is properly adjusted Set the new water hardness level following the hardness instructions provided in this manual Use the test strip supplied with the product following the steps given below to determine the water hardness level Water softening system The product is equipped with a water softening system which reduces the hardness of incoming water This system softens the water...

Страница 16: ...normal operating mode once the new setting has been saved Program selection knob rotates in 5 increments independent of machine programs 5 Press the Start Pause Cancel button once to save the level you have selected Water hardness level setting table Level of hardness English degree hardness of water dE German degree hardness of water dH French degree hardness of water dF Location of button select...

Страница 17: ... taking into account the information provided above according to the water hardness level of your new home Your machine will display the last hardness level setting 3 Add 1 liter of water to the salt reservoir of the device only when using it for the first time Adding salt The water softening system needs to be regenerated so that the app always provides the same performance Dishwasher salt is use...

Страница 18: ...detergent dispenser cover A VS Different brands of salt on the market have different particle sizes and the water hardness may vary Dissolving the salt in the water can therefore take several hours The Salt light may stay on for a while after adding salt to the appliance 2 Put the recommended amount of powder liquid gel or tablet detergent into the tank Detergent VS The detergent dispenser contain...

Страница 19: ... level mentioned 3 Push the detergent dispenser cover to close it A You will hear a click when the lid will be closed 1 VS The best washing results in the dishwasher are obtained by separately using a detergent a product of 2 3 VS Follow the detergent manufacturer s instructions on the package when using tablet detergents VS Use the powder or liquid gel detergent in short programs without pre wash...

Страница 20: ...e washed elements Therefore be sure to use rinse aid in the rinse aid container and rinse aids made specifically for dishwashers 4 If there are stains on the cutlery after washing the level should be increased and if you observe a blue trace after wiping it by hand it should be decreased It is set to level 3 as factory setting VS Adjusting the rinse aid is described in the section Adjusting the am...

Страница 21: ...l in the cutlery basket VS The decorative patterns of the porcelain elements as well as those made of aluminum or silver may be discolored or become dull after washing in the dishwasher as can happen when washing by hand Certain types of delicate glass and crystals may become dull over time We strongly recommend that you check whether the tableware you are going to buy is suitable for the dishwash...

Страница 22: ...Preperation Dishwasher Loading Suggestions Incorrect loading of the dishwasher Lower basket Upper basket Incorrect loading of the dishwasher 20 44 EN Dishwasher Instructions for use ...

Страница 23: ...ace when placing your dishes in the lower basket and free up space for your dishes of different sizes depending on the model The cutlery basket is designed to clean your cutlery such as knives forks spoons etc in a cleaner way As the cutlery basket is removable A B you can create a wider space when placing your dishes in the lower basket and free up space for your dishes of different sizes Dishwas...

Страница 24: ...n create larger spaces by folding each of the rods separately or all at once Lower basket retractable rods depending on the model The six retractable rods A located in the lower basket of the machine are designed to facilitate the storage of bulky items such as saucepans salad bowls etc You can create larger spaces by folding each of the rods separately or all at once Po po and Po con re in the la...

Страница 25: ...l position by holding them by their sleeves and pushing them in the direction of the arrow Retractable stemware holder depending on the model Retractable Stemware Rack found in the lower rack of your machine ensures safe washing of your oversized glasses and tall glasses Drip tray support depending on the model Use the supports to wash the trays located at the bottom of the basket Refer to the Add...

Страница 26: ...To close the supports 1 Fold the support A 2 Slide the stand up B 3 Put the stand in upright position VS 4 Slide the stand down and lock it with the latches D VS You can open the brackets by following the same procedure in reverse To adjust the size of the supports 1 Fold the support E 2 Slide the bracket up F 3 Open the support to the desired level G VS You can use the racks as needed by moving t...

Страница 27: ...pport depending on the model Use the lower and upper parts of the adjustable height supports in the upper basket of the appliance by sliding them up and down according to the height of glasses cups etc A B C If you want to reuse the upper basket s multi function holder you can easily attach it to the side section of your upper basket Upper basket multifunction support depending on the model This a...

Страница 28: ...ure B 2 Lower the basket from its current position to the lower position 3 Release the basket once it goes to a lower level Thanks to this mechanism v use your basket in different lower m upper 1 2 3 1 To lift your upper basket rods hands ensuring you are in position pull them up is not 2 You will hear one of the mechanics of indicating that the pan not VS Travel mechanism may not work correctly i...

Страница 29: ...horizontal position hold them in the middle and push them in the direction of the arrow shown in the figure Place your bulky dishes in the cleared space To return the rods to an upright position simply straighten them VS Putting the rods in a horizontal position by holding them by the ends can cause them to bend Therefore you must hold the rods by their sleeves while bringing them back to the hori...

Страница 30: ... the middle tray to lift up and lock the system 1 In models with partial movement function when you push the bar 1 on the handle the central tray of the basket moves to the lower position and the system unlocks Thus the trays on the right and left can be used as moving parts The free space left by the side trays makes it possible to load long pieces into the upper basket Upper cutlery basket depen...

Страница 31: ... Off position Start Pause Cancel key Used to start pause or cancel the program Delay key It is used to set the delay time 4 Place a sufficient amount of detergent in the detergent compartment 5 Check the salt and rinse aid indicators and add them if necessary 6 Close the dishwasher door Program selection 1 Press the On Off Program selection button to switch on the machine 2 Refer to the Table of p...

Страница 32: ...shing and fast for items with a degree normal dirt Suitable for lightly soiled daily dishes which has been pre cleaned Degree of dirt Average Raised Average Average Weak Prewash Washing Drying Duration min 210 120 120 58 30 Water I 11 5 17 6 16 2 11 8 11 8 Energy kWh 1 03 1 65 1 38 1 20 0 80 The consumption values given in the table were determined under standard conditions However differences may...

Страница 33: ...e washing time Timeout You can use the delay button to delay the start of the selected program for up to 9 hours Press the key Start Pause Cancel after setting delayed start After the delay the selected program will start automatically To add additional functions to the program 1 Select the desired washing program by pressing the program selection button 2 In the selected washing program if the au...

Страница 34: ...aining time is 6 hours until the start of the washing programme VS Be careful not to open the door when the machine is in operation Stop the machine by pressing the Start Pause Cancel key if you need to open the door Then open the door of the machine Steam may be released when the door is opened so be careful Close the door and press the Start Pause Cancel button again The program resumes its cour...

Страница 35: ... 1 Press and hold the Start Pause Cancel button for 3 seconds to cancel the program VS Setting the water hardness level is explained in the Water softening system section 2 Release it when the Washing and Drying lights flash The water in the machine will be drained in 45 seconds When the Washing and Drying lights go out and the End light comes on it means that the program has been cancelled You ca...

Страница 36: ...his time This action improves the drying efficiency of the machine 4 Press the Play Pause Cancel button once to save the level you have selected 5 When you turn the program selection knob back to the Off position the machine goes into normal mode Quantity of product of rinsing Location of button selection of programs Rinse Aid Setting Indicator 1 scoop of product of rinse is distributed The washin...

Страница 37: ...shing the outer surface of the product Wipe the exterior surface and door handles of the product gently with a mild cleaning agent and a damp cloth Wipe the control panel with a slightly damp cloth 2 Remove the metal plastic filter 3 from its seat Washing the inside of the device Clean the inside of the machine and the tank by running a program with or without detergent depending on the degree of ...

Страница 38: ... 4 Clean the three filters under the tap using a brush 5 Place the metal plastic filter 2 After taking out the filter wash it under running water 6 Place the large filter in the micro filter Make sure it is installed suitable way Turn the large filter clockwise until you hear a click 3 Replace the cleaned filter in its place in the pipe 4 Attach the hose to the faucet varies by model VSDo not use ...

Страница 39: ...er propeller 1 are blocked If they are remove the dirt and clean the propeller Turn its nut to the left to remove the upper propeller Make sure the nut is tight q Lower propeller Check if the holes in the lower propeller 1 are blocked If they are remove the dirt and clean the propeller You can lift the lower propeller to remove it Dishwasher Instructions for use 37 44 EN ...

Страница 40: ...ers as shown in the Cleaning and Maintenance section The filters are clogged Check if the filter system is clean Periodically clean the filter system as shown in the Cleaning and Maintenance section Filters are not placed correctly Check the filter system and make sure it is installed correctly The baskets are overloaded Do not overload the baskets beyond their capacity The detergent is stored und...

Страница 41: ...ookware with deteriorated surface and it is not hygienically desirable to use such utensils Water cannot flow easily over deteriorated surfaces It is not recommended to wash such utensils in the dishwasher VS It is normal for drying issues to occur with Teflon cookware This is related to the structure of Teflon Since the surface tension of Teflon is different from that of water the water drops rem...

Страница 42: ...shes in remove the remains on the dishes and run a Prewash program without detergent every 2 days In these cases do not completely close the door of the machine to prevent odors from arising You can also use commercially available odor removers or machine cleaners Rust discoloration or surface deterioration damages dishes There are salt leaks Salt can cause deterioration and oxidation of metal sur...

Страница 43: ...nt was added Make sure the detergent drawer is completely dry before filling it Detergent is added long before washing Be sure to add the detergent can before washing starts The detergent dispenser lid cannot be opened during washing Place the dishes so as not to prevent the lid of the detergent dispenser from opening and the water from entering the machine through the propellers The detergent is ...

Страница 44: ...r to a milk stain remains on the glasses and does not disappear when wiped off with the hand There is a bluish rainbow appearance when the glass is turned towards the light Too much rinse aid is used Reduce the rinse aid setting Clean up rinse aid that overflows when adding rinse aid Corrosion occurs on glass due to soft water Water hardness setting is low or salt level is insufficient Measure sup...

Страница 45: ...ogged Check if the filter system is clean Periodically clean the filter system as shown in the Cleaning and Maintenance section The drain hose is clogged blocked Check the drain hose If necessary remove the drain hose unblock it and reattach it as shown in the user manual VS If you cannot solve the problem by following the instructions in this section consult your supplier or Authorized Agent Neve...

Страница 46: ......

Отзывы: