background image

126

>>>

SETTINGS

Settings

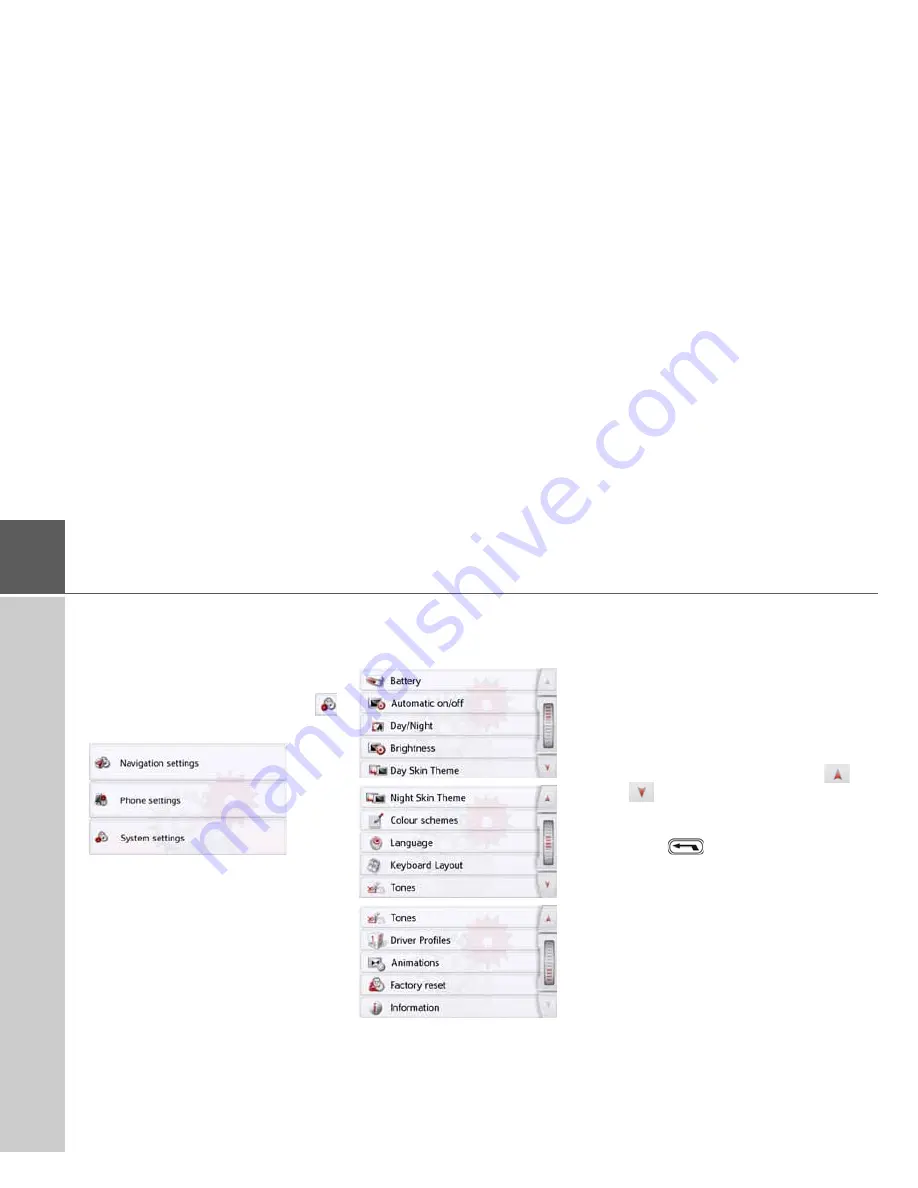
Selecting system settings

You can change various basic settings
for all applications on the Navigation
device.

>

In the main menu, press the 
button.

>

Press the 

System settings

 button.

The system settings menu is displayed.

The system settings menu

You can select the various settings
optionsfrom the system settings menu.

Operation

Selection options

Select the desired menu item by press-
ing the appropriate button. The function-
ality of the buttons varies depending on
the selection and is described under "The
individual menu items" on page127.
You can go to the next or previous page
of the settings by pressing the 

 and

 buttons.

Closing the settings menu

Press 

 to close the settings menu.

Содержание GPS Navigator

Страница 1: ...OPERATING GUIDE ...

Страница 2: ... Connection to the mains outlet 20 Connecting to power supply 20 TMC antenna depending on the model 20 GPS antenna 20 Unit antenna 20 Cable for vehicle integration depending on model optional 21 Cable for rear view camera depending on the model optional 21 Memory card 21 Inserting the memory card 22 Ejecting the memory card 22 Unit bracket 22 Fitting the unit bracket 22 On the windscreen 23 Adjust...

Страница 3: ... Additional point of interest information 53 Travel Guide model dependent 53 Selecting a destination from the map 53 Coordinate entry 54 Route planning 55 Simulation of the route 56 Creating a new route 57 Editing a route 58 Optimising a route 58 Navigation settings 59 The Map view button 59 Auto zoom 61 Select POI categories 61 Selecting Info box data fields 62 3D city view 62 The Route overview ...

Страница 4: ...and mobile homes selected models only 101 Feedback after route calculation 101 Zooming in on the map 101 Warnings with planned route 101 Warnings without planned route 102 Show route 102 Display height profile 102 Telephone mode 104 Calling up the telephone mode only selected models 104 Telephone menu only selected models 105 Dialing a number 105 Phonebook 106 Call list 108 Icons used 108 Scrollin...

Страница 5: ... profile 132 Deleting driver profile 133 Driver profile Pro model dependent 133 Service information 134 Factory settings 134 Calibration model dependent 134 WiFi settings model dependent 135 Technical terminology 136 index 138 Model overview and technical specifications 141 NOTICE 142 EU Declaration of Conformity 142 Disposal of the unit 143 Disposal of the battery 144 Duty to supply information a...

Страница 6: ... the buyer immediately after defects are discovered and must be accompanied by the initial buyer s purchase contract The warranty expires after 24 months battery 6 months neither warranty claims nor fulfilment shall effect an ex tension of the warranty period Faults resulting from improper handling incorrect installation of the unit improper noise suppression of the vehicle static charge or mechan...

Страница 7: ...rns or deviations in data Therefore you must always observe the actual road signs and traffic regulations In particular the navigation system must not be used as an orientation aid at times of poor visibility The device must only be used for its intended purpose The volume of the navigation system should be adjusted so that noises external to the vehicle are still well audible Turn the unit off im...

Страница 8: ...tions of the product are permitted any such modification leads to the loss of the operating permission Only use original BECKER accessories This way it is ensured that all relevant provisions will be met and that health risks and damages to the product are avoided Dispose of the used product or the battery according to the legal regulations in effect Improper use excludes all warranties The safety...

Страница 9: ... in vehicles Protect the product and the accessories from moisture and dirt Navigation The use of the GPS Global Positioning system eliminates the tedious process of looking in street maps The receiver antenna integrated into the product allows constant access to the navigation services outside buildings Within buildings it is currently not possible to access any navigation functions When using in...

Страница 10: ...npack the contents carefully and check them thoroughly Note Your Navigation device is delivered in a stable packaging If the packaging or its contents show the signs of serious damages you must not continue to unpack the product In such case please contact your dealer Overview of functions standard not available optional Navigation system active 5 CE BE B00 active 5 BE B01 transit 5 BE B02 active ...

Страница 11: ... packaging Handling the packaging Keep the original packaging in a dry place at least for the warranty period Description of the device The navigation device consists of the basic unit and the accessories included in the scope of delivery For descriptions of the individual parts see Overview of the scope of Delivery on page 14 1 2 3 4 2 1 2 3 4 2 4 Note The disposal must be performed in a professi...

Страница 12: ... 24 V socket in a vehicle or via the optional mains power supply unit to the 230 V mains USB connection cable With the USB connection cable provided it is possible to connect the Navigation device to a standard PC with a USB interface The integrated flash memory of the navigation device and a micro SD card that may eventually be inserted can then be addressed by the PC like a removable storage dev...

Страница 13: ...rovide a brief introduction to operating your Navigation device The most important basic functions of the Navigation device are explained in the Quick Start Guide Operating instructions A comprehensive explanation of the Navigation device functionalities is contained in these operating instructions Registration You can register your product using our software service We will then inform you of any...

Страница 14: ...Device 2 USB connection cable 3 Unit holder with carrier plate the design depending on the model 4 Cable for power supply via the vehicle cigarette lighter 12 24 Volt with integrated TMC antenna depending on the model In the case of devices with magnetic holders the carrier plate and car adapter cable form one unit 1 2 3 4 3 2 4 ...

Страница 15: ...r on the left bottom side of the screen or in the left top corner of the housing Press Back function in most applications Press and hold Open the main menu 2 Touch screen showing the main menu selected 3 Touch screen key Press activates the corresponding key command 4 Microphone depending on the model sometimes in the right top corner too 1 2 3 4 ...

Страница 16: ...ply 4 Connection for reversing camera 5 Connection for vehicle integration 1 2 3 4 5 Model dependent the arrangement of the connections can differ on the bottom side of the device Top of the unit 1 Standby switch sleep mode Underside of the unit 2 Slot for Micro SD card 3 Mini USB connection connection for power supply 4 On Off switch I O 1 2 3 4 model dependent ...

Страница 17: ...damage the rechargeable batteries and cause certain plastics to warp or melt Do not store your mobile navigation system in cold environments During operation when the unit warms up to operating temperature moisture may form internally causing damage to electronic components Do not drop your mobile navigation systemunit protectitfrom shocksand do not shake it Improper handling can damage components...

Страница 18: ...ts pixels may be visible on the display Some pixels may also appear brighter or darker However such instances do not represent a product flaw Start up Once the Navigation device has been unpacked and checked for damage the unit can be started up The individual start up steps are connect to power supply switching on the unit ensuring antenna reception if navigation is desired Power supply Note You ...

Страница 19: ...adle on the underside of the supporting plate Model dependent this step is not required on navigation devices with magnetic holders Insert the adapter into the cigarette lighter Note Note that if the battery is completely discharged it may take up to a minute before the device can be switched on again Note In the event of a defective battery please contact your authorised dealer Please do not atte...

Страница 20: ...remove the cable of the TMC antenna from the cable for the cigarette lighter Model dependent the cable cannot be disconnected on navigation devices with magnetic holders GPS antenna Unit antenna The GPS antenna is integrated into the housing Danger Make sure that your hands are not wet and that the power supply unit is dry Only connect the power supply unit to a permissible mains power supply Note...

Страница 21: ...ar view camera to your navigation device using a 4 pin 2 5mm AV cable Insert the cable into the socket provided on the back of the basic unit also see page 16 You can make the necessary settings in the chapter Rear View camera on page 118 Memory card Your Navigation device has a slot for a micro SD memory card As the map data is stored in an internal memory on the Navigation device the slot for a ...

Страница 22: ...rd and place it in the packaging while ensuring not to touch contact bar Unit bracket The Navigation device can be attached directly to the windscreen with the unit holder Fitting the unit bracket Note The Navigation device and unit bracket must not be exposed to long periods of direct sunlight Temperatures inside the vehicle of 70 C and higher may damage parts of the bracket Note Fasten the unit ...

Страница 23: ... plate onto the four retaining lugs of the unit holder Select a suitable spot to attach Loosen the fastening screw slightly Press the base with its suction surface against the windscreen Turn the unit holder such that the carrier plate is positioned roughly in the desired viewing direction Press the lever down The holder has attached itself firmly to the windscreen It can now be adjusted with prec...

Страница 24: ...of the carrier plate This unlocks the Navigation device which can be removed from the carrier plate Devices with magnetic holders The unlocking button is not present First place the navigation device with the upper mounting point onto the carrier plate and fold down the navigation device The magnet holds the navigation device securely on the carrier plate To remove the navigation device first take...

Страница 25: ...ment is given Confirm your selection by pressing the OK button The following prompt appears shortly afterwards If you agree to the request contained in this prompt press the OK button Switching off depending on model You can switch the unit off at any time Press the button on the top of the Navigation device The Navigation device switches to sleep mode Before finally switching off the naviga tion ...

Страница 26: ...nction is started from the menu see also page 134 Note We recommend that you place the Navigation device in sleep mode in the event of short interruptions to operation of up to a week This significantly reduces the switch on time and the Navigation device finds the satellites required for navigation much faster If route guidance was active when sleep mode is activated it is automatically resumed i...

Страница 27: ...tains further information and operating options You can tell whether a telephone is already connected by the symbol on the Phone button Telephone connected Telephone not connected A satellite symbol at the right of the status line shows you whether there is currently GPS reception or not GPS reception No GPS reception If route guidance is already active the current destination address and a button...

Страница 28: ... the process is concluded by pressing the key and the entry passed on to the Navigation device for processing When a navigation destination is entered the Navigation device compares the data with the stored data Only those letters that are still possible area vailable for selection Characters that cannot be selected are displayed greyed out Accepting proposals During entry the Navigation device ma...

Страница 29: ...nd UE if necessary If for example you are looking for the location Würzburg then simply press WUERZBURG or WURZBURG Special characters can be useful when naming destinations and routes In order to switch to the special characters keyboard press the button marked with an arrow The special characters keyboard is displayed Enter the desired special character After you enter a character the Naviga tio...

Страница 30: ...tton marked with an arrow Switching between upper and lower case During free text entry it is possible to switch between upper lower case and the automatic function Press repeatedly on the button in the top right hand corner of the display until the desired method of entry is activated The inscription on the button symbolises the method of entry The button represents automatic mode This means that...

Страница 31: ...l The main menu is displayed by pressing and holding the button Content Manager The Content Manager is a PC based application containing a number of important functions to help you manage the content on your Navigation device With the Content Manager you can back up the content saved on the Navigation device to your PC and restore it later to your Navigation device download current content from th...

Страница 32: ...owse and define another folder Click on Install to start the copying procedure Click on Details to see the details during copying The Content Manager is automatically started immediately after installation Remove the check mark from the box if you do not want this This completes the installation proce dure Click on Finish to exit the installation program Starting the Content Manager Execute the fo...

Страница 33: ...cal update the Exit button will be shown instead of the No button You must install the new version otherwise you have to exit the application If you have not yet made a backup of the navigation unit the Content Manager will ask you each time it starts whether you would like to make a complete or partial backup copy Transferring pictures Images music and videos can be stored on a separate Micro SD ...

Страница 34: ...evice using the On Off switch If the messages reappear or the unit doesnot function correctly for any other reason please contact your local dealer You can also try to find a solution to your problem in the FAQ in the Support area on the Becker homepage www mybecker com Note Never attempt to open the unit yourself Please contact your authorised dealer if you are unable to remedy the fault ...

Страница 35: ...bove sea level can be calculated if signals are received from four or more satellites The Navigation device determines the direction and distance from the destination using a navigation computer and a digital street map held in its internal memory For safety reasons route guidance is given predominantly in spoken form This is supported by a direction indicator and a map display on the touch screen...

Страница 36: ...stination as described under The New destination menu on page 41 If you have already entered your home address you can start route guidance to your home address in the first line A home address once entered can be modified later In the My destinations menu next to the Home option press the button Press the Change button to enter a new home address The menu for selecting the destination appears Not...

Страница 37: ... up using the fast access function The destination list The destination list displays line by line all destinations available for fast dialling Each line of the destination list is divided into two fields Each list field is designed as a button The destination is shown on the right hand button and the properties of the destination are displayed using the left icon Note Up to 200 of the most recent...

Страница 38: ... button to the left of the desired destination A selection menu appears Icon Meaning Thisdestinationisastandard destination with no special features This destination is protected If the destination memory is full this destination will not automatically be deleted This can be performed manually if required In the case of a protected entry you can also determine the position using the fast access fu...

Страница 39: ...evice and start route guid ance to one In the main menu press the button My destinations Press the Personal destinations button Remove protection The protection is re moved from the desti nation This function is only available for pro tected destinations Move up The destination is moved forwards by one position If the destina tion is moved it is auto matically protected Move down The destination i...

Страница 40: ... chosen destination on the map On map store it in fast access mode Save display the route to the destination Show route or call the number if a telephone is connected and a phone number is available by pressing the button with the symbol Selecting a destination from Contacts You can call up Microsoft Outlook contacts that have been imported into the Navigation device and start route guidance to on...

Страница 41: ...he address shown for the contact on the map On map store itin fast access mode Save display the route to the destination Show route or call the number displayed if a phone number is provided button with the symbol If there are a number of addresses provided for the chosen contact you can select one of them after pressing the button If there are a number of phone numbers provided for the chosen con...

Страница 42: ...there See Travel Guide model dependent on page 53 Select on map With the button Select on map you can select a destination directly on the map and start route guidance See Selecting a destination from the map on page 53 Enter geo coordinates The geographic coordinates for a destination can be entered and route guidance started via the Enter geo coordinates button See Coordinate entry on page 54 Ro...

Страница 43: ...ation address in the address input menu The following settings can be made in the address input menu Town Zip code or postal code Street and house number Junctions as an orientation aid It is also possible to search for a point of interest near to the address entered POI search This can be entered as described under Point of interest near to an address on page 51 save the destination in fast acces...

Страница 44: ...When sufficient letters have been entered it will automatically switch to a list from which you can select the town However you can switch to the list before this by pressing the button Using the town list Once a few letters of the desired town have been entered you can display a list of all the towns with the relevant letter combinations or this list will be displayed automatically Press the butt...

Страница 45: ...t Once a few letters of the desired street have been entered you can display a list of all the streets with the relevant letter combinations or this list will be displayed automatically Press the button on the right of the screen to call up the street list You can scroll through the displayed list using the buttons Press the button for the desired street Selecting the Intersection After entering t...

Страница 46: ...e Start button The other options on this screen are described under Displaying the whole route on page 93 Storing a destination In the address input menu the Save button opens a menu where a name can be entered for the specified destination If the desired name has been entered and has been pressed to accept it the destination is transferred to fast access mode and protected Starting navigation The...

Страница 47: ...ered you will be asked whether the new destination should replace the old destination or the waypoint Select Replace stopover or Replace old destination Note The symbols above the progress bar refer to restrictions that you may have activated e g unpaved roads toll roads Note If there is no GPS signal when the route is calculated the following will be displayed When a GPS signal is available the r...

Страница 48: ...lay the route or store the address as described on page 46 Notes Only one address can be entered using the voice entry function Lists for more precise selection cannot be operated using speech The destination country cannot be entered using speech The symbol in the list of countries indicates the countries for which address entry using speech is possible If entry using speech is not possible the b...

Страница 49: ... Live POI Search your Becker navigation device establishes a connec tion to our live Server You have access to millions of addresses in Europe You can choose between A Live POI Search in the vicinity A Live POI Search near to an address A Live POI Search near to a destination Subsequent operation is similar to how it is described in the chapter entitled Points of interest on page 49 except that no...

Страница 50: ...the scroll wheel to scroll through the list displayed Select one of the available categories For some categories e g petrol stations a further selection menu is displayed in which you can narrow down the choice further e g by brand If you have selected the category any points of interest belonging to the relevant category and available within the area in question will now be displayed The name dis...

Страница 51: ...untry In the City or Code field enter the town where you wish to search for a point of interest Press the Select category button The available Points of interest categories for the city entered will be displayed Select the desired point of interest as described under Point of interest in the vicinity on page 50 Press the Start button to begin route guidance to the point of interest directly Howeve...

Страница 52: ...ter the desired point of interest or part of the name Press the button The Navigation device displays in a list all the points of interest corresponding to the name entered Select the desired destination in the list You will now receive additional informa tion about your chosen destination Press the Start to begin route guidance to the point of interest straight away However you can also display y...

Страница 53: ...n a similar fashion to the Enter point of interest function see also page 42 The Travel Guide for Berlin is already pre installed All travel guides are available in 5 languages D E I S F Other languages are represented in English Additional cities can be purchased from the ContentManager see also page 31 Selecting a destination from the map You may also select a destination directly from the displ...

Страница 54: ... select a new destination by touching the map even during the route guidance in progress in order to insert a stopover or to replace the old destination When touching the display a compass appears with arrows to adjust the horizontal display and the vertical display angle of the map This function is described on page 90 Coordinate entry You can also enter your destination using geographic coordina...

Страница 55: ...n points for the desired route It is then possible to travel to these points consecutively without having to enter any further information You can also optimise the destination points entered and in so doing change their order In the main menu press the button New destination Press the Route planning button In the route menu you can create a new route by pressing the Create new route button Previo...

Страница 56: ...uidance for this route You can call up the route options using the Options button Simulation of the route There is a play button on the left under the map used to start a simulation of the route If you touch the display after starting a control bar is displayed at the top with control buttons for the simulation You can pause the simulation with the button and continue it with the button The button...

Страница 57: ...tions button In the input menu press the OK button to accept the relevant intermediate destination Press Add stage to enter further intermediate destinations as described above When you have entered all intermedi ate destinations press the Done button Give the route a name of your choice The stage menu for the new route will be displayed Notice depending on model Here you can define a loading time...

Страница 58: ...he route Press Optimise The route is optimised and recalculated The optimised route is displayed Option Meaning Show details The data relating to the intermediatedestination is displayed From this screen you can display the intermediate destination on the map Entering loading time You can define the ex pected loading time This is necessary in or der to display the most accurate expected arriv al t...

Страница 59: ... buttons or the scroll wheel The Map view button You can select whether the map is to be displayed in 3D or 2D mode in a split screen with 3D or 2D display or in arrow mode You can also select whether or not 3D buildings available in towns should be displayed in 3D mode Further setting options are available to you in the extended settings Press the Map view button in the settings menu The Map view...

Страница 60: ...ct how the map changes when approaching an action point or at different speed Select POI categories You can select which symbols are displayed for points of interest on the map Infobox data fields In this menu you can define the data to be displayed in the Info box in the top left corner of the map view You can select between Speed Speed limit Time and Height 3D City models You can select whether ...

Страница 61: ...function on or off When the zoom function is switched on you can select whether the autozoom action should be weak medium or strong Select POI categories You can select which POI symbols are to be displayed on the map Press the Select POI categories button in the extended settings Selecting Show all POIs displays all points of interest on the map Selecting Show no POIs displays no points of intere...

Страница 62: ...ow appears Touch the first field to select one of the possible options An options list appears on the right side over the window After selecting a route cell with route the following display options are availa ble Distance Remaining time Arrival time Speed Speed limit Time and Height Under these options you can select displays for the travel without a selected route Here you can only select betwee...

Страница 63: ...s The Route Overview displays the Points of Interest selected in the POI Categories menu The display is recalculated every two minutes Activate the option TMC On Route The Route Overview in the map view displays TMC announcements Press the Select POI Categories button The Select POI Categories window is opened Three point of interest catego ries can be selected If you touch the preset option of on...

Страница 64: ...p you to avoid traffic jams or traffic disrup tions The responsive ness can be adjusted with 3 sensitivity set tings Parking Assistant If this function is acti vated theAssistantwill help you to choose a car park at the destina tion ExitAssistant If this function is acti vated theAssistantwill help you if you leave the motorway unex pectedly Setting Meaning Country info When this function is enabl...

Страница 65: ...s the Route options button The Route options settings window appears Selecting the vehicle profile depending on model This setting influences the calculation of the expected time of arrival and blocks e g motorways for the bicycle setting Select the mode of travel or the required vehicle profile after pressing the Vehicle button Tunnel View If this function is activated you will see a three dimens...

Страница 66: ...peed menu with the back button Exit the vehicle selection menu too with the back button The selected vehicle type is now displayed The required profile is displayed once selected Truck and mobile home functions depending on model You can select or set the vehicle profile For the truck profiles depending on the model you can define or select dimen sions weight number of axles etc Once the appropria...

Страница 67: ...neral truck profile You can now set the selected profile With this button you can set the size of the truck With this button you can set whether the truck has a trailer and how many axles there are With this button you can set the maximum permissible weight as well as the actual weight With this button you can set the haz ardous materials class of the truck Use this button to select tunnel rest ri...

Страница 68: ...ton for the trailer and axle settings Use the button to select whether there is a trailer or not Select the total number of axles Confirm your settings by selecting Setting weight In the profile settings press the button for setting the weight Press the button next to the weight to be entered An entry menu will appear Enter the desired weight Confirm the entry in the entry menu by pressing Once yo...

Страница 69: ...electing vehicle category and name Once you have changed one of the truck profiles you have the option to enter the displayed truck symbol and name Press the button to enter another name The entry menu will appear Enter the desired name Confirm the entry in the entry menu by pressing The name is changed Press the button to change the displayed symbol Select the desired symbol The new ve hicle cate...

Страница 70: ...lculation You can set one of the following options for each of these road types Confirm your selection in the Route options window ny pressing the OK button Option Meaning Fast route With this option the fastest route in terms of travel time is calculated Economical route With this option the most economical route in terms of travel time and mileage is calculated taking into consideration further ...

Страница 71: ...played instead of TMC The traffic announcements will always then be retrieved updated from the serv er The settings are the same as de scribed in the chapter entitled TMC Setting Meaning Rerouting This button allows you to choose whether the route change should be made Never Automatically or Manually See Taking announcements into consideration when calculating routes on page 83 The setting Never i...

Страница 72: ...trol To do this select the interior volume level suitable for your vehicle With the Dynamic setting selected models the interior noise is meas ured with the aid of the integrated mi crophone the volume is then continually adjusted depending on the noise level Announce streets Using the Announce streets button you can switch the announcement of the names of streets into which you are to turn on or ...

Страница 73: ...he situation this setting can be fitted into the map display In the Voice guidance settings window press the Volume button The Volume settings window appears Select the desired volume with the and buttons or the scroll wheel The voice output can be switched off completely or turned back on by pressing the Mute button Confirm your settings by pressing the button The Warnings button In the Warnings ...

Страница 74: ...s Setting Driver alerts If this information is saved in the map material and is supported by your navigation device you can display information signs e g for dangerous bends or descending gradients In addition you can define whether the display of the sign is also to be accompanied by a warning sound In the Warnings settings window press the Driver alerts button The Driver alerts settings window a...

Страница 75: ...hat this in formation is saved in the card material and is supported by your navigation sys tem This function can be activated or deactivated By pressing the symbol with the bell you can set the audible warning signal audible warning signal activated Confirm your settings by pressing the button Truck warnings depending on model You can let yourself be warned about en vironmental zones provided tha...

Страница 76: ... road works for example The traffic situation and the local road signs take precedence over the navigation system information Setting Meaning Show signs Select whether speed limits are never displayed always displayed or only displayed if the limit is exceeded Furthermore you can select whether the sign should blink when exceeding the speed limit by selecting Always or If speed limit is exceeded I...

Страница 77: ...week Press the buttons with the days on which the road should not be blocked Press the clock symbol under one of the days and limit the block of this day to the required time of the day You can now set whether or not the road should be blocked for each day of the week Confirm your settings by pressing the back button or Press the button under one of the days and set up to two times when the road s...

Страница 78: ...he value can be giv en to one decimal point Confirm your entry by pressing the OK button Press the Extra urban button to enter the average fuel consumption of the vehicle outside cities This can be entered as described for the In city value Press the Type of engine button to set your engine type The display changes by pressing the button repeatedly You can select Petrol Diesel and Hybrid as the en...

Страница 79: ...rtant for the correct calculation of the estimated time of arrival Press Time in the settings menu The Time settings window appears Using the Time zone you can set whether the time zone should be set automati cally by the Navigation device or not Use auto time zone on or Use auto time zone off If the automatic function is switched off you can select the desired time zone by pressing the button bel...

Страница 80: ...te to the destination See The TMC button on page 71 Live Traffic Traffic Announce ments via Data Connection model dependent Your navigation device can receive traffic announcements from a server via a data connection These announcements are more up to date than data received via TMC and are also available more quickly There must also be an appropriate data connection Subsequent use of the traffic ...

Страница 81: ...vigation device will re ceive up to date traffic announcements It is then possible to calculate dynamic routes traffic jam diversion You can also view traffic announcements directly Settings for TMC can be made as described under The TMC button on page 71 In the main menu press the button The map overview appears Notice The data transmission via your mobile phone may involve additional costs de pe...

Страница 82: ...he sign Traffic announcements received via Premium TMC are indicated by the symbol A red twisted arrow next to the traffic report warns for traffic jams that need to be avoided If the arrow is grey and crossed in red colour there is no sensible byroad available to avoid the traffic jam Reading a message Press on the desired message in the list The message display appears on the top of the screen w...

Страница 83: ...raffic announcement affects your route a window with detailed informa tion on the traffic announcement ap pears If after displaying the traffic message the navigation system detects that a sensible alternative route is possible the following display appears The display provides you with an overview of the alternative route calculated The red route or route marked blue for an obstruction shows the ...

Страница 84: ...n the settings made in Map display options on page 93 or in The Map view button on page 59 and whether route guidance is active or not Map display without route guidance If the navigation is not active almost the whole area of the touch screen will be taken up by the map Speed limit on the road currently being driven on display not available for all roads signs for the driver alerts will also be d...

Страница 85: ...ed on the map via the position icon The Information box During route guidance you can have information displayed in the Info box If you press the Info box again more or less fields are displayed At least one field and a maximum of three fields can be displayed The information displayed depends on the settings that are selected in the Navigation settings in the map view menu Advanced Info box data ...

Страница 86: ...lerts will also be displayed Driver alerts depending on the model Zoom buttons Vehicle position Power level telephone status depending on the model Button for calling up the options Traffic lane recommendation only appears on some multi lane roads green arrows recommended lanes Next driving maneuver Current street or street to which the next driving maneuver leads Distance to the next driving mane...

Страница 87: ...settings Lane Assistant Pro 3D model dependent You can display an animated realistic representation of the lane at many junc tions To do this switch on the function Lane Assistant Pro 3D as described un der The Guidance info button on page 64 At selected complex junctions you will be shown exactly which lane you have to change to You can leave the Lane Assistant Pro 3D again by touching the displa...

Страница 88: ...an be repeated with updated information Press the speaker symbol in the preview area while route guidance is active The last announcement is be repeated with updated information The volume is also displayed If the preview area is reduced and no speaker symbol is displayed the announcement can be spoken again if you press the preview area Note The tunnel view and the intersection view can be deacti...

Страница 89: ...speaker symbol in the preview area to mute the voice again The bar display disappears again automatically after a short while if no button is pressed Map zooming The map can be zoomed into in steps by using the zoom buttons Press the button The zoom buttons are displayed Press zoom in to zoom in on the map and therefore to get closer to the details displayed Press zoom out to zoom out from the map...

Страница 90: ...e display a little longer Apart from the pulsating point a compass and two arrow buttons pointing to the left and right appear on the top edge of the screen Press the and buttons to rotate the map towards the desired compass direction You can orient the map for example in the direction of travel If you have selected a 3D display for the map view the vertical display angle can be adjusted too Press...

Страница 91: ...isplayed Press one or more buttons to display TMC events or POIs A list of POIs and if applicable TMC events is displayed with the expected arrival time and distance from the current vehicle position Press the desired Point of Interest or TMC event Information such as the address and the telephone number of the POIs or the type of traffic obstruction are displayed From this view all actions alread...

Страница 92: ...ed on page 84 The Park Assistant This assistant will be activated when you are near the destination or passed by the destination In the case when the driver is looking for a parking place the symbol is activated as soon as it is possible to park in the given point of interest Up to eight parking possibilities may be displayed where the route to there and the footpath from the parking lot to the de...

Страница 93: ...selecting a function or by pressing the button Displaying the whole route Only available when route guidance is active You can have the whole route to the destination displayed on the map Additionally you can have a complete route description displayed As a further option you can display and if needed select the different routes that can be set in the Route options Call up the options menu for the...

Страница 94: ...displayed immediately under neath You can set the route options using the Options button By pressing the Play button the whole route can be simulated The control elements that are displayed by touching the screen shortly allow you to play the simulation in up to 16x speed or to step from route section to route section The simulation can be stopped by pressing the back button Route description When...

Страница 95: ...imes is descri bed on page 124 Selecting alternative routes You can have the different routes displayed by the navigation device When the whole route is displayed press the Alternative routes button This function can be selected in the Route overview too After a short time the map is displayed Each route is calculated after each other and displayed on the map On the right hand side you can see the...

Страница 96: ...nce button This cancels route guidance to all destinations Entering deleting a stopover Only available when route guidance is active With this function you can enter a stopover or you can delete an entered stopover Call up the options menu for the map display Press the Add stopover button You can now enter a stopover as described under The New destination menu on page 41 Enter address Select Point...

Страница 97: ...uttons If route guidance is active you can select a road length between 200 m and 50 km As soon as you selected the stretch a new route will be calculated Furthermore the distance and time difference are also displayed in the lower part of the display Notes The selected length of the block is only an approximation since the actual distance blocked depends on the availability of an exit Notes If ro...

Страница 98: ... for the map display Press the Where Am button The current position is displayed If possible an address is displayed If no address is available for the current position the geographic coordinates are displayed With the Emergency call button you can make an emergency call under the Eu rope wide standard emergency call number 112 depending on model if a mobile telephone is connected to your navigati...

Страница 99: ... button you can display country specific information such as the maximum permitted speed for the country you are currently in By pressing GPS info you can view information regarding the GPS reception You can see how many satellites are being received and whether the satellite reception is good enough for navigation The current time and the geographic position are also displayed Entering the destin...

Страница 100: ...the colour key for the individual routes the mileage for each route and the estimated driving time You can select the desired route by pressing the buttons on the right Skipping a destination If a planned route with several destina tions is active you may delete the cur rent destination of the route Route guid ance to the next destination is then started This may be necessary if a destination was ...

Страница 101: ... or to re turn to the last entry Press the Next button to start the naviga tion The following is displayed for each re striction A graphic for the restriction The distance from the current posi tion A description of the restriction When you select a restriction the corre sponding section will be displayed on the map Zooming in on the map You can gradually zoom in and out of the map using the Zoom ...

Страница 102: ...oute You can display the route on the screen once you have entered a destination If a different route has been selected on the basis of a profile setting vehicle dimen sions weight dangerous goods the section of road being avoided because of this is shown in blue On the avoided blue route the restric tions are displayed with signs Select a traffic sign on the map to display a de tailed view of the...

Страница 103: ...tions are available for al ternative routes Press the Next and Previous buttons to highlight the in dividual height profiles The height pro files and their associated alternative routes on the right hand side of the screen are displayed in the same colour Once you have decided on a route use the buttons on the right to select it ...

Страница 104: ...igation device is already connected to a cell phone the telephone menu is displayed If Bluetooth is not activated upon calling up the telephone function the system will prompt you to switch Bluetooth on Press the Yes button to activate Bluetooth Note For some cell phones equipped with Bluetooth wireless technology it is possible that some of the functions described are not available The following ...

Страница 105: ... from the phonebook to display the telephone book to call up the call list To search for Buetooth telephones To disconnect the connection to a cell phone If Bluetooth is activated and the Navigation device is already connected to a cell phone the telephone menu is displayed after the telephone function is called up In the upper area of the telephone menu the signal strength of the cell phone the c...

Страница 106: ...ess the Dial button Press the Phone book button If there are more than 10 entries in the phonebook an input menu is displayed If there are less than 10 entries a list with the entries will be displayed directly Note Press the button to delete the characters entered Note Be aware that it may take several minutes to transfer the phonebook If the cell phone whose phonebook was already loaded is recon...

Страница 107: ... phone number The Navigation device then attempts to establish a connection to the phone number selected You can find out how to continue operation in Telephone calls on page 113 Note For example if you entered the letters M and I the entries are displayed whoselastnames or firstnames start with MI Thatmeans Miller John or Bauer Michael You may enter the first letter of the last name and then ente...

Страница 108: ...call list is divided into fields Each list field is designed as a button On the right button the number name is displayed and the features of the entry are displayed with the left icon Icons used The following icons are used in the call list Scrolling through the call list Using the buttons you can scroll through the call list in the corre sponding direction of the arrow Notes The last 100 numbers...

Страница 109: ...sing the Missed Received and Dialled buttons Using the buttons you can scroll through the list in the corresponding direction of the arrow To initiate a call press the button with the entry you want Selection Meaning Show details The data for the entry is displayed number and name time and date of call if available Move up Move down The entry is moved one position forwards backwards Delete entry T...

Страница 110: ...nes that were already connected to the Navigation device Each line of the device list is divided into two fields Each list field is designed as a button On the right button the device is named and its features are displayed with the left icon You can call up a menu by pressing the icon Note If you have not yet established any connections to cell phones then the list is empty Icon Meaning This devi...

Страница 111: ... Bluetooth phones button The search starts During the search any devices found are displayed and you may cancel the search by pressing the Stop search button After the search or after you press the Stop search a list of the devices found is displayed Then select the name of the cell phone to be connected The Navigation device will then attempt to establish the connection On the cell phone the pass...

Страница 112: ... dis played Connecting a mobile phone You can also attempt to establish a connection to the Navigation device from the mobile phone If a request is received from a mobile phone that has not yet been connected you will be asked whether you wish to allow the connection Press the Yes button to permit the connection Enter the displayed password four zeros on the mobile phone The connection will be est...

Страница 113: ...ging tone will sound Also the following is displayed If available the phone number and name of the caller are displayed For incoming calls you have several operating options If you have switched on the automatic call acceptance as described in Automatic call acceptance on page 116 the time to call acceptance is also displayed for the Accept button Selection Meaning Accept The call is accepted The ...

Страница 114: ...rty are displayed If route guidance is active then you will receive the navigation instructions with arrows on the call screen To call the options menu of the call screen press the Options button Volume By pressing the Volume you can call the volume adjustment See Telephone volume on page 116 Microphone off Microphone on For a private conversation in a vehicle you can switch off the microphone of ...

Страница 115: ... Press the Hands free button to make and receive calls again via the Navigation device prior to ending the call Telephone settings The telephone settings include all the settings relevant for the telephone mode In the main menu press the button Press the Phone settings button You will branch to the menu for the telephone settings Start In the menu various pages with the functions are available You...

Страница 116: ...e With this function you can set whether or not or after which time an incoming call is accepted automatically In the settings menu press the Answer call automatically button Select whether incoming calls will be accepted automatically after 3 5 or 10 seconds If you select Off the function is switched off Telephone volume With this function you can set the volume of the ringtone and the volume of ...

Страница 117: ...press the Refresh button Be aware that it may take several minutes to load the phonebook Bluetooth name With this function you can assign a name for your Navigation device This assigned name will then be displayed by other Bluetooth devices In the settings menu press the Bluetooth name button Enter the desired name Confirm the name entered by pressing the OK button ...

Страница 118: ...e model dependent on page 53 Rear View camera Displaying Rear view camera depending on the model When a reversing camera is connec ted to your navigation system and the reversing camera setting is set to Ma nual see Rear view camera depen ding on the model auf Seite 131 you can display the image of the reversing camera on your navigation system via the button Show rear view camera Press the button...

Страница 119: ...aining images Thumbnails of the images in the current folder View the previous page of images folders Go up one level in the directory hierarchy View the next page of images folders Selecting an image In the image viewer menu select the desired folder and then the desired image You can use the and buttons to scroll through the pages of images and folders The selected image is displayed along with ...

Страница 120: ...age menu Press the Zoom button Move the control on the top of the screen to the desired level of magnifi cation The image can then be moved around Press the centre of the image to cancel the enlargement Rotating the picture Show the image menu Press the Rotate button until the image is in the desired orientation Press the centre of the image to hide the image menu again Displaying image informatio...

Страница 121: ...he transition effects for the images In Load pictures in high quality slower you can choose whether images should be loaded at high resolution or not Loading the images at high resolution makes the display slower Confirm your settings by pressing the back button Where am I See Displaying current position Where am I on page 98 Traffic forecast depending on model With the traffic forecast you can ob...

Страница 122: ...y country specific information for numerous countries maximum permit ted speed alcohol limits etc Press the Country information button The list of countries is displayed Press the button for the desired country The country specific information is displayed maximum permitted speed alcohol limits etc Below you will find a description of the symbols used Note Please note that the information may not ...

Страница 123: ... the start and end point of the section to be blocked by touching the map The points will be marked by the letters A and B Define the direction of blockage for the road section from A to B or from B to A Additionally you can display a list of permanent blockages already defined on the map Select the desired blocked road by pressing in order to set the blockage times Symbol Meaning Speed limit in b...

Страница 124: ...button to set a block for an entire day Press the Use setting for button to also use the block on other days Press again the back button to confirm the settings and to exit the menu Trip computer depending on model The Trip computer provides a data display with average speeds maximum speeds etc and a stopwatch with the option to record laps In the main menu press Extras Press the Trip computer but...

Страница 125: ...ecord up to 300 laps in the same way Press the Stop button to stop the recording The time continues if you press the Start button again after stopping the recording Press the Reset button to delete all recordings and reset all times to zero You can display the individual laps in list form using the List view button Press the Delete list button to delete the recorded laps 6 7 8 9 9 Notes The second...

Страница 126: ...settings menu You can select the various settings optionsfrom the system settings menu Operation Selection options Select the desired menu item by press ing the appropriate button The function ality of the buttons varies depending on the selection and is described under The individual menu items on page127 You can go to the next or previous page of the settings by pressing the and buttons Closing ...

Страница 127: ...isplay and shows the settings menu Automatic on off The Navigation device can switch automatically to sleep mode when the vehicle ignition is switched off Prerequisite for this The Navigation device must be connected to the vehicle cigarette lighter see also page 19 The cigarette lighter is de energized after the ignition is switched off The relevant function can be switched on at the Navigation d...

Страница 128: ...tween day and night display de pending on the time the current position and the time of year With the following button you can call up the setting Press the Day Night button Select from Automatic Day and Night The desired function is activated and the system settings are displayed Brightness You can set the brightness of the display separately for day and night display With the following button yo...

Страница 129: ...ing the day Confirm your selection by pressing the back button Design by night Two schemes with different contrasts are available to select for the map display at night Press the Design by night button Select the option on the bottom to set a lighter night display for the map view Select the option on the top to reset the darker standard preset night display for the map view Confirm your selection...

Страница 130: ...utton is labelled with the language name and the associated national flag Scrolling Using the buttons or the scroll wheel it is possible to scroll through the list in the direction of the relevant arrow Selecting the language Press the button for the required language The selection is confirmed by pressing the back button The selection list for the voice is displayed Using the buttons or the scrol...

Страница 131: ...ptio nal on page21 you can display the image of the rear view camera on your navigation system Press the button rear view camera You can choose from the following options Screen animations You can switch the animated screen changes on and off Press the animations key Depending on the previous setting you will either switch the animated screen changes on or off Top icon animations switched on Botto...

Страница 132: ... be named in dividually This function can be useful for example if several drivers use the same navigation system Many settings and regular destinations are stored in the driver profiles The following are stored in the driver profiles Home address Last destinations Planned routes Blocked roads Last calls Data in the journey computer Last GPS position Navigation settings Phone settings System setti...

Страница 133: ...last connected phone is not found your navigation de vice checks whether another telephone is within reach that was selected as a trigger for changing the profile Press the Set Auto connect button A list of possible telephones is displayed that you can use as a trigger for this profile select the corresponding telephone by pressing the appropriate button Notice In order to use a telephone as a tri...

Страница 134: ...n reset your Navigation device to the factory settings The following updated data is deleted saved destinations saved routes the home address telephone data images videos etc saved on the internal memory Press the Factory reset button Press the Yes button The Navigation device is reset to the factory settings Calibration model dependent If the touch screen responds incorrectly when buttons are pre...

Страница 135: ... to a network you can select it from this list without having to enter a password again If you have previously connected with a WiFi hotspot the system will automati cally try to re establish the connection the next time you activate WiFi If you select the button in this menu you can establish or disconnect a connection delete this network from the list or delete all networks displayed from the li...

Страница 136: ...atellite from the running time differences and thus evaluates its actual current position in terms of geographical length and width In order to determine the position signals from at least three satellites are required and the fourth one allows the height to be determined JPG JPEG Joint Photographic Experts Group The JPEG is the most common type of storage format for dissipating picture compressio...

Страница 137: ... as softly as possible i e without the danger of scratching the screen The stylus is more accurate than opera tion using the fingers since only the thin tip touches the screen In addition dirty marks on the screen caused by finger prints are avoided TMC Traffic Message Channel Traffic announcements transmitted by most FM stations via RDS Basis for dynamic navigation USB Universal Serial Bus The Un...

Страница 138: ...122 Current position 98 D Destination from map 53 Destination input menu Start 42 Destination list 37 Destination memory changing 38 108 Scroll 38 Destinations Entering 42 Protected 38 Standard 38 110 Storing 46 Dial 105 Dialing a number 105 Display position 54 Display street names 61 Displaying information signs 74 Displaying the route 46 93 Driver warnings 74 E Easy route 70 Economical route 70 ...

Страница 139: ...ook 105 106 Update 117 Photo 118 Point of Interest on the route 52 Points of interest Call 52 entering directly 52 in the vicinity 50 near the destination 52 near to an address 51 Q Quick access Icons 108 R Restrictions Ferries 70 Motorways 70 Toll roads 70 Route calculator 124 Route description 94 Route guidance starting 46 terminating 27 96 Route options 65 96 Route planning 42 55 Route types 10...

Страница 140: ...ngs 126 T Telephone menu 105 The main menu 27 Time of day format 79 Time zone 79 TMC 71 80 Displaying TMC messages on the map 81 Route recalculation 83 TMC antenna 20 Toll roads 70 Traffic information 64 122 Truck profile 67 U Units 79 USB 137 V Vehicle profile selecting 65 66 setting 66 Voice 73 Voice commands 48 W Warnings Speed limit 76 ...

Страница 141: ... MB 256 MB Li ion battery 1250 mAh 1250 mAh 1250 mAh 1250 mAh 1550 mAh 1550 mAh TMC Holder for vehicle integration Bluetooth hands free device Dimensions in mm W x H x D 138x85x16 138x85x16 138x85x16 138x85x16 167x103x16 167x103x16 Screen size 12 7 cm 12 7 cm 12 7 cm 12 7 cm 15 8 cm 15 8 cm Display Resistive Touch Display display resolution 800 horizontally and 480 vertically Micro SD card reader ...

Страница 142: ...ectronic devices as well as interfering influences on your unit from other electrical electronic devices are largely prevented EU Declaration of Conformity The United Navigation GmbH hereby declares that the navigation device described here isin compliance with the essential requirements of the EC directives and in particular is incompliance with the essential requirements and other relevant regul...

Страница 143: ... life Please bring this product to the appropriate collection sites for processing and recycling The units will be accepted there free of charge The proper disposal of this product serves the purpose of environmental protection and prevents the harmful effects to persons and the environment that may be caused by improper disposal For further information on the nearest collection points please cont...

Страница 144: ...quipped for this purpose statutory obligation to return It is the duty of the retail and of manufacturers to take back these batteries free of charge and to correctly recycle them or to dispose of them as hazardous waste statutory obligation to take back The lithium ion battery in the Navigation device is marked with the adjacent symbol consisting of a crossed out waste bin and the type of battery...

Страница 145: ...ver Lever off the rear of the housing using a flat blade screwdriver placed at the slits on the sides of the housing Remove the circuit board if necessary to do this you first have to remove the screws of the circuit board model dependent Pull out the connector of the battery connecting cable Remove the battery Note Do not reconnect a unit that you have opened to the power supply 4 1 2 3 2 4 3 1 1...

Страница 146: ...ing a flat headed screw driver placed between the display and display frame Remove the 5 screws You can now lever off the front of the device from the back panel using a flat headed screw driver Then remove the circuit board to do this you first have to remove the screws of the circuit board Disconnect the plug of the battery connection cable Remove the battery Note Do not reconnect a unit that yo...

Страница 147: ...3LGRCBÍ TGE RGMLÍ K J ͱ ͱEͱ LJ Á Á KL E JG Germany UUU KW CAICP AMK ...

Отзывы: