background image

23

2

D

D

EMPURRE  •  PUSH

EMPUJAR • POUSSER

P

E

F

GB

NL

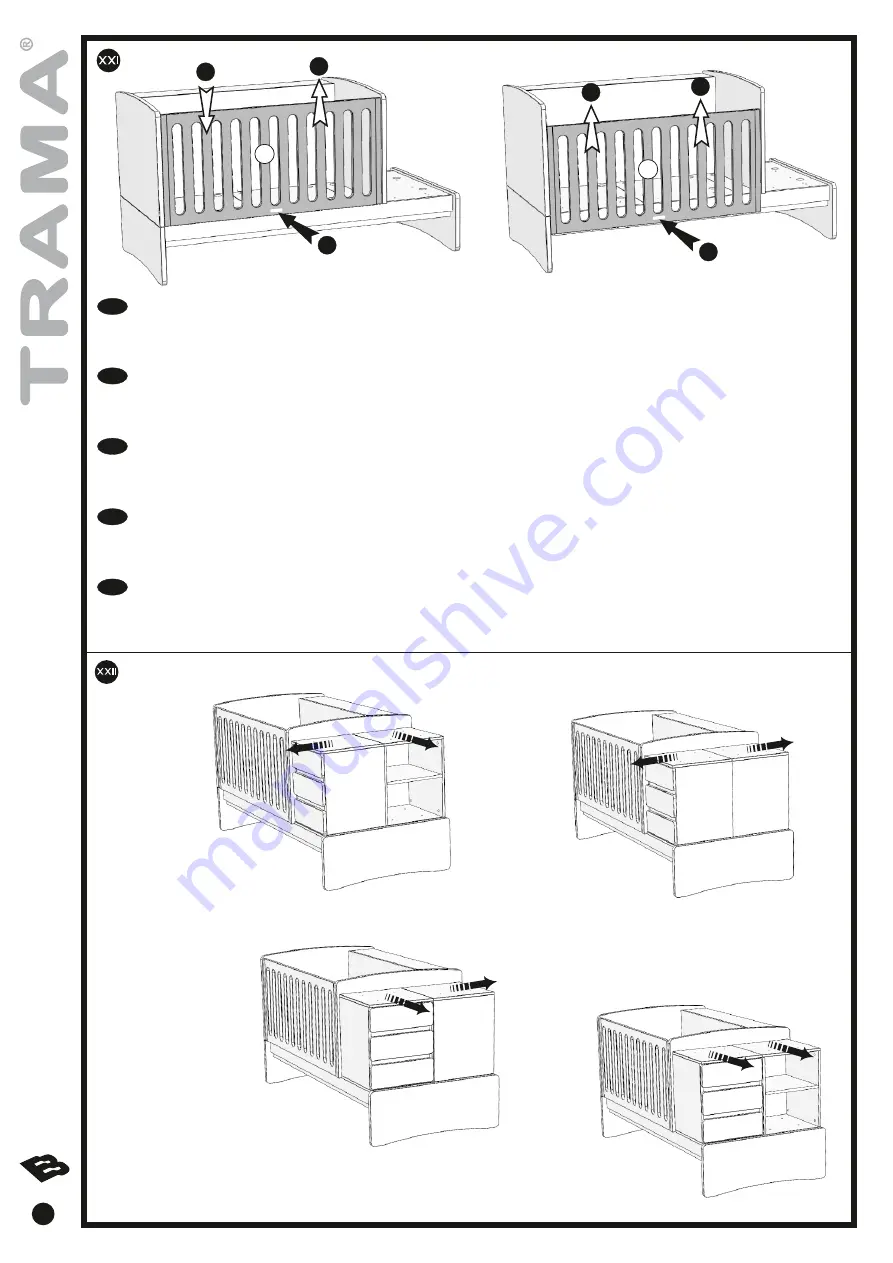
     DROPSIDE OPERATION

-     To lower dropside (D), raise side slightly (1), press with leg at centre of bottom rail (2) and lower side until it locks  automatically (3). Check that it is 
     correctly engaged. 
-    To raise the drop side slightly lift it (4), and while you maintaining this action, press with your leg at center of bottom rail (5) and raise side until it engages 
     automatically (6). Check that the side is perfect secure.

     OPERACIÓN DEL LATERAL MOVIL

-     Para bajar el lateral (D), levante ligeramente (1), mientras pulse con la pierna el centro de la reja inferior (2) y baje  el lateral (3). Asegúrese que está 
     perfectamente fijo.

-     Para subir, levante el lateral ligeramente (4) mientras pulse con la pierna el centro de la reja inferior (5) y levante el  lateral hasta que encaje 
     automaticamente (6). Asegúrese que está perfectamente fijo.

      PARA DESCER E SUBIR O LATERAL AMOVÍVEL

-     Para descer o lateral amovível (D), levante-o ligeiramente (1) e empurre a parte central inferior do mesmo com a  perna (2), deixe-o descer lentamente 
     até que encaixe automaticamente (3). Certifique-se que está bem fixo. 

-     Para subir o lateral, levante-o ligeiramente (4) e empurre, em simultâneo, a parte central inferior do mesmo com a  perna (5), continue a puxa-lo para 
     cima até que encaixe automaticamente (6). Certifique-se que está bem fixo.

     POUR BAISSER OU SOULEVER LE CÔTÉ AMOVIBLE

-     Pour baisser le côté amovible (D), soulevez-le un peu (1) et poussez le centre de la partie inférieure avec la jambe (2), jusqu'à ce qu'il s'engage 
     automatiquement (3). Assurez-vous qu'il soit bien en place.
-     Pour soulever le côté amovible (D), soulevez-le un peu (4) et poussez le centre de la partie inférieure avec la  jambe dans le même temps (5), jusqu'à ce 
     qu'il s'engage automaticament (6). Assurez-vous qu'il soit bien en place.

     OM DE BEWEEGBARE ZIJDE NAAR BOVEN OF BENEDEN TE BRENGEN

-     Om de beweegbare zijde (D) naar beneden te brengen, hef ze een beetje op (1) en duw met uw been in het   midden van de onderste rail (2), tot deze 
     automatisch vastklikt (3). Controleer of deze goed vast zit.
-     Om de beweegbare zijde (D) naar boven te brengen, hef ze een beetje op (4) en duw tegelijkertijd met uw been   tegen het midden van de onderkant (5), 
     trek de zijde dan omhoog tot ze automatisch vastklikt (6). Controleer of de  zijde goed haar plaats zit.

1

3

5

4

6

optional versions
versiones opcionales
versões opcionais
versions optionnelles
optionele versies

I

I

I

I

I I

IV

EMPURRE  •  PUSH

EMPUJAR • POUSSER

Содержание Trama NEST 07507

Страница 1: ...Ref NEST 07507 instructions instrucciones instruções made in europe ...

Страница 2: ...ewerkt Produkt behandeld met Melaminepapier niet toxisch Vernis of Verf P E F GB N L 07517 Ref 07537 Ref OPTIONAL ACCESSORY ACCESORIO OPCIONAL ACESSÓRIO OPÇÃO ACCESSOIR EN OPTION OPTIONAL ACCESSORY ACCESORIO OPCIONAL ACESSÓRIO OPÇÃO ACCESSOIR EN OPTION TOOLS REQUIRED HERRAMIENTAS NECESARIAS FERRAMENTAS NECESSARIAS OUTILS NÉCESSAIRES GEREEDSCHAP NODIG BOX BOX 07997 Ref OPTIONAL ACCESSORY ACCESORIO ...

Страница 3: ...mall Cot End Cabeceiro Pequeno Piecero Petite Tête De Lit Klein Bedeinde A5 1 99 x 34 cm Bottom Sash Bar Ilhargueiros Larguero Étagère Legplank B2 B1 190 x 10 cm 1 x 1 x B B1 B2 Bottom Sash Bar Ilhargueiros Larguero Étagère Legplank 190 x 12 cm B3 1 B4 86 x 63 cm Base Plate Placa Do Estrado Pieza De Somier Plaque De Base Basisplaat C1 2 Base Plate With Bushings Placa Do Estrado Com Buchas Pieza De...

Страница 4: ...De Mesilla Fond Table De Nuit Achterzijde Nachtkastjes 1 58 x 45 5 cm Brown Marrón Castanho Brun Bruin White Blanco Branco Blanc Wit 1 46 5 x 43 5 cm Bedside Table Shelf Prateleira Da Mesinha De Cabeceira Estante Mesilla de Noche 56 x 45 cm 1 Right Side Of Bedside Table Lateral Direito Da Mesinha Lateral Derecho De Mesilla Côté Droit Table De Nuit Zijkanten Nachtkastje 1 Left Side Of Bedside Table...

Страница 5: ...De Mesilla Côté Tiroir Table De Nuit Zijkant Lade Nachtkastje Q1 Q2 3 x 3 x 40 x 39 cm 3 Bottom Panel Of Drawer Fundo De Gaveta Da Mesinha Fondo De Cajón De Mesilla Fond Du Tiroir Onderzijde Lade O 44 x 5 cm 2 Wooden Bar Barra de Madera Barra de Madeira Bar en Bois Houten Bar Ø7 75 x 35 mm 14 3 5 x 16 52 Yellow Amarillo Amarelo Jaune Screws Parafusos Tornillos Vis Schroeven V Ø10 x 40 mm Wooden Pi...

Страница 6: ...étal Metalen Glijders 3 x 3 x 56 56 Cam Fasteners Rondles Tuercas Excentriques Excentrieken Cam Screws Perno Dos Rondles Tornillo Pasador Tétons Metalen Pinnen I 4 Glider Deslizantes 12 Socket Casquilho Casquillo Douille Bus X 4 Plastic Supports Suportes de Prateleira Soporte Plástico Supports Plastique Plastiekensteunen Y Shock absorber for drawer soft close Amortiguador para los cajones Amortece...

Страница 7: ...erro Perno de Ferro Fer Pin Mattress Thickness Espesor del Colchón Espessura do Colchão Épaisseur du Matelas MAX 12 cm Spring Metal Pin Mola Perno Metálico Resorte Pasador de Metal Ressort Clou Lente Metalen Pin 2 Plastic Cover Sticker Tapa Furos Autocolantes Tapones Caches en Plastique Plastieken Beschermdopjes 16 ...

Страница 8: ...08 baby page pagina 09 26 page pagina 16 26 page pagina 11 13 14 15 page pagina 16 26 page pagina EN 716 2008 A1 2013 09 10 page pagina page pagina 11 13 page pagina 14 15 ...

Страница 9: ...3 x S1 S1 M1 M2 M3 x 3 N N N Q1 Q1 Q1 Q2 Q2 Q2 O O O IMPORTANT Tighten Completely IMPORTANTE Apriete Completamente IMPORTANTE Apertar Completamente IMPORTANT Fixer Completement BELANGRIJK Draai Volledig Vast R P R P x 12 R 12 x Q1 N Q2 P R P R N Q ...

Страница 10: ...10 N Q1 Q2 O v Q1 M P P M Q O R R 12 x P x 12 Q2 O R ...

Страница 11: ...11 P x 8 P S1 16 x S1 S1 S1 G L1 L2 W2 W2 G L1 W1 W1 W1 L2 J 1 J 1 U U U U Z Z Z W2 W L1 L2 L W1 W1 W2 W2 G G G G S7 9 x S7 S7 S7 L1 Z L1 Z Z Z ...

Страница 12: ...v V2 12 x 8 L1 L2 V2 V2 L V2 x 8 U U V2 V2 L1 L2 U U L U R L1 L2 L R 4 x G G ...

Страница 13: ...etely IMPORTANTE Apriete Completamente IMPORTANTE Apertar Completamente IMPORTANT Fixer Completement BELANGRIJK Draai Volledig Vast R R 4 x R R G G x S1 6 x S1 S1 S1 L1 L2 L L W W1 W2 L1 L2 G S1 12 x G L2 L1 J 1 R P J 1 S1 G G G ...

Страница 14: ...G x 8 G V2 V2 L3 4 x L3 J 2 L3 L3 L3 L3 L3 P R G G IMPORTANT Tighten Completely IMPORTANTE Apriete Completamente IMPORTANTE Apertar Completamente IMPORTANT Fixer Completement BELANGRIJK Draai Volledig Vast R R P G G K1 ...

Страница 15: ...R I 15 v 4 x G G R L3 S1 12 x G S1 L3 x 4 L3 L3 I L3 L3 J 2 J 2 L3 L3 L3 L3 R G G ...

Страница 16: ...27 16 24 5 X 16 B2 B3 x 10 B3 B2 A4 A3 B3 B2 B1 C1 C1 C2 S2 S2 S2 S2 S2 S2 S2 S2 S2 S2 S2 S2 A3 A4 V B4 x 8 V V V B4 B4 B3 B2 x 4 A3 A4 X X ...

Страница 17: ...v S6 17 A4 A3 16 x A3 A4 T T1 T2 T3 T4 T1 S6 S6 S6 S6 S6 16 x B1 B1 S6 S6 S6 S6 B2 B2 B3 T2 ...

Страница 18: ...S3 Y T4 T3 18 C1 C2 C1 C1 C2 A3 A4 x 24 B1 A3 A4 C1 C1 10 x C2 C2 B1 B2 A4 A3 B1 A4 A3 B1 A3 4 x 4 x A4 T4 T1 T3 T2 Y S3 S3 B4 B4 B2 B1 B2 B2 B4 ...

Страница 19: ...ina 2 então antes de seguir os próximos passos deverá proceder á montagem dos mesmos AVERTISSEMENT Si vous avez acheté ces produits Réf 07517 07527 07537 07997 voir page 2 vous devez assembler les produits avant de vous rendre dans les prochaines étapes WAARSCHUWING Als u volgende producten hebt aangekocht Ref 07517 07527 07537 07997 zie pagina 2 moet u eerst deze producten in elkaar steken vooral...

Страница 20: ...cado em ambos os lados como indicado em cima Para fixar o lateral amovível siga as instruções de montagem Esta característica possibilita que a cama seja colocada no quarto de acordo com a posição pretendida Le côté amovible D de ce lit peut être monté de chaque côté selon votre choix comme indiqué ci dessus Pour fixé le côté amovible suivre les instructions de montage Cette option vous permet de ...

Страница 21: ... 6 x R IMPORTANT Tighten Completely IMPORTANTE Apriete Completamente IMPORTANTE Apertar Completamente IMPORTANT Fixer Completement BELANGRIJK Draai Volledig Vast R P R E F F E A2 A4 A3 A2 A3 A3 A2 F E F A4 B1 ...

Страница 22: ...22 C2 A1 A2 F E R R R 10 x EMPUR RE PUSH EMPUJ AR POUSS ER EMPURRE PUSH EMPUJAR POUSSER D D I Step II Step III Step A1 A2 A D D A S4 A2 A1 D A D D A D A A1 A1 A2 A3 F E F C2 B1 ...

Страница 23: ...r o lateral levante o ligeiramente 4 e empurre em simultâneo a parte central inferior do mesmo com a perna 5 continue a puxa lo para cima até que encaixe automaticamente 6 Certifique se que está bem fixo POUR BAISSER OU SOULEVER LE CÔTÉ AMOVIBLE Pour baisser le côté amovible D soulevez le un peu 1 et poussez le centre de la partie inférieure avec la jambe 2 jusqu à ce qu il s engage automatiquemen...

Страница 24: ...S5 S5 24 x 4 x 4 S5 S5 H S5 x 3 S5 K2 K2 H H G S5 x 4 S5 H G G ...

Страница 25: ...25 K L3 I L3 PUSH EMPUJAR EMPURRE POUSSER Z Z L1 K1 L3 K1 M1 M2 M3 ...

Страница 26: ...bujo 2 por favor haga el ajuste a la pieza siguiendo los pasos I II y III Voor een correcte werking van de schokdemper controleer of deze overeenkomt met Fig 1 Indien deze overeenkomt met Fig 2 pas het onderdeel aan door de instructies stap I II en III te volgen FR Pour que I amortissuer fonctionne correctement veuillez à ce que celui ci corresponde à Fig 1 Dans le cas où il correspond à Fig 2 ajo...

Страница 27: ...27 page pagina 28 36 junior 16 18 page pagina 28 30 page pagina 09 10 11 13 page pagina 31 14 15 page pagina 32 33 36 page pagina ...

Страница 28: ...28 S5 K1 G H G S5 H S5 G ...

Страница 29: ...29 A1 F E A1 E F F R A2 A2 v D A2 A1 A D D A S4 D A D A1 F F E A2 A3 A3 B1 A4 ...

Страница 30: ...x V1 Y 30 C2 C2 A4 A3 A5 2 x Y x 3 A5 A5 x 2 A3 A5 A3 A5 V1 V1 A4 A2 A4 A3 ...

Страница 31: ... 31 L2 G PUSH EMPUJAR EMPURRE POUSSER Z Z L1 U M1 M2 M3 M1 M2 M3 G x 4 ...

Страница 32: ...32 L3 H G L3 I L3 J 2 L3 L3 K1 K1 K1 x 4 ...

Страница 33: ...P E 33 A1 A2 E F E F F E F E x 3 F E E R P P ...

Страница 34: ...R A1 A2 34 v 3 x E F F E V A A1 A2 R A1 A2 A S4 R P ...

Страница 35: ...x R P 35 10 x E A2 A1 R A1 A2 F F F E A2 A1 A2 A1 x 4 A1 A2 R P R A ...

Страница 36: ...6 x 15 x 3 3 x KEEP FOR FUTURE REFERENCE GUARDAR PARA FUTURO USO GARDER POUR UN USAGE FUTUR BIJHOUDEN VOOR EEN LATER GEBRUIK ATENÇÃO WARNING ADVERTENCIA ACHTUNG ATTENTION OPGELET INSTRUCTIONS BOOK D x 2 x 2 x 2 H K2 x 8 ...

Страница 37: ... and tear undue force neglect or accident In furtherance of their policy of continuous product development TRAMA reserves the right to make specification and design changes IMPORTANT READ CAREFULLY AND KEEP FOR FUTURE REFERENCE ATENCIÓN Advertencia No es aconsejable tener aparatos de calefacción cerca de la cuna Llama calefactores de gas ó eléctricos Advertencia No utilizar la cuna si se rompe qui...

Страница 38: ...truções bem como negligências ou acidentes A TRAMA reserva o direito de modificar desenhos ou especificaçõesdos seus produtos sempre que entenda conveniente IMPORTANTE LER ATENTAMENTE E GUARDAR PARA FUTURA REFERÊNCIA P IMPORTANT LIRE ATTENTIVEMENT ET GARDER POUR UN USAGE FUTUR ATTENTION Attention Il est à déconseiller de mettre le lit près d une source de chaleur feu ouvert électrique ou à gaz Att...

Страница 39: ...jzen korrekt zijn aangedraaid De spatie tussen matras en bed mag 30mm rondom niet overschrijden Vanaf het ogenblik dat het kindje met de lattenbodem in de laagste stand en de zijkant naar boven uit het bedje kan klimmen mag u dit bedje niet meer gebruiken voor dat kind Een kleurverschil op onderdelen van dit product is mogelijk door het schilderen of vernissen van natuurlijke producten zoals hout ...

Страница 40: ...ecar com FABRIQUÉ AU PORTUGAL GREAT BRITAIN BÉBÉCAR UK LTD ROBERTSON HOUSE NORTH WALSHAM NORFOLK NR28 0BX TELE SALES 01692 408801 SERVICE 01692 408807 FAX 01692 500176 E mail sales bebecar co uk www bebecar co uk MADE IN PORTUGAL BÉBÉCAR UTILIDADES PARA CRIANÇA S A RUA DOMINGOS OLIVEIRA SANTOS 62 APARTADO 8 4509 903 CALDAS DE S JORGE PORTUGAL TELEF 256 910400 FAX 256 911346 E mail info bebecar com...

Отзывы: