5
www.bdsensors.de
ASM 400
3.3 Installation steps
•
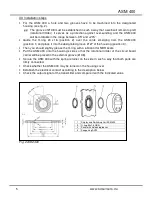
For the ASM 400, a hole and two grooves have to be machined into the designated
housing (see fig. 2).
The groove of Ø 38 must be established in such a way that a web will remain top left
(rotational limiter). It serves as a protection against over-winding, and the ASM 400
will be rotatable in the range between -35° and +215°.
•
Guide the O-ring 24 x 1.6 (position 2) over the cords emerging from the ASM 400
(position 1) and place it into the designated groove Ø 27 of the housing (position 3).
•
Then you should slightly grease the O-ring with a lubricant for NBR seals.
•
Put the ASM 400 onto the housing’s side so that the rotational limiter of the circuit board
carrier will be placed in the external groove (Ø 38).
•
Secure the ASM 400 with the spring retainer on the side in such a way that both parts are
firmly connected.
•
Check whether the ASM 400 may be turned on the housing cover.
•
Establish the electrical contact according to the description below.
•
Check the output signal of the transmitter and compare it with the indicated value.
Fig. 2 ASM 400
1
Display and Switching Unit ASM 400
2
O-ring 24x1.6 NBR
3
Panel with hole and grooves
4
Seegerring AV20
Содержание ASM 400
Страница 18: ...ASM 400 Dimensions...
Страница 19: ...19 www bdsensors de ASM 400...


