ASM 400
Menu 7 - Setting the switch-on point for contact 1
After confirming "S1on" by pushing both buttons, the value to acti-
vate contact 1 can be set. To complete the setting, push both but-
tons simultaneously.
Please take further information from the figures in menu 11.
Menu 8 - Setting the switch-off point for contact 1
After confirming "S1of" by pushing both buttons, the value to
deactivate contact 1 can be set. To complete the setting, push
both buttons simultaneously.
Please take further information from the figures in menu 11.
Menu 9 - Setting the switch-on point for contact 2
After confirming "S2on" by pushing both buttons, the value to acti-
vate contact 2 can be set. To complete the setting, push both but-
tons simultaneously.
Please take further information from the figures in menu 11.
Menu 10 - Setting the switch-off point for contact 2
After confirming "S2of" by pushing both buttons, the value to
deactivate contact 2 can be set. To complete the setting, push
both buttons simultaneously.
Please take further information from the figures in menu 11.
Menu 11 – Hysteresis and compare mode of set point 1
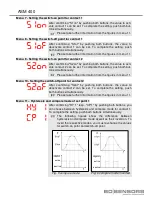
After confirming "HY 1" resp. "CP 1" by pushing both buttons, you
can choose between hysteresis and compare mode for contact 1.
To complete the setting, push both buttons simultaneously.
The following figures show the difference between
hysteresis and compare mode as well as their inversion. To
invert the respective modes, you must exchange the values
for switch-on point and switch-off point.
Fig. 5 compare mode
Fig. 6 compare mode inverted
active
inactive
active
inactive
Содержание ASM 400
Страница 18: ...ASM 400 Dimensions...
Страница 19: ...19 www bdsensors de ASM 400...


