background image


BAYKAL


EDITION NO          :


APH 

SECTION     :


DATE OF ISSUE    :


July-2005 

PAGE           :


43


3.


Program mode 


When you select the program mode in the controller, you can bend sheet metals 
according to the program you write before. To work with program, first you 
should select program mode; 


1.


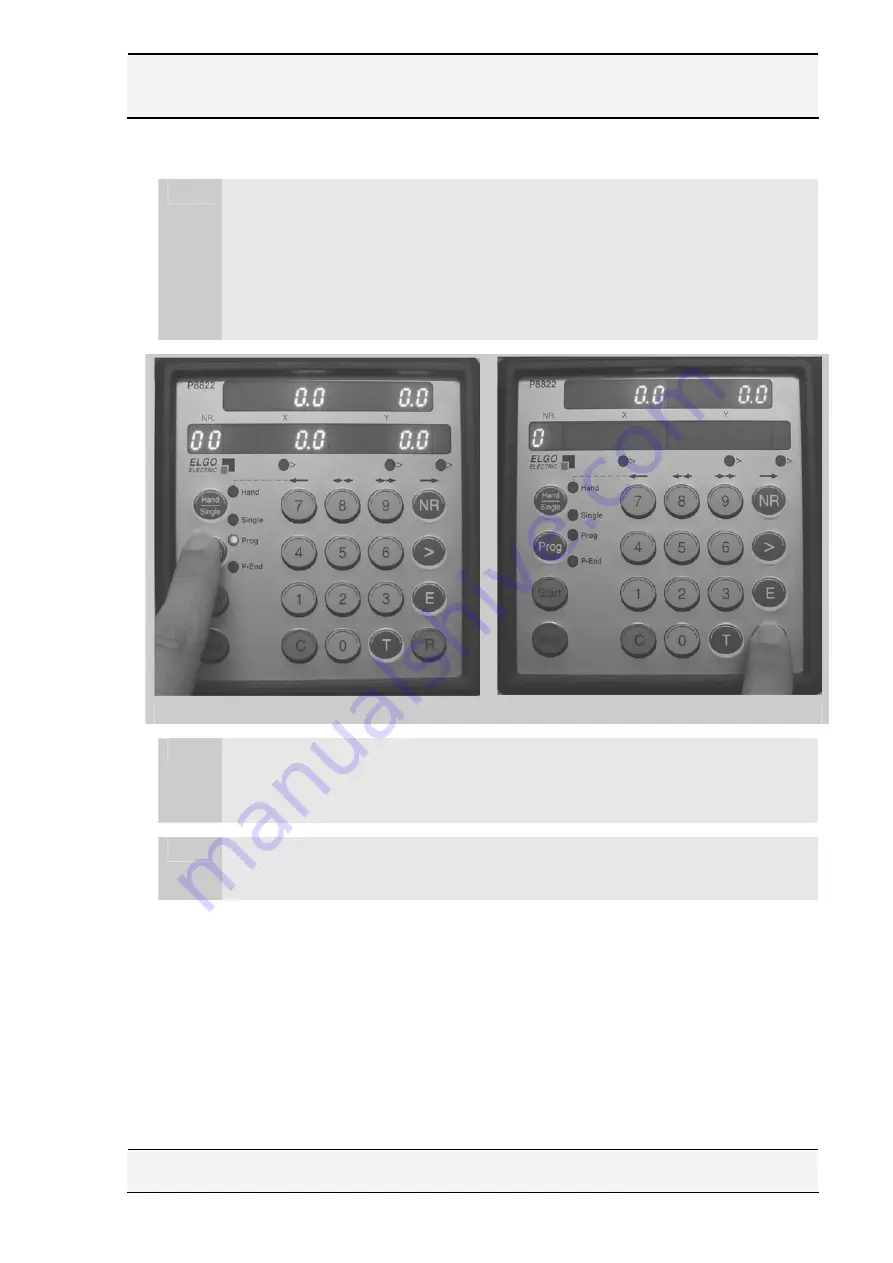
Press Prog key on the controller 

(See Figure 6.5.3.16)

. The small led 

(Prog. Led) will light up. A new program can be selected by means of 
Register R40. The values of digits in register R40 are 0 to 99 i.e. value 
"0" is the number 1 program. 


Figure 6.5.3.16 

Figure 6.5.3.17 


2.


In this step, you should select program number. To select program 
number, press R key 

(See Figure 6.5.3.17) 

on the controller. (If you are 

editing a program, press T key to resets windows to zero.) NR window 
begins flashing. 


3.


Enter 40 

(See Figure 6.5.3.18)

 using numerical keys and press Cursor 

key 

(See Figure 6.5.3.19)

You will see existing program number in X widow. 


Содержание APH Series

Страница 1: ...PH SECTION DATE OF ISSUE July 2005 PAGE 1 USER S MANUAL HYDRAULIC PRESS BRAKE MODEL APH No part of this User s Manual may be reproduced or transmitted by any without Prior permission of Baykal Makine...

Страница 2: ...HYDRAULIC BLOCK ACCESSORIES APH X X X X XXX C CE S STAND 1 220 2 230 3 240 4 400 5 415 6 440 7 480 8 600 9 220 400 1 ELGO 8822 1 FISSLER AKAS 2 SICK LIGHT GUARD 3 REER 4 LAZER SAFE NOTE In order to SE...

Страница 3: ...TION OTHERWISE THE PUMP WILL BE DAMAGED CHECK THE MOTOR ROTATION BY PUSHING THE GREEN START AND IMMEDIATELY AFTER THE RED STOP BUTTONS ON THE ELECTRICAL PANEL THE MOTOR MUST BE ROTATING IN THE DIRECTI...

Страница 4: ...ANDS WHEN BENDING SHEET JAMMED MAY BE JAMMED BETWEEN MAY CRASH SOME PARTS BETWEEN TOOLS TOP TOOL AND SHEET OF BODY DESIGNATION PLATE Manufacturer BAYKAL Mak San Tic A Bursa T RK YE Machine Hydraulic P...

Страница 5: ...of the Press brake Using The Press Brake 6 5 1 Requirements for the initial test and examination 6 5 2 Electrical connections 6 5 3 Operating the Machine 6 5 4 Centering the Bottom tool 6 5 5 Top beam...

Страница 6: ...T 10 FOLDING FACILITIES 11 PRINCIPLES OF PRESS BRAKE BENDING TECHNOLOGY APPENDIX A SPARE PARTS LIST B HYDRAULIC CIRCUIT DIAGRAM C ELECTRIC CIRCUIT DIAGRAM ADDITIONAL MANUALS A ELGO P8822 Operating Man...

Страница 7: ...ENERAL MACHINE INFORMATION 1 1 Registered trademark BAYKAL 1 2 Machine type APH 1 3 Serial number 1 4 Year of manufacture 1 5 Address of manufacturer BAYKAL MAK NE SAN T C A Organize Sanayi B lgesi Ye...

Страница 8: ...ty Emergency stop buttons engaging type are available on the control unit on the pedal control stand and on the electrical cabinet cover see Figure 2 1 1 Emergency Stop Buttons Figure 2 1 1 Electro sw...

Страница 9: ...ion If anything access area between two devices transmitter and receiver before the top beam reaches the muting point the beam will stop and retract automatically Transmitter Receiver Left side of mac...

Страница 10: ...oad where the machine is to be installed must be accounted for 4 The machine must be operated only by authorized and trained personnel Operation by unauthorized and untrained personnel in a way that d...

Страница 11: ...air work is carried out DO NOT let yourself be locked in the interior space of the machine The safe distance of the two hand control of this machine is 130 mm Make sure that this safe distance is kept...

Страница 12: ...of this press brake 8 In the operation of the press brake no special personal safety equipment is necessary It is however recommended to use working gloves when handling the workpieces 9 General main...

Страница 13: ...3 Noise measurement The sound pressure level of the press brake at operator s working position is under 70 Db A 2 4 Stop time control The stopping time of this press brake is 80 ms and the correspond...

Страница 14: ...BAYKAL EDITION NO APH SECTION DATE OF ISSUE July 2005 PAGE 14 3 OVERALL DRAWING AND DIMENSIONS Figure 3 1...

Страница 15: ...ss brakes the centre of gravity is on the front side Therefore the machine must be handled with extreme caution when lifting and installing to prevent it from inclining forward or even falling down Ma...

Страница 16: ...truction Therefore the hazardous situations regarding the operator other persons or materials due to incorrect installation will be reduced It is important to leave a work space by both sides of the m...

Страница 17: ...BAYKAL EDITION NO APH SECTION DATE OF ISSUE July 2005 PAGE 17 Figure 5 1...

Страница 18: ...eed mm sec 11 Total Stroke mm Piston Stroke mm Adjustment Stroke mm 12 Pump flow rate cm rev 13 Oil tank volume lt 14 Back gauge range mm 15 Main motor 3 phase 380 V 50Hz kw 6 1 2 Standard Equipment E...

Страница 19: ...pid wear No Part name Size specification Qty 1 Bottom tool 1 2 Top tool 1 3 Piston seal 2 4 Rod seal 2 5 Scraper 2 6 O ring cylinder 2 6 1 4 List of bearings and special parts No Part name Part no des...

Страница 20: ...formed is mm in case of 42 kgs mm steel plate which is the most common material processed on press brake The APH press brake is a downstroking type meaning that the bending force is applied by a down...

Страница 21: ...ea between top and bottom bending tools When any of the protective devices or guardings of the machine are NOT mounted or NOT functioning For operations involving Cutting punching slitting breaking cr...

Страница 22: ...g at desired angle Oil leakage in cylinder Damage to tooling breaking of tooling with possible injury to operator Breaking of stud connecting piston to beam Incorrect use 2 Bending flame cut material...

Страница 23: ...ed in its place Check that the bottom tool is properly placed with respect to the top tool Make sure that the cables are not damaged Check the components and terminal ends inside the electrical cabine...

Страница 24: ...rst class components are used in the electrical cabinet and all electric wires are numbered according to electric circuit diagram and conform to established standards Cartridge fuses are used in the c...

Страница 25: ...components of machine stop d Operation ON OFF It switches on off pedal operation e 10S6 Up When Up button is pressed Beam goes up in the Inching Mode f Reset In order to restart the machine after lig...

Страница 26: ...BAYKAL EDITION NO APH SECTION DATE OF ISSUE July 2005 PAGE 26 B Front Connections Figure 6 5 2 2 Mark Label Designation Description e f i j a k l b h g c d...

Страница 27: ...y switch Left side Safety switch and connection This is used for additional safety When the side guard door is opened it sends a interrupt signal to the Controller and thus pomp stop f 13S3 Side guard...

Страница 28: ...BAYKAL EDITION NO APH SECTION DATE OF ISSUE July 2005 PAGE 28 C Back side connections Figure 6 5 2 3 Mark Label Electr Diag Designation Description a b c d e...

Страница 29: ...Back door safety switch When this door is opened main pump of the machine will stops d Ground connection Ground connection for the electric circuit Do not forget connecting this point to the ground e...

Страница 30: ...irection b 5S3 X Limit switch Limit position of X axis movement in the positive direction c 5M1 Motor It provides X axis movement d 5B1 Encoder X axis encoder connection Encoder supplies feedback of t...

Страница 31: ...controls downward movement of Y axis c Y11B Directional valve It controls upward movement of Y axis d Y12 Safety valve Safety valve of directional valves e S12 Sensor It checks position of Directional...

Страница 32: ...ckgauge moves forward c 4S4 Beam reducer up When this button is pressed the reducer goes upwards to adjust bending angle d 4S3 Beam reducer down When this button is pressed the reducer goes downwards...

Страница 33: ...itch g is on the Position 2 and 3 On the both of them Positions is AKAS Laser System active d 10S1 Emergency stop button In case of emergency when this button is pressed all movements are stopped e 9S...

Страница 34: ...BAYKAL EDITION NO APH SECTION DATE OF ISSUE July 2005 PAGE 34 Inside the electrical cabinet a b c d e f g h i j k l...

Страница 35: ...protects Main motor against overflow current f 2Q3 Reducer motor protection relay It protects Reducer motor against overflow current g Control fuses They control the current flowing through the corre...

Страница 36: ...be first started up and be put into service by authorized and qualified personnel 1 Check the emergency stop buttons If they are engaged release them Pull and release 2 Switch on the main switch See F...

Страница 37: ...rotating in the reverse direction change any two phases in the electricity supply point 5 Turn the operation ON OFF switch on pedal control pendant to the position ON See Figure 6 5 3 5 Thus the peda...

Страница 38: ...d at anytime the beam will return at fast speed until it is in contact with the top point switch 3 Turn the mode selector switch to the position 2 in order to perform bending operation Top beam travel...

Страница 39: ...nd Position Displays X and Y axes entries NR Display Shows NR value Hand Single Hand or Single mode selection key Prog Program mode selection key Start It executes X and Y axes according to values ent...

Страница 40: ...ording to the tool you are using and also move the backgauge for adjustment applications To work with manual mode 1 Press Hand Single key two times See Figure 6 5 3 8 on the P8822 The small led on the...

Страница 41: ...e value Y value If you want o make another bent you should enter new X and Y values To select single mode 1 Press Hand Single key once See Figure 6 5 3 11 on the controller The related led Single led...

Страница 42: ...See Figure 6 5 3 15 Thus the back gauge will move to its final position and the motor with reducer behind the top beam will adjust the angle value Figure 6 5 3 15 Note Y value is in millimeters Becau...

Страница 43: ...light up A new program can be selected by means of Register R40 The values of digits in register R40 are 0 to 99 i e value 0 is the number 1 program Figure 6 5 3 16 Figure 6 5 3 17 2 In this step you...

Страница 44: ...See Figure 6 5 3 20 for example 1 using numerical keys and press E key See Figure 6 5 3 21 Figure 6 5 3 20 Figure 6 5 3 21 5 You will see zero on NR window now program line number and X Y demand value...

Страница 45: ...3 23 to select program line After pressing NR key NR window will show 01 Now you can edit your program 7 Enter the bending width See Figure 6 5 3 24 in X axis window X value using numerical keys 8 Pr...

Страница 46: ...n Y axis window Y value using numerical keys 10 Press Cursor key again See Figure 6 5 3 27 to go to the second line in the program NR window will show 02 Now you are in the second line in your program...

Страница 47: ...program line number and X Y demand value windows See Figure 6 5 3 29 Figure 6 5 3 28 Figure 6 5 3 29 4 Editing a program 1 In order to make any changes in a existing program press Prog key on the cont...

Страница 48: ...Press cursor key to select axis value you want to change If you want to change X axis value do not need to press cursor key 4 Press C key to delete existing value See Figure 6 5 3 32 Write new value...

Страница 49: ...en press R key See Figure 6 5 3 37 2 Write 40 by using numerical keys in NR window Figure 6 5 3 36 Figure 6 5 3 37 3 Press Cursor key See Figure 6 5 3 38 Now you are ready to select the program 0 show...

Страница 50: ...The controller will sets the backgauge and angle Figure 6 5 3 40 Figure 6 5 3 41 6 5 3 3 Bending 1 If you are using pedal mode mode 2 keep the left foot switch pressed on the pedal control See Figure...

Страница 51: ...sure that the far end of the sheet touches the backgauge finger Figure 6 5 3 43 a Figure 6 5 3 43 b While the beam is travelling down DO NOT insert anything between tools In such cases the beam stops...

Страница 52: ...point some safety devices will be NOT ACTIVE except emergency stop buttons back door safety switch and side doors safety switches 3 Release the left foot pedal and press it again see Figure 6 5 3 45...

Страница 53: ...s 1 2 3 by selecting the appropriate V groove on the bottom tool according to material thickness used Remember 6 When the foot pedal is released during fast speed before mute point the beam will retra...

Страница 54: ...It can be reversed if necessary To align top tool with appropriate V groove on the bottom tool proceed as follows 1 Lift up the bottom tool from the both sides by means of top beam power using the cha...

Страница 55: ...up see Figure 6 5 4 3 a and reducer down see Figure 6 5 4 3 b on the control panel to coin the top tool in the vee to be used When using the above pushbuttons it is possible to work with side fences o...

Страница 56: ...ntering see Figure 6 5 4 4 and Figure 6 5 4 5 Figure 6 5 4 4 Figure 6 5 4 5 IMPORTANT As soon the punch is in contact with the V release pushbutton reducer down Otherwise the reducer or the sliding sh...

Страница 57: ...splined shaft see fig a and remove it The spring in the shaft the piston screw connection point allows the shaft bush move back see Figure 6 5 5 1 Figure 6 5 5 1 2 To re establish parallelism use push...

Страница 58: ...same level 4 When parallelism is achieved put the bush of splined shaft back into its original position The piston on the left hand side can travel safely within a range of 2mm To avoid beam deflecti...

Страница 59: ...t should be made 1 Backgauge profile parallelism 2 Guiding profile parallelism 1 Backgauge profile parallelism Backgauge profile parallelism should be adjusted in the Y direction See Figure Both ends...

Страница 60: ...fig along the backgauge profile are used to adjust parallelism in Y direction and the bolts A are used in X direction Guiding profile must be parallel to the bottom tool so that bending process can be...

Страница 61: ...low Figure 6 5 7 1 There is danger of top tool falling free if the tool fixing bolts are let loose excessively and also danger of top tool and adaptors assembly falling free if the adaptors fixing bol...

Страница 62: ...should loosen the all bolts along the beam so that you can pull out the top tool 3 Place the new top tool from any side 5 Tighten up the all bolts to fix the top tool Figure 6 5 7 2 b Changing the bo...

Страница 63: ...er by means of lifting equipment Place the new bottom tool from any side 5 Place the wedge in its place NOTE 1 If the X value width of the bottom tool is larger than width of the removed tool you shou...

Страница 64: ...ype 2 a Changing the top tool The top tool is fixed in its place as seen in Figure 6 5 7 4 below Figure 6 5 7 4 There is danger of top tool falling free if the tool fixing bolts are let loose excessiv...

Страница 65: ...top tool manually by the left side of the machine Stock it using appropriate lifting equipment If the tool is a sectional type by hand NOTE You should release all latches along the beam so that you ca...

Страница 66: ...new bottom tool from any side 4 Tighten up the fixing bolts along the bed Type 3 Changing the bottom tool The bottom tool is fixed in its place as seen in Figure 6 5 7 7 below In order to change the b...

Страница 67: ...ect to some material deformation Such deformations will make it difficult to obtain identical angles over the full bending length If deformation is excessive the tools require re machining in cases wh...

Страница 68: ...fixing bolts See Figure 6 5 8 2 a and b with approximate amount of y 0 5 mm 3 Push the conical wedges in the direction of the arrow to the extent of tool deformation See Figure 6 5 8 2 Figure 6 5 8 2...

Страница 69: ...BAYKAL EDITION NO APH SECTION DATE OF ISSUE July 2005 PAGE 69 Wedge Adjustment Work Table Figure 6 5 8 3 A A...

Страница 70: ...bending angle is different 2 Pull forward the conical wedges B by means of A bolts to the extent of deformation The deformed section of work table is thus pushed up 3 The same adjustment should be don...

Страница 71: ...6 5 9 1 as indicated by Y and Z in the diagram Without the correct amount of bed deflection compensation by crowning convex correction to amount of sagging it would mean that the upper and lower tool...

Страница 72: ...es See Figure 6 5 9 2 compensate the deflection of the press brake quickly and accurately Manual models as shown in Figure 6 5 6 2 are adjusted simply by turning a hand crank the built in numerical re...

Страница 73: ...ress brake has been checked with respect to the following safety and operational functions and verified O K 9 Safety guards 9 Electric circuit diagram 9 Hydraulic circuit diagram 9 Top beam speed 9 So...

Страница 74: ...lified and authorized personal operate the machine All personnel in charge of set up operation service and maintenance must be identified clearly Clearly specify the responsibilities of the machine op...

Страница 75: ...ator Lubrication of tooling Daily Operator Guards against any physical damage Daily Operator Oil leakage in pipes hoses and hydraulic elements Weekly Operator Hydraulic fluid level Weekly Operator Cyl...

Страница 76: ...lectrician 6 6 2 Hydraulic System All precautions must be taken to keep the hydraulic system clean at all circumstances 6 6 3 Changing oil Oil must be changed after first 200 working hours of use and...

Страница 77: ...from the filling up point seen in Figure 6 6 3 1 a Oil level must be seen in the middle of the oil indicator Observe the oil level from this indicator Always keep the oil in same level When changing...

Страница 78: ...d and bolts Figure 6 6 4 3 Figure 6 6 4 4 a Changing suction filter The suction filter must be changed after first 200 hours of use and then every 1000 working hours See Figure 6 6 4 5 Suction filter...

Страница 79: ...PAGE 79 Figure 6 6 4 5 1 2 3 Remove the cover on the oil tank after loosing and pulling out the screws Remove the old filter from its place inside oil tank by turning in CW Fix the new filter into it...

Страница 80: ...H APHS 240 TON MANUFACTURER TYPE FILTER ELEMENT MP Italy MPF 100 3AG3D MPF 100 3A25HB GEN FA Turkey GYD 21 25 GYE 20 25 APH APHS 300 TON MANUFACTURER TYPE FILTER ELEMENT MP Italy MPF 180 1AG1D MPF 180...

Страница 81: ...ti rust lubricant Lubricate plastic hoses against cracking Lubricate pistons slides and all metal surfaces by an an anti rust lubricant Cover the machine by a nylon cover for protection against dust 6...

Страница 82: ...ION DATE OF ISSUE July 2005 PAGE 82 6 7 3 Scrapping If the press brake has completed its normal operating life prior to scrapping all the oil in the tank and cylinders should be drained off and the ma...

Страница 83: ...YPES LUBRICATION PERIOD REDUCER ASSEMBLY 1 2 2 MOLLYKOTTE BR2 PLUS MORRIS K48EP 2 7 Days SLIDES 5 6 2 KAP GREASE 2 2 7 Days TORSION BAR SEATS 3 4 2 KAP GREASE 2 30 60 Days OIL TANK 7 1 t 10 C HLP 32 t...

Страница 84: ...VALENT OIL TYPES LUBRICATION PERIOD TORSION BAR BEAM CONNECTION POINTS 8 9 2 KAP GREASE 2 30 60 Days REDUCER SHAFTS 10 11 2 KAP GREASE 2 30 60 Days BACK GAUGE CHAIN 1 KAP GREASE 2 60 90 Days BACK GAUG...

Страница 85: ...Check and tighten pipe fittings Change pump Check and replace seals if necessary Change pressure switch c Oil leaking from cylinders Throat seal is damaged Cylinder o ring is damaged Piston seal is t...

Страница 86: ...llowing with respect to material thickness Selecting the correct vee Bending force required to bend material of 1 meter length Minimum flange that can be bent Inside radius F Ton Pressure in metric pe...

Страница 87: ...BAYKAL EDITION NO APH SECTION DATE OF ISSUE July 2005 PAGE 87 10 FOLDING FACILITIES You can see some bending examples according to the different tools below...

Страница 88: ...ner radius of the bend annulling the elasticity a very high degree of angular precision is achieved 1 AIR BENDING There are two methods a Air bending with bottoming of the punch Basic Rules R S residu...

Страница 89: ...maintain good bending quality The shape of the punch and of the die is immaterial Figure 11 2 Figure 11 2 2 COINING Basic Rules R S The nose of the punch penetrates into the natural radius of the coi...

Страница 90: ...BAYKAL EDITION NO APH SECTION DATE OF ISSUE July 2005 PAGE 90 APPENDIX A SPARE PART LIST...

Страница 91: ...BAYKAL EDITION NO APH SECTION DATE OF ISSUE July 2005 PAGE 91 B HYDRAULIC CIRCUIT DIAGRAM...

Страница 92: ...BAYKAL EDITION NO APH SECTION DATE OF ISSUE July 2005 PAGE 92 C ELECTRIC CIRCUIT DIAGRAM...

Страница 93: ...BAYKAL EDITION NO APH SECTION DATE OF ISSUE July 2005 PAGE 93 ADDITIONAL MANUALS...

Отзывы: