background image

5

Not for use in altitudes above 2,000 meters

GAME SPECIFICATIONS

SAFETY PRECAUTIONS

WEIGHT

NET WEIGHT

600 LBS.

SHIP WEIGHT

700 LBS. 

DIMENSIONS

WIDTH

38.5”

DEPTH

44”

HEIGHT

109”


(adjusts to 107”,116”,123”)

OPERATING TEMPERATURE

FAHRENHEIT

80-100

CELSIUS

26.7-37.8

POWER REQUIREMENTS

INPUT VOLTAGE 

RANGE

100 to 

120 VAC /

220 to 

240 VAC

INPUT FREQUEN-

CY RANGE

50 HZ

/

60 HZ

MAX OPERATING 

CURRENT

1.4 AMPS @ 115 VAC

.8 AMPS @ 230 VAC

DANGER

DO NOT perform repairs or maintenance on this game with the power ON. 

Unplug the unit from the wall outlet or shut off the power strip located inside the cabinet. 

!

!

NOTICE

Modifications to the mechanical, electrical and structural components of this game 

may void its compliance certifications.

!

!

WARNING

Use of flammable subtances can cause sever burns or serious injury.

Always use NON-FLAMMABLE solvents for cleaning. DO NOT use gasoline, kerosene or thinners.

!

!

CAUTION

Lifting heavy objects can cause back, neck or other injuries. Be sure adequate lifting and moving 

devices are available when unloading, unpacking and moving this game. 

!

!

ATTENTION

Be sure the electrical power matches the game requirements. See the serial number located on the 

back of the game cabinet. Always plug into a grounded circuit. If the supply cord is damaged, it must 

be replaced by an approved cord or assembly provided by the manufacturer.  

A shielded power cable must be used for the game to retain EU/EMC compliance. 

!

!

IN CASE OF EMERGENCY

UNPLUG THE POWER CORD.

The power cord must be accessible at all times in case of an emergency.  

!

!

This appliance is suitable for INDOOR, DRY locations only. 

Содержание quik drop

Страница 1: ...1...

Страница 2: ...2 8936 E sales baytekgames com All games are proudly manufactured at our factory in Pulaski Wisconsin USA JOIN OUR SERVICE FIRST NETWORK This free service is intended to keep you up to date on the lat...

Страница 3: ...RMATION 2 WELCOME TO Quik Drop 4 GAME SPECIFICATIONS 5 LINKING KIT SETUP GUIDE 6 14 LINKING KIT LED DIAGRAM 15 DIP SWITCH SETTINGS 16 WIRING DIAGRAMS 17 18 TROUBLESHOOTING 19 20 DIAGNOSTICS 21 PARTS L...

Страница 4: ...tory if you have any questions or would like some more information Thank you for your purchase Your business is important to us and we hope you enjoy this game as much as we do Your Friends at Bay Tek...

Страница 5: ...mpliance certifications WARNING Use of flammable subtances can cause sever burns or serious injury Always use NON FLAMMABLE solvents for cleaning DO NOT use gasoline kerosene or thinners CAUTION Lifti...

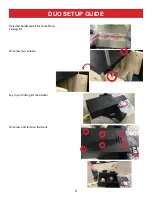
Страница 6: ...6 DUO SETUP GUIDE Unscrew two screws Included hardware kit for Quik Drop Linking kit Lay top of linking kit face down Unscrew and remove the back...

Страница 7: ...7 Remove 4 bolts Stand bottom part of linking kit up and slide top piece in place Secure top to bottom with the 4 bolts that were previously removed Remove the back of bottom piece DUO SETUP GUIDE...

Страница 8: ...other red cord right globe Clip into saddle Black CE5862 goes up through opening to top piece of linking kit to connect to other black cord left globe CE5863 connect to matching cord The cord with tw...

Страница 9: ...ng at the top of the top linking kit to attach to the left cord Connect other end of cord to the right cord on top Then pull excess cord into the cabinet of the top part of the linking kit Screw the b...

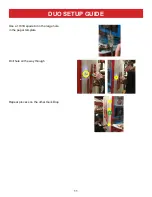
Страница 10: ...ical position Take the paper template out of the box Place paper template along top edge of the game Tape in place Make sure there are no cords in line with template screw holes before drilling Use a...

Страница 11: ...11 Use a 13 16 spade bit in the large hole in the paper template Drill hole all the way through Repeat process on the other Quik Drop DUO SETUP GUIDE...

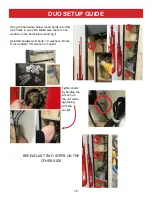
Страница 12: ...es in one side Make sure there is one washer on the bolt before inserting it Included hardware 6 bolts 12 washers 6 nuts Tools needed 1 2 wrench or socket REPEAT LAST TWO STEPS ON THE OTHER SIDE Tight...

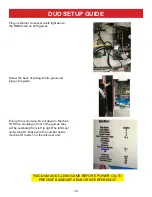
Страница 13: ...right hole to the right Quik Drop game Unscrew screw from the steel and add the green and yellow cord to it Screw back in place Repeat process with other green and yellow cord with the left Quik Drop...

Страница 14: ...lace and plug in the game Pull up the main menu Scroll down to Machine ID When standing in front of the games they will be numbered from left to right The left most unit will be 1 Make sure the number...

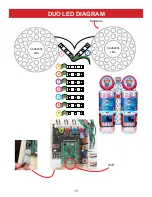
Страница 15: ...15 DUO LED DIAGRAM 9 8 7 5 6 3 4 1 2 Marquee AACB6505 LEDs AACB6505 LEDs USB 1 2 3 4 5 6 7 8 9...

Страница 16: ...TTINGS If there is only one quik drop one marquee the dip switch settings should be set to 1 as shown above If there is only two quik drop two marquees linked the dip switch settings should be set to...

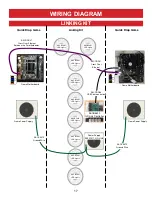
Страница 17: ...D Lights AACB5801 LED Lights AACB5801 LED Lights AACB5801 LED Lights AACB5801 LED Lights Power Supply AAPS1011 QD LINK Quick Drop Game Quick Drop Game Linking Kit AACE5870 Ground Wire AACE5870 Ground...

Страница 18: ...840 AACE5840 AACE5860 4 3 1 2 12 Volt 5 Volt Power In AACE5872 AACB5801 LED Lights AACB5801 LED Lights AACB5801 LED Lights AACB5801 LED Lights AACB5801 LED Lights AACB5801 LED Lights AACB5801 LED Ligh...

Страница 19: ...ectly from power supply Replace LED if needed AACE5840 Check cables from LED board to Power Supply AACE5840 AACE5860 Check for 12 Volts from power supply Replace Power Supply if needed Part AAPS1011 Q...

Страница 20: ...Version is 1 07 or higher Verify Link Server Version is 1 0 or higher Verify Link Server Version is 1 0 or higher Physical wire connections Link Server Version This shows because of the cross over Et...

Страница 21: ...ly to Board Turn power ON Power supply fan comes ON Power supply fan remains OFF Turn power OFF Reconnect the outputs at the Link Controller Board one at a time Wait 3 minutes be tween tests to turn p...

Страница 22: ...e R7sd4 AACB5800 Assy Pcba Qd Link Marquee Controller AACB5801 Red Ball Lights Board AACE5840 Cable L R Instruction Led Cable AACE5860 Cable Assy Power To Mini Stick Light AACE5861 Cable Assy Button 1...

Страница 23: ...e quickest and provide you a valuable troubleshooting option Call our technicians to get recommendations for what you should keep on hand for spare parts Technical Support You are the best tool for tr...

Страница 24: ...product or as a result of any unauthorized repairs or alterations The warranty does not apply if any serial number decal is altered defaced or removed from its original position Should you need your g...

Отзывы: