background image

13 


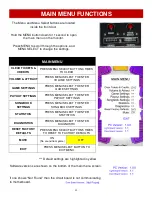
MAIN MENU FUNCTIONS 

The Menu and Menu Select buttons are located 

inside the front door. 


Hold the MENU button down for 1 second to open 

the main menu on the monitor. 


Press MENU to scroll through the options, and 

MENU SELECT to change the settings. 

MAIN MENU 

CLEAR TICKETS & 

CREDITS 

PRESS MENU SELECT BUTTON 3 TIMES 

TO CLEAR  

VOLUME & ATTRACT 

PRESS MENU SELECT TO ENTER                

VOLUME SETTINGS 

GAME SETTINGS 

PRESS MENU SELECT TO ENTER              

GAME SETTINGS 

PAYOUT SETTINGS 

PRESS MENU SELECT TO ENTER                

PAYOUT SETTINGS 

SONGBOOK        

SETTINGS 

PRESS MENU SELECT TO ENTER              

SONGBOOK SETTINGS 

STATISTICS 

PRESS MENU SELECT TO ENTER                

STATISTICS 

DIAGNOSTICS 

PRESS MENU SELECT TO ENTER                  

DIAGNOSTIC 

RESET FACTORY 

DEFAULTS 

PRESS MENU SELECT BUTTON 5 TIMES 

TO RESET TO FACTORY DEFAULTS 

MUTE           

ON                             

(

No sound from game)


OFF 

EXIT 

PRESS MENU SELECT BUTTON TO                 

EXIT MENU 

*** Default settings are highlighted in yellow 

Software versions are shown on the bottom of the main menu screen. 
 
 
If one shows “Not Found” then the circuit board is not communicating  
to motherboard. 

Содержание Piano Keys

Страница 1: ......

Страница 2: ...on the latest game information early notification of parts specials pertinent technical bulletins updates on retro fit parts software upgrades and much more Log on to http www baytekent com Then clic...

Страница 3: ...UME ATTRACT 14 GAME SETTINGS 14 PAYOUT SETTINGS 15 SONGBOOK SETTINGS 16 STATISTICS 17 DIAGNOSTICS 17 DIPSWITCH SETTINGS 18 CIRCUIT BOARD LAYOUT 19 WIRING DIAGRAMS 20 24 DIAGNOSTICS 25 29 POWER SUPPLY...

Страница 4: ...umulating tickets as you go The faster and more accurately you play the more tickets you win Please take a moment to read through this manual as it contains a lot of helpful information Be sure to con...

Страница 5: ...Swipe card or insert credits to start game Follow the colored squares on the screen to play on the oversized keys The faster and more accurately you play the more tickets you win Play again to beat yo...

Страница 6: ...87 cm DEPTH 54 138 cm HEIGHT Adjustable to 84 3 4 107 272 cm OPERATING TEMPERATURE FAHRENHEIT 45 80 F CELSIUS 7 2 26 7 C SHIPPING DIMENSIONS WIDTH 40 DEPTH 60 HEIGHT 90 POWER REQUIREMENTS INPUT VOLTAG...

Страница 7: ...e small plastic bag taped to the top console PIANO KEYS GAME SETUP Open the front door using a H95 key Tools Needed 1 step ladder 6 8 foot 2 Phillips screwdriver bit 2 people Diagonal Cutting Pliers S...

Страница 8: ...the cables Raise the marquee to the top of the game From the back of the cabinet feed the cable harness down the left side hole into the game cabinet Marquee Preparation Work Locate the 2 of part A5B...

Страница 9: ...along the left side of the back of game cabinet Locate the hardware needed to install marquee to top of game 2 each of A5BOPH320 A5WAFL060 A5WASI020 1 4 20 by 1 1 2 1 4 Flat Washer 1 4 Split Washer P...

Страница 10: ...from the front of monitor cover Plug in game There are 2 options Option 1 Power Cord from Back of Cabinet Unclip the power cord from back of game carefully extend power cord and plug into the wall Op...

Страница 11: ...DJUSTABLE MARQUEE Components of the marquee can be removed to accommodate a lower ceiling height Refer to chart below for available options 8 11 107 272 cm 8 3 99 252 cm 7 11 95 242 cm 7 3 4 84 3 4 21...

Страница 12: ...Verify Swipe Prompt set to Enabled Go to Game Menu Set Redemption Type to desired option Check dipswitches on the I O Aux Board in the front of game Verify Dipswitch 5 ON Option 1 Card swipe systems m...

Страница 13: ...SELECT TO ENTER GAME SETTINGS PAYOUT SETTINGS PRESS MENU SELECT TO ENTER PAYOUT SETTINGS SONGBOOK SETTINGS PRESS MENU SELECT TO ENTER SONGBOOK SETTINGS STATISTICS PRESS MENU SELECT TO ENTER STATISTIC...

Страница 14: ...nds TO In increments of 1 second 60 Seconds DEFAULT 20 Seconds BAD NOTE PENALTY Timed delay if wrong key is pressed 0 0 Seconds No Penalty 0 1 Seconds TO In increments of 0 1 second 2 Seconds DEFAULT...

Страница 15: ...O In increments of 1 20 DEFAULT 1 SWIPE PROMPT ENABLED Shows Swipe Card to Play OR DISABLED Shows Credits DEFAULT ENABLED TICKET PATTERN Refer to Chart Below DEFAULT 9 FIXED TICKETS Fixed tickets give...

Страница 16: ...L ENABLED DISABLED LONDON BRIDGES ENABLED DISABLED MARY LITTLE LAMB ENABLED DISABLED ODE TO JOY ENABLED DISABLED OLD MCDONALD ENABLED DISABLED STAR SPANGLED BANNER ENABLED DISABLED TAKE ME OUT ENABLED...

Страница 17: ...PRESS MENU SELECT BUTTON 3 TIMES TO RESET HIGH SCORES BACK PRESS MENU SELECT TO RETURN TO MAIN MENU DIAGNOSTIC LEFT KEY INPUT UP DOWN When key is pressed LEFT MIDDLE KEY INPUT UP DOWN When key is pres...

Страница 18: ...nse tickets X 3 NJ LOCKOUT Saves tickets owed and unused credits after a power loss X 4 1 2 TICKET PAYOUT Dispenses 1 2 the amount of tickets as shown on screen It will round up odd amounts of tickets...

Страница 19: ...5CBL5900 USB Communication to Motherboard AACB5156 Power Dist Board Power In from Power Supply CE13004 CE13005 CE13007 CE13038 CE13008 CE13006 CE13014 AACE13022 12 V Power to A5CB9600 AACE13017 Power...

Страница 20: ...und Enable Signal 12 Volt Power Coin Switches and Lights AACBL4A DOOR UCL Connector Card Swipe system cable would be plugged into this connector AACE13014 Power In from Power Distribution Board AACB96...

Страница 21: ...o LED is ON Once key is pressed Sensor is not blocked so LED is OFF AACE13021 AACE13032 AACE13033 Each Red and Black wires go up to the marquee to power marquee key lights Key Lights Four sets of LED...

Страница 22: ...rquee Lights Behind Piano Keys Lights up as the keys are pressed Marquee Lights are connected together around perimeter of marquee 9 total bulbs A5LI1302 A 5 L I 1 3 0 2 AACE13030 AACE13040 AACE13034...

Страница 23: ...Connectors Orange Connectors Gold Connectors Gold Connectors AACE13016 Left Inside LED s AACE13037 Left Outside LED s AACE13005 Power to Door Board AACE13015 Monitor Surround LED s AACE13007 AACE1301...

Страница 24: ...Power Supply Cables to Power Distribution Board AACB13000 Key Controller Board AACE13022 12 VDC In From Power Distribution Board A5CB9600 Audio Amplifier Plug input cable into end of A5CEAU010 AACB960...

Страница 25: ...O Aux Board AACB9604 Problem Probable Cause Remedy Monitor powers on but everything else off Power Supply not ON Power supply unplugged Rocker Switch Power supply shutting down because of 12 Volt over...

Страница 26: ...ies it Volume set to zero in menu Ensure Mute is set to OFF Disconnected loose or broken wires Faulty speaker Enter Volume Attract Menu and verify Game Volume Attract Volume is not zero Check connecti...

Страница 27: ...ACE13038 A5PS1013 Refer to Power Distribution Power Out Wiring Diagram Key lights in marquee do not light up Do pressed key lights work correctly If no refer to Lights Under Pressed Keys do not Light...

Страница 28: ...e all OFF Tickets do not dispense or Wrong amount dispensed Check for the correct amount of tickets showing on Monitor Marquee Outline LED s and Marquee LED stick do not work All three of the LED s no...

Страница 29: ...rd Replace moth er board AAMB10 HD Monitor has nothing at all on power up Power cable unplugged from moni tor Faulty monitor Ensure power is plugged into back of monitor down to power strip Replace mo...

Страница 30: ...to locate short If power supply still does not power on then replace power supply A5PS1013 or replace motherboard AAMB10 HD 1 Verify AC power to game Check power strip in front door The rocker switch...

Страница 31: ...ndard DBA is MEI AE2654 U5 Part A5AC9101 or A5AC9094 Determine if Bill Acceptor has power Turn game ON The bill acceptor should make noise as stacker cycles and green lights on outside bezel should fl...

Страница 32: ...he cabinet The piano key drawer is designed to slide out to access the lights and sensors Trash and debris can also be removed from between the keys Tools Needed 7 16 Wrench The sensors can now be cle...

Страница 33: ...c surround bezel and set aside for later Unplug monitor power from power strip and the HDMI 1 cable from the back of the old monitor Remove and cable clamps to ensure the cables will come out with the...

Страница 34: ...screws from the lower back of monitor frame Re install the white plastic surround Plug the monitor power back into the power strip and the HDMI 1 cable into the back of the new monitor Set up Monitor...

Страница 35: ...NKING PLATES DOOR BOARD PINOUT A5PL8900 Plate used for Bill Validator A5PL9995 Plate used instead of ticket dispenser A5PL4200 DBA Plate for 12V Upstacker Bill Acceptor A5PL9998 Plate used instead of...

Страница 36: ...te control to turn the TV on off and to access the TV menu to adjust settings The following screen shots are the recommend settings for the original A5MO5502 TV During February of 2019 the TV changed...

Страница 37: ...ssy Marquee Light Split Power AACE13007 Cable Assy Monitor Light Power AACE13008 Cable Assy Game Play Light Power AACE13010 Cable Assy Speaker Wires AACE13011 Cable Assy Menu Select AACE13012 Cable As...

Страница 38: ...38 DECAL DIAGRAM...

Страница 39: ...003 A5LI1302 A5LK2001 A5LK5002 A5ME2035 A5ME4182 A5ME5300 A5ME5301 A5PL4200 A5PL8900 A5PS1013 A5RO5300 A5RVNY010 A5TD1 A5VF5300 A5CBL5900 A5CE2300 A5CEAU010 A5CORD35A A5CORD5 A5OU1000 AACBL4A DOOR AAC...

Страница 40: ...NTENANCE LOG If you need to make repairs or order replacement parts it is a good idea to keep a log Below is a chart you can use to track repairs and maintenance NOTES DATE MAINTENANCE PERFORMED PARTS...

Страница 41: ...parts Technical Support You are the best tool for troubleshooting Your abilities to understand the game and your skills to repair the game are invaluable to us If you need help you know you can call...

Страница 42: ...red defaced or removed from it s original position Should you need your game serviced determine the serial number from the decal on the back of the game cabinet or main board and call 920 822 3951 Ext...

Страница 43: ...43...

Отзывы: