


3
9.
Caulk the outside perimeter to make weather tight.
10.
Slide the Counter Top and Red Bin Assembly back into the drawer shell/frame, align the
Counter Top and reuse the screws and holes to secure it.
11.
Re-install the Back Panel and then test the Drawer and Lock operation.
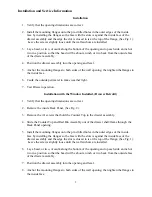
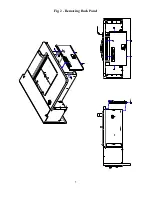
Servicing the Inside of the Drawer
Access to the inside of the drawer is through the inside back panel. There are two screws that go
into the bottom of the counter top, and two up into the bottom drawer plate, that hold the back
panel in place. There is one screw on each side that fastens the back panel to the vertical sides of
the drawer frame. After removing the screws, tilt the bottom of the back panel out, and then
drop it down to remove, (See Fig. 2). Reverse this procedure to reinstall the back panel.
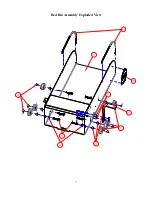
Drawer Bin Removal
To remove the Red Bin, it is necessary to remove the back panel as stated above, and then
remove the two bolts and spacers attaching the operator handle. The bin is then pulled into the
building to remove it from the drawer assembly.
Reinstalling the drawer is as simple as sliding the drawer back into position and reversing the
above procedure.
Troubleshooting
Drawer won't work.........
Check for damage to drawer.
Is the drawer jammed? If the drawer is jammed, correct the problem.
Drawer won't run out...
Check night latch, set to unlock.
Check that the customer door latches work freely.
Drawer won’t close fully…
Check that night latch is set to unlock.
Check for damage to drawer.
Check for object between the sliding bin and the inside back cover.
Is the drawer jammed? If the drawer is jammed, correct the problem.
After completing the above, if a problem continues, contact qualified service personnel.
Содержание Basic Manual Transaction Drawer 3
Страница 2: ......
Страница 4: ......
Страница 8: ...4 Fig 1 Mounting Flange Assembly...
Страница 9: ...5 Fig 2 Removing Back Panel...
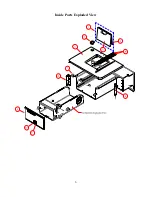
Страница 10: ...6 Inside Parts Exploded View...
Страница 11: ...7 Red Bin Assembly Exploded View...
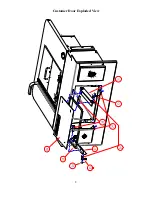
Страница 12: ...8 Customer Door Exploded View...
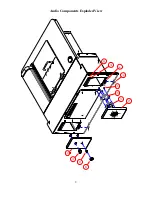
Страница 13: ...9 Audio Components Exploded View...
Страница 18: ......