


2
Installation and Service Information
Installation
1.
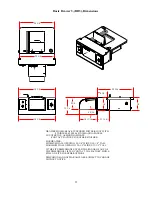
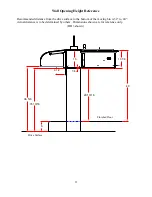
Verify that the opening dimensions are correct.
2.
Install the mounting flanges onto the pre-drilled holes in the outer edges of the inside
face by installing the flanges so the face with the slots is against the inside face of the
drawer assembly and the edge the slot is closest to is at the top of the flange, (See Fig. 1).
Leave the screws slightly loose until the wall anchors are installed.
3.
Lay a bead, or two, of caulk along the bottom of the opening and up each side an inch or
two in a position so that the bead will be about an inch or two back from the outside face
of the drawer assembly.
4.
Position the drawer assembly into the opening and level.
5.
Anchor the mounting flanges to both sides of the wall opening, then tighten the flanges to
the inside face.
6.
Caulk the outside perimeter to make weather tight.
7.
Test Drawer operation.
Installation with the Window Installed, (Drawer Retrofit)
1.
Verify that the opening dimensions are correct.
2.
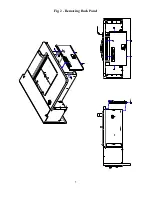
Remove the inside Back Panel, (See Fig. 2).
3.
Remove the (4) screws that hold the Counter Top to the drawer assembly.
4.
Slide the Counter Top and Red Bin Assembly out of the drawer shell/frame through the
Back Panel opening.
5.
Install the mounting flanges onto the pre-drilled holes in the outer edges of the inside
face by installing the flanges so the face with the slots is against the inside face of the
drawer assembly and the edge the slot is closest to is at the top of the flange, (See Fig. 1).
Leave the screws slightly loose until the wall anchors are installed.
6.
Lay a bead, or two, of caulk along the bottom of the opening and up each side an inch or
two in a position so that the bead will be about an inch or two back from the outside face
of the drawer assembly.
7.
Position the drawer assembly into the opening and level.
8.
Anchor the mounting flanges to both sides of the wall opening, then tighten the flanges to
the inside face.
Содержание Basic Manual Transaction Drawer 3
Страница 2: ......
Страница 4: ......
Страница 8: ...4 Fig 1 Mounting Flange Assembly...
Страница 9: ...5 Fig 2 Removing Back Panel...
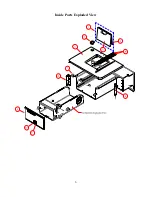
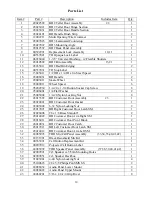
Страница 10: ...6 Inside Parts Exploded View...
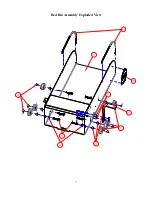
Страница 11: ...7 Red Bin Assembly Exploded View...
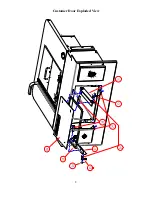
Страница 12: ...8 Customer Door Exploded View...
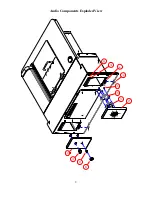
Страница 13: ...9 Audio Components Exploded View...
Страница 18: ......