
B062-002-PS2
Console Module
B062-002-USB
Console Module
This Quick Start Guide briefl y describes how
to install and operate the B062-002-PS2/
B062-002-USB Console Module with the
Matrix KVM Switch.
1
2
5
Package Contents
The B062-002-PS2/B062-002-USB
Front View
Hardware Installation
The complete package consists of:
• (1) B062-002-PS2 or B062-002-USB Console Module
• (1) Custom KVM Cable
• (1) AC Power Adapter
• (1) Quick Start Guide
If anything is missing or damaged, please contact your dealer
immediately.
1. Link LED – Indicates good connection
2. Local LED – Indicates local PC is being accessed
3. Remote LED – Indicates remote console is being accessed
4. Local/Remote Pushbutton
Note: Local PC or KVM Switch can also be accessed by
using the following Hotkey Sequence: N minus (-)
key + minus (-) key. Press and hold the NumLock key, hit
the minus (-) key twice, then release the NumLock key.
Before you begin, make sure that power to all the devices
you will be connecting to have been turned off. Follow the
4 steps listed below to properly install your Console Module:
1. Plug your keyboard, mouse and monitor into the
appropriate console ports of the B062-002-PS2/
B062-002-USB Console Module. Each port is labeled
with the appropriate icon to indicate itself.
2. Plug the RJ45 connector into its appropriate port on the
rear panel of the B062-002-PS2/B062-002-USB Console
Module. At the other end, plug the RJ45 connector into
one of the console ports on the rear panel of the
Matrix KVM switch.
3
The B062-002-PS2/B062-002-USB
Rear View
1. Power Jack
2. Local PC Connector
3. Cat5 Port to connect to KVM
4. Firmware recovery switch
5. Console port connectors
Console
• A VGA, SVGA or Multisync monitor capable of the highest
resolution that you will be using on any computer in
the
installation.
• A PS/2 Style Keyboard and Mouse (B062-002-PS2) or a
USB Style Keyboard and Mouse (B062-002-USB)
Cables
• For optimal signal integrity and to simplify layout, a high
quality Console Module to Local PC cable (with custom
HD15 connector) is included with the Console Module.
• Use Tripp Lite N001-, N002- or N105-Series Cat5 cable to
connect to KVM switch.
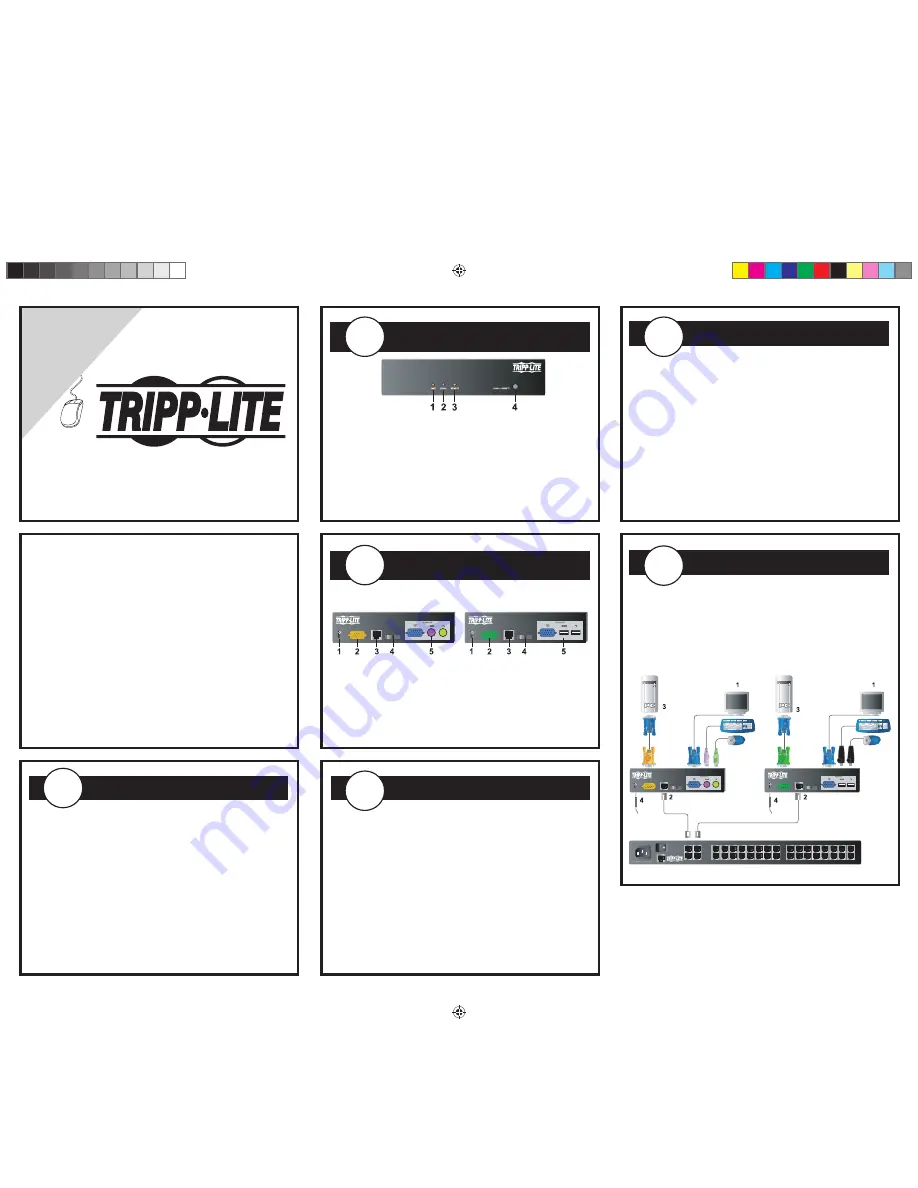
4
System Requirements
6
Hardware Installation ctd….
3. For the Local PC connection, use the cable provided to
connect to the keyboard, mouse and monitor ports of your
local PC. At the other end, plug the HD15 connector into
the appropriate port of the B062-002-PS2/B062-002-USB.
4. Plug in the power adapter, then turn on the
connected
computer.
B062-002-PS2
B062-002-PS2
B062-002-USB
B062-002-USB
B060-032
Regulatory Compliance Identifi cation Numbers
For the purpose of regulatory compliance certifi cations and identifi cation, your
Tripp Lite product has been assigned a unique series number. The series number
can be found on the product nameplate label, along with all required approval
markings and information. When requesting compliance information for this
product, always refer to the series number. The series number should not be
confused with the marking name or model number of the product.
Tripp Lite follows a policy of continuous improvement. Product specifi cations
are subject to change without notice. Made in China.
WARRANTY
REGISTRA
TION
Register online today for
a chance to win a FREE T
ripp Lite
product! www
.tripplite.com/war
ranty
200801150--quick start.indd 1
200801150--quick start.indd 1
2/4/2008 2:27:07 PM
2/4/2008 2:27:07 PM


