Syscompact 2000 M pro
Configuring and operating the IRG 2000
822-175-2
45 / 98
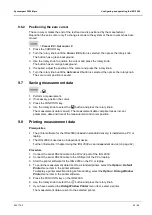
9.6.2 Positioning the zero cursor
The zero cursor marks the end of the test lead and is positioned by the manufacturer.
Reposition the zero cursor only if a change is made to the system or the zero cursor has been
moved.
>
Cursor # 0
>
Set cursor 0
1. Press the
CURSOR
key.
2. Turn the rotary knob until the
Cursor # 0
button is selected, then press the rotary knob.
The button has a green background.
3. Use the rotary knob to position the cursor and press the rotary knob.
The button has an orange background.
4. If required, adjust the position of the cursor and press the rotary knob.
5. Turn the rotary knob until the
Set cursor 0
button is selected, then press the rotary knob.
The zero cursor position is saved.
9.7 Saving measurement data
>
1. Perform a measurement.
2. If necessary, position the cursor.
3. Press the
FUNCTION
key.
4. Use the rotary knob to select the
button and press the rotary knob.
The measurement data is saved. The measurement data comprise traces incl. set
parameters, date and time of the measurement and cursor position.
9.8 Printing measurement data
Prerequisites
The printer software for the IRG 2000 (included in standard delivery) is installed on a PC or
laptop.
The IRG 2000 is used as an independent device.
Further information: Chapter
Using the IRG 2000 as an independent device
(on page 42)
Procedure
1. Connect the serial RS232 cable to the
RS-232
port of the IRG 2000.
2. Connect the serial RS232 cable to the USB port of the PC or laptop.
3. Start the printer software for the IRG 2000 on the PC or laptop.
4. To send the measurement data direct to a standard printer, select the
Option
>
Default
Printer
menu item in the printer software.
To display a printer selection dialog before printing, select the
Option
>
Dialog Window
Printer
menu item in the printer software.
5. Press the
FUNCTION
key on the IRG 2000.
6. Use the rotary knob to select the
button and press the rotary knob.
7. If you have selected the
Dialog Window Printer
menu item, select a printer.
The measurement data are sent to the selected printer.
Содержание Sys compact 2000 M pro
Страница 97: ......

