background image

6.3 Replace Cutting 
Teeth

 WARNING

Prevent serious injury or death caused 

by unexpected movement:

1� 

Park on a level surface�

2� 

Lower boom mower to a comfortable 

or preferred level to access cutting 

teeth�

3� 

Engage parking brake�

4� 

Shut off engine and remove key�

5� 

Support boom mower with an 

adequate device�

1.  Park skidsteer and boom mower on a level 

surface.

2.  Lower boom mower to a comfortable or 

preferred level to access cutting teeth. Support 

boom mower with an adequate device to 

prevent mower falling while working under 

mower.

3.  Shut off engine and remove key.

4.  Inspect cutting teeth for damage and wear.

5.  Replace individual teeth as needed.

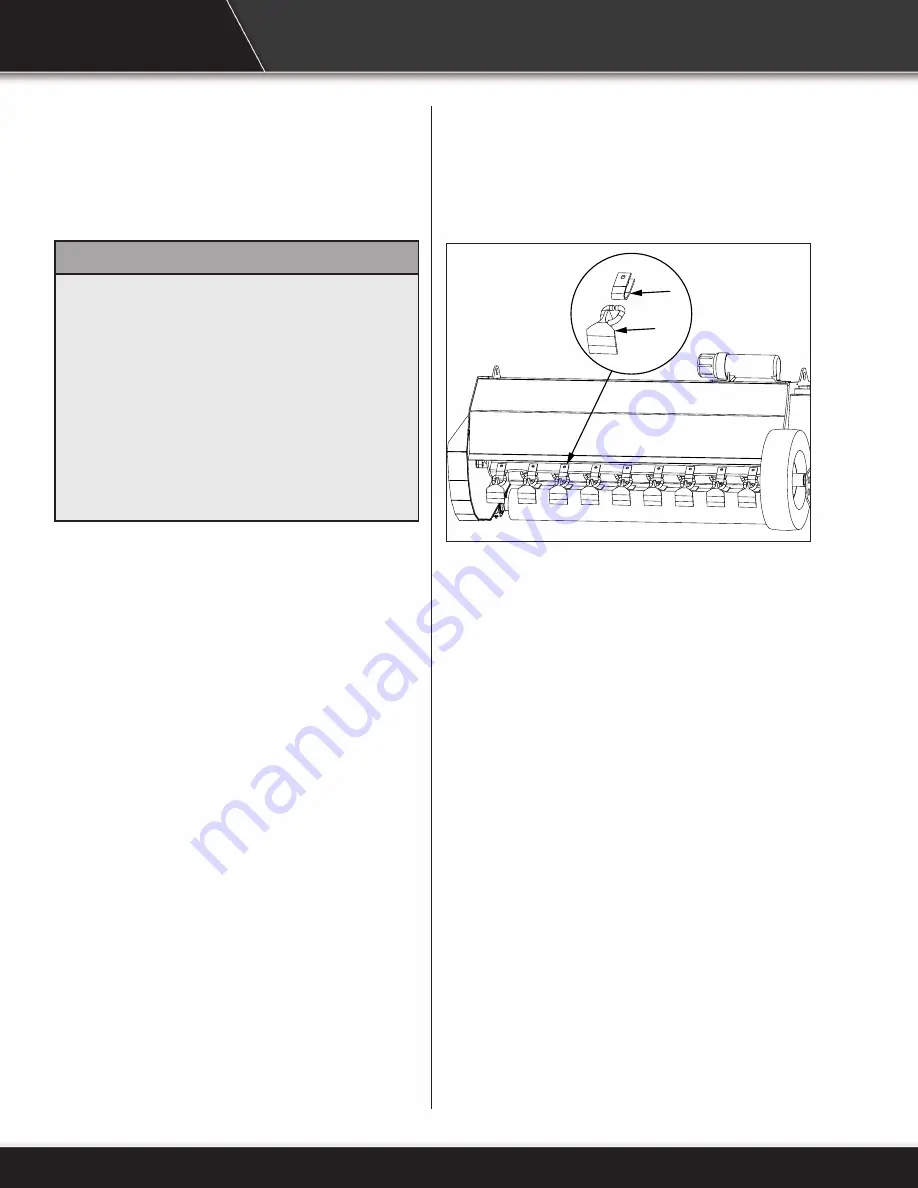
6.  Remove mounting hardware and bracket (A) 

with tooth (B). Install new tooth on bracket (A) 

and install on rotor.

7.  Install bolt and tighten to 170 lb-ft (230 Nm) of 

torque.

B

A

Note:

 Parts breakdown can be found on 

Baumalight’s website. www.baumalight.com

22

Содержание SWA750/HX550

Страница 1: ...Skidsteer Boom Mower OPERATOR S MANUAL Issue Date Aug 2020 ...

Страница 2: ...s 5 3 SAFETY SIGNS 6 3 1 SWF Models 6 3 2 SWA Models 7 4 ASSEMBLY 10 4 1 SWF Models 10 4 2 SWA Models 11 5 OPERATION 13 5 1 Preparation For Use 13 5 2 Hydraulic Connections 13 5 3 Machine Components 14 5 4 Control Boxes 14 5 5 Attach Boom Mower 15 5 6 Transporting 16 5 7 First Time User Tips 16 5 8 Field Operation 17 5 9 Height Adjustment 18 5 10 Hydraulic Adjustment 19 5 10 Detach Boom Mower 20 6...

Страница 3: ...or additional copies of the manuals OPERATOR ORIENTATION The directions left right front and rear as mentioned throughout this manual are as seen from the driver s seat and facing in the direction of travel 1 1 Overview The boom mower is designed to be used by an experienced operator Operator must be trained in the safe operation of a skidsteer and hazards related to using the boom mower and the s...

Страница 4: ...t avoided could result in minor or moderate injury NOTICE NOTICE Indicates a situation that could result in damage to the equipment or other property 2 1 Safety Alert Symbol And Safety Words 2 2 Operational Hazards WARNING Prevent death or serious injury Read and understand this manual before operating boom mower Always stop engine and remove key before leaving operators seat Never allow anyone ne...

Страница 5: ...Keep your equipment in proper working condition Know the regulations and laws that apply to you and your industry This manual is not to replace any regulations or laws Additional information may be found at www asae org or www osha gov If you do not understand any part of this manual contact Baumalight at 866 820 7603 Prepare for Emergencies Be prepared in case of emergencies Keep a fire extinguis...

Страница 6: ...can result if equipment comes near or contacts power lines Electrocution can occur without direct contact Check clearance before raising equipment DO NOT leave the operator s seat if any part of the equipment contacts electric lines or cables Detach Boom Mower Safely Detach boom mower on a firm and level surface Be sure people livestock and pets are clear of machinery Raised Attachment WARNING Cru...

Страница 7: ... state and federal regulations The health effects from exposure to wood dust are due to chemicals in the wood or chemical substances in the wood created by bacteria fungi or molds 2 3 Maintenance Hazards Before servicing park machine on a firm and level surface set parking brake and place a Do Not Operate tag on control panel Read and understand this manual If you do not understand any part of the...

Страница 8: ...cing WARNING Crushing hazard Before performing inspections service or maintenance Park machine on firm level surface Engage parking brake Lower boom mower to ground Turn engine off and remove key Place Do Not Operate tag on control panel 3 SAFETY SIGNS A B B B F B C E E F D C D G H A I A K J 3 1 SWF Models 6 ...

Страница 9: ...can expose you to chemicals including 1 3 Butadiene and lead which are known to the state of California to cause cancer and birth defects or other reproductive harm For more information go to www P65Warnings ca gov D005262 3 2 SWA Models A B B E F F H G I B E D A A D J K 7 ...

Страница 10: ...F D005405 D005405 G D004878 D004878 D D005126 D005126 E D005129 D005129 8 ...

Страница 11: ...H D005440 Cutting Head ON OFF D005440 I D005411 D005411 J D005125 D005125 K D005517 D005517 9 ...

Страница 12: ... covered by warranty 1 Connect boom mower to skidsteer See Attach Boom Mower in section 5 2 Verify valve lever is in the Cutting Head Off position 3 Position mower boom to cutting unit A and install pins B Install pin retainers 4 Pump grease into grease fittings on pins B A B 4 ASSEMBLY 4 1 SWF Models 5 Remove cover C 6 Connect case drain hose small hose to case drain fitting D on motor 7 Install ...

Страница 13: ... Light on valve will illuminate when that valve is selected F Tilt G Stick H Boom F G H 13 Install all covers 4 2 SWA Models 1 Connect boom mower to skidsteer See Attach Boom Mower in section 5 2 Remove pins A A 3 Verify valve lever is in the Cutting Head Off position 4 Operate skidsteer and position boom so bushings align and install pins A 5 Shut off skidsteer engine A 11 ...

Страница 14: ...tor This hose is critical and must be installed 9 Route pressure and return hoses through opening G remove hose plugs and connect to ports H on motor Connect hose with red zip tie to fitting on motor with red zip tie Connect hose with no zip tie to fitting on motor with no zip tie 10 Verify hoses are clear of pinch points and moving and or rotating parts C C D E G F H 11 Install motor cover B 12 ...

Страница 15: ...red during moving or shipping Review all skidsteer pre start instructions and verify that all recommended steps and procedures have been followed 5 OPERATION 5 1 Preparation For Use 5 2 Hydraulic Connections WARNING Pressurized fluids can penetrate the skin Disconnect and lock out power source before disconnecting and or connecting hydraulic hoses The boom mower is equipped with three hoses You mu...

Страница 16: ...nual Holding Tube E Adjustable Floating Deck Roller F Rotor G Flail Teeth H Height Adjustable Tire I Hydraulic Motor J Hydraulic Valves A B C J D E F G H I J 5 3 Machine Components 5 4 Control Boxes D004126 SWA Directional Control Box D004876 TILT SELECT SWA Selector Control Box 14 ...

Страница 17: ...oom mower 1 Read and follow all safety instructions 2 Attach skidsteer to boom mower See skidsteer operator s manual 3 Connect pressure return and case drain hydraulic hoses Verify hydraulic hoses are clear of pinch areas and moving parts 4 Move to a clear open area to test functions 5 5 Attach Boom Mower D004162 SWF Directional Control Box D004127 STICK SELECT TILT SELECT SWF Selector Control Box...

Страница 18: ...mower to the operating position Operating Storage Position Operate all functions in a clear area at low speed to get a good feel for the controls Choose low density brush and move into it slowly do not expect to get the first area done fast Each operator must experiment to find a technique that works for them in their application Although it is best to mow when it is dry the machine works well in ...

Страница 19: ... operator WARNING Prevent serious injury or death Operation with raised boom may result in capsizing carrier machine 3 Unfold boom mower to the operating position 4 Lower boom mower so deck roller and tire are close to or on the ground Keep skidsteer boom close to the ground 5 Set engine speed to low idle and engage boom mower 6 Slowly increase engine speed to high idle 7 Monitor pressure gauge A ...

Страница 20: ...ncrete 5 9 Height Adjustment WARNING Prevent serious injury or death caused by unexpected movement 1 Park on a level surface 2 Lower boom mower to a comfortable or preferred level close to ground 3 Engage parking brake 4 Shut off engine and remove key 5 Support boom mower with an adequate device 1 Park skidsteer and boom mower on a level surface 2 Lower boom mower to a comfortable or preferred lev...

Страница 21: ...e key before making adjustments A Counter Balance Counter balance valve is supplied by two manufactures Both valves function the same but are different in appearance Closing counter balance valve will block oil flow one way allowing cylinder to only work one way If cylinder is collapsing valve is open too far Pressure on gauge will increase when lowering cylinders 6 Boom mower should be level fron...

Страница 22: ...ow Adjust Adjusting the flow determines how much oil is sent to cylinders and rotor The more oil that is sent to the rotor will result in cylinders moving slower If more oil is sent to the cylinder rotor speed may decrease when cylinder is activated Typical adjustment is 5 8 turn out from closed position C Pressure Relief 1 4 turn out from closed position is approximately 3000 psi 207 bar Relief m...

Страница 23: ... of dirt mulch and debris Clean out as needed 6 1 Daily 6 2 Every Four Hours WARNING Prevent serious injury or death caused by unexpected movement 1 Park on a level surface 2 Lower boom mower to ground 3 Engage parking brake 4 Shut off engine and remove key Check cutting edge A of teeth for wear and damage Keep cutting teeth in good condition Unit will cut faster and remaining teeth will last long...

Страница 24: ...el surface 2 Lower boom mower to a comfortable or preferred level to access cutting teeth Support boom mower with an adequate device to prevent mower falling while working under mower 3 Shut off engine and remove key 4 Inspect cutting teeth for damage and wear 5 Replace individual teeth as needed 6 Remove mounting hardware and bracket A with tooth B Install new tooth on bracket A and install on ro...

Страница 25: ...uire a change in lubricating periods as dictated by experience Generally a lower quantity of grease at frequent intervals is more effective than a greater quantity at extended lubrication intervals Using the table below the boom mowers operate in the 1501 2000 rpm range Determine the lubrication interval based on the hours of use per day Typical lubrication quantity is 1 pump from a standard greas...

Страница 26: ... flow to sump or reservoir Also check drain line for blockage Correct any problems before replacing shaft seal 3 2 1 Order replacement seal kit from Baumalight and follow instructions provided with kit Motor Shaft Seal Replacement manual can be found at www baumalight com support Note Parts breakdown can be found on Baumalight s website www baumalight com 6 5 Motor Shaft Seal 24 ...

Страница 27: ...the product This warranty is extended only to the original purchaser If a difficulty develops with the product you should contact your nearest Authorized Repair Center or distributor Only these locations are authorized to make repairs to the product or affect the replacement of defective parts which will be done at no charge within a reasonable time after the receipt of the product Units or parts ...

Страница 28: ...MTB MFG INC CORPORATE HEADQUARTERS 4575 Powell Rd Wallenstein Ontario Canada N0B 2S0 Phone 519 698 9864 Toll Free 866 820 7603 Fax 519 698 1087 www baumalight com 26 ...

Отзывы: