background image

Operating Instruction  


117650   


57 / 66 

EN 

Service 

There are 4 functions available in this menu: Configuration, View LOG, Advanced 
Services, and Import/Export, allowing for adjustment and display of range of 
functions and starting the appliance maintenance procedures.  


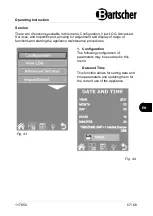
1.


Configuration 

The following configuration of 
parameters may be executed in this 
menu:  
 

Date and Time  

This function allows for setting date and 
time parameters and updating them for 
the current use of the appliance. 


Fig. 43 


Fig. 44 


Содержание Silversteam P-5230D

Страница 1: ...Silversteam P 5230D P 5110D P 7110D P 10110D 117650 117651 117652 117653 ...

Страница 2: ...tscher GmbH Franz Kleine Str 28 D 33154 Salzkotten Germany Phone 49 5258 971 0 Fax 49 5258 971 120 Technical Support Hotline 49 5258 971 197 www bartscher com Version 1 0 Date of preparation 2021 02 17 EN ...

Страница 3: ...Delivery Check 8 3 2 Packaging 8 3 3 Storage 8 4 Technical Data 9 4 1 Technical Specifications 10 4 2 Functions of the Appliance 14 4 3 List of Components of the Appliance 15 5 Installation Instructions 16 5 1 Installation 16 5 2 Inspections and Commissioning Test 21 6 Operating Instruction 23 6 1 Operation 26 6 2 Thermal processing 30 6 3 Functions menu 56 7 Cleaning and Maintenance 60 7 1 Safety...

Страница 4: ...ons included in this manual is a prerequisite for safe and proper handling of the appliance Additionally accident prevention occupational health and safety and legal regulations in force in the area the appliance is used apply Before you start using the appliance especially before turning it on read this instruction manual in order to avoid personal injuries and property damages Improper use may c...

Страница 5: ...ent Too high a mains voltage or incorrect installation may cause electric shock The appliance may be connected only if data on the rating plate correspond with the mains voltage To avoid short circuit the appliance should be kept dry If there are malfunctions during operation disconnect the appliance from the power supply Do not touch the appliance s plug with wet hands Never take hold of the appl...

Страница 6: ...rol spirit alcohol etc High temperature triggers evaporation of these materials and as a result of contact with sources of ignition an explosion may occur In case of fire disconnect the appliance from the power supply before attempting suitable fire extinguishing actions Never attempt to extinguish fire with water if the appliance is connected to the power supply Following extinction of fire ensur...

Страница 7: ... Unintended or prohibited use may cause damage to the appliance The appliance may only be used when its technical condition is flawless and allows for safe operation The appliance may only be used when all connections are executed according to rules of law in force The appliance may only be used when it is clean Use only original spare parts Never attempt to repair the appliance on your own Do not...

Страница 8: ...ndard use is prohibited and considered to be an unintended use The following is an intended use Preparation of suitable food 1 4 Unintended Use An unintended use may lead to personal injuries or property damages caused by hazardous voltage fire or high temperature The appliance may only be used to perform tasks described in this instruction manual ...

Страница 9: ...ntroduced by the user usage of unapproved spare parts We reserve the right to introduce technical modifications to the product intended for improvement of the appliance and its performance 2 2 Copyright Protection This instruction manual and texts drawings and images included in it as well as its other components are copyright protected It is prohibited to reproduce this instruction manual includi...

Страница 10: ...e used to store the appliance when relocating or when shipping the appliance to our service point in the case of any damages The packaging and its elements are made of recyclable materials Particularly these are plastic films and bags cardboard box When disposing of the packaging observe applicable domestic regulations Recyclable packaging materials should be recycled 3 3 Storage Leave the packagi...

Страница 11: ...n wheels steam production by means of direct injection Rack Control function Temperature control stepless Type of guide rails crosswise Continuous operation Thermal core probe connection side USB port Fume extractor Internal lighting LED display steam injection Delta T thermal processing thermal processing phases core temperature fan speed program temperature time Control touch Features Rounded ba...

Страница 12: ...ombi steamer Silversteam P 5230D Art No 117650 Material CNS 18 10 Thermal processing chamber material CNS 18 10 Number of guide rail pairs 5 Guide rail format 2 3 GN Distance between guide rail pairs in mm 74 Temperature range min max in C 50 300 Time setting from to in min 0 599 Number of thermal processing programmes 99 Number of thermal processing phases 8 Number of motors 1 Number of stages of...

Страница 13: ...ide rail pairs in mm 74 Temperature range min max in C 50 300 Time setting from to in min 0 599 Number of thermal processing programmes 99 Number of thermal processing phases 8 Number of motors 1 Number of stages of fan speed 3 Water connection 3 4 Connected load 7 7 kW 400 V 50 Hz Dimensions W x D x H in mm 885 x 835 x 675 Weight in kg 87 2 We reserve the right to implement technical modification...

Страница 14: ...ature range min max in C 50 300 Time setting from to in min 0 599 Number of thermal processing programmes 99 Number of thermal processing phases 8 Number of motors 2 Number of stages of fan speed 3 Water connection 3 4 Connected load 12 6 kW 400 V 50 Hz Dimensions W x D x H in mm 890 x 830 x 865 mm Weight in kg 106 8 We reserve the right to implement technical modifications The set includes 1 grat...

Страница 15: ...erature range min max in C 50 300 Time setting from to in min 0 599 Number of thermal processing programmes 99 Number of thermal processing phases 8 Number of motors 2 Number of stages of fan speed 3 Water connection 3 4 Connected load 17 4 kW 400 V 50 Hz Dimensions W x D x H in mm 890 x 830 x 1 065 Weight in kg 120 2 We reserve the right to implement technical modifications The set includes 1 gra...

Страница 16: ...inspected Appliance door contact switch interrupts the appliance operation after opening the door either the heating system or the fan are switched off When the appliance door is closed the operation is resumed 4 2 Functions of the Appliance The Silversteam P series combi steamer with electronic control is designed for preparation of food and keeping it warm with the use of suitable accessories Mo...

Страница 17: ...el 3 Ventilation openings 4 Thermal core probe connection 5 USB connection 6 Fume extractor 7 Fan 2x 8 Guide rails 9 Door 10 Door handle 11 Height adjustable feet 4x 12 Drain tray 13 Grate 14 GN container 15 Thermal processing chamber 16 Door latch 17 Contact switch 18 Control panel ventilation filter ...

Страница 18: ...tion The appliance is designed to operate in closed rooms and may not be used in open air nor subject to unfavourable atmospheric conditions The appliance may be used in properly ventilated room in order to avoid excessive accumulation of harmful substances in the air We recommend positioning the appliance under a fume extractor hood or to remove hot vapours and odours from the thermal processing ...

Страница 19: ...e it according to regulations in force in the country of installation CAUTION Choking hazard Prevent children from accessing packaging materials for instance plastic bags and EPS elements Check if the appliance is undamaged Before positioning the appliance check the dimensions and exact positions of the electric water and extraction connections Position the appliance vertically to this end the hei...

Страница 20: ... to walls low walls division walls kitchen furniture or other surfaces made of flammable materials Unconditionally observe fire fighting regulations in force Maintain minimum clearance of at least 50 mm at the rear and sides between the appliance and walls or other objects Fig 3 Leave a clearance of 500 mm between the left side of the appliance and other objects for the purpose of facilitating ins...

Страница 21: ...a closing valve and a filter between them Make sure that the closing valve is installed in an easily accessible place for the user Fig 4 ATTENTION Hydraulic water pressure should be max 3 bar If the water pressure in the installation is higher install pressure reducer upstream of the appliance The minimum water pressure should be exceeding 1 5 bar to assure correct operation of the appliance In or...

Страница 22: ...nect the appliance to electrical supply install an automatic breaker between the appliance and the electrical installation suitable for the power value Follow installation indications so that contacts of such an mechanism must feature suitable spacing providing for full discharge with respect to conditions for overvoltage category III The disconnecting mechanism should be installed so that it is a...

Страница 23: ...nspected in order to confirm the consistency of the appliance and its installation with regulations in force technical data and recommendations for safety The following conditions must be met Temperature in the installation location must exceed 4 C The thermal processing chamber must be empty All packaging elements must be fully removed including the protective film on external walls Ventilation o...

Страница 24: ...ressing the same key again The appliance switches off after opening the door and switches back on after closing it In appliances with two fans motors feature the same direction of rotation Fan motors automatically change direction every 3 minutes time depends on thermal processing duration After setting the steam injection water flows out of the water hose in the thermal processing chamber towards...

Страница 25: ...cloths Never install the appliance in the vicinity of heat sources such as a grill or a deep fryer Never leave flammable materials near the appliance Fire hazard Do not put flammable materials nor food products containing alcohol in the combi steamer it may cause self ignition and fire that in turn may lead to an explosion Avoid salting food inside the thermal processing chamber If you cannot avoi...

Страница 26: ...ng from top to bottom until reaching the centre of the product by the tip of the thermal core probe If there is the need to intervene with the prepared food during its thermal processing open the appliance door for possibly the shortest period of time to prevent temperature drop in the chamber to an extent deteriorating the thermal processing results To compensate the heat loss we recommend pre he...

Страница 27: ... product to be cooked Aluminium trays offer more uniform cooking that steel trays Cooking in a vacuum bag Product can be cooked directly inside a vacuum bag This type of cooking allows for particularly soft and flavoured meat to be obtained and at the same time decreases spoilage of the product Pack the products into appropriate bags for vacuum cooking Set the device to Mixed cycle at 100 humidity...

Страница 28: ...mounted Preparation of the Appliance 1 Before starting up clean the appliance inside and outside as well as accessories observing indications in section 6 Cleaning 2 Thoroughly dry all cleaned surfaces and elements 3 Before the first start up check the correctness of installation stability and levelling of the appliance as well as execution of all connections Appliance Start up 1 Switch the applia...

Страница 29: ... the bottom cover into the appliance The cover acts as a spacer between the heating element and l eft over food tray Carefull yi nser t the connection box with the heati ng element at the back edge of the appliance A pin in bottom par t of the c onnecti on box must enter a hol e i n the mai n appliance This way the connection box is properly mounted Control Elements Fig 7 1 ON OFF switch B Recipes...

Страница 30: ...Operating Instruction 28 66 117650 EN Start screen Fig 8 ...

Страница 31: ...ing Relative humidity percentage Temperature maintaining mode Unlock key allows a program to be changed Automatic cooling available only from the second thermal processing phase Indicator of a program changed by the user or a new program Message mode Program SETTING may be controlled during thermal processing Smoking mode Manual humidifier key Time timer Programmed start key Thermal core probe mod...

Страница 32: ...word protected and reserved exclusively for service technicians Fig 9 Touch Screen Interaction All operations may be selected by pressing the desired item or pictogram 1 Press the relevant field to change thermal processing parameters e g temperature and rotate the rotary control knob 4 Fig 7 until the required temperature setting is selected 2 To confirm the change press the parameter or rotary c...

Страница 33: ...essing key 1 Fig 10 to the left or right this function may be enabled or disabled NOTE Automatic pre heating must be executed with empty oven chamber Fig 10 Setting Thermal Processing Mode Key 2 Fig 10 is factory set as default to Convection thermal processing mode By pressing this key the thermal processing mode may be changed to Mixed or Steam Additionally you may set the following thermal proce...

Страница 34: ... case of thermal processing with the thermal core probe it is possible to choose between the thermal probe 4a and ΔT thermal processing 4b Switching between these modes allows the product to be prepared more accurately More information is provided in section Thermal Core Probe and ΔT Thermal Processing Mode Fig 12 4a Thermal processing with thermal core probe Setting Humidity Discharge Valve Only ...

Страница 35: ...ress key 7 Fig 13 and set the value Fig 13 Setting Fan Speed In Mixed and Convection thermal processing modes you may change fan speed parameters In Steam thermal processing mode this setting is automatic Fan motors are designed for uniform heat distribution in the oven chamber in order to obtain the uniform thermal processing intensity and browning of products on various levels 1 To set the fan s...

Страница 36: ...epared products in the right temperature until the user returns In Hold mode by default humidity is factory set at 20 and the fan speed at 1 For effective temperature maintenance it is recommended not to modify fan speed in this mode 1 In the case of roasted products the humidity setting is recommended to be set between 20 and 35 and in the case of brazing or stewing between 90 and 100 2 To modify...

Страница 37: ...ccessory to be introduced before the smoking phase begins At the end of the smoking phase the appliance will request for the smoking accessory to be removed Both processes must be confirmed by the user Only following the confirmation the appliances switches to the subsequent phase Fig 16 In Smoking mode it is possible to set temperature time ventilation and humidity drain valve However it is recom...

Страница 38: ...menu displayed on screen enter your message e g score the rind and set the time required If you select INF time the thermal processing cycle will continue until the user enters a new settings and confirms it If however you select a different process the thermal processing phase for a given message lasts as long as it is required and then the next thermal processing phase is commenced without reque...

Страница 39: ...pressing Advanced Customisation key Fig 19 you may manually select a specific starting phase for thermal processing or exchange it with a thermal processing phase of another thermal processing mode by selecting this thermal processing phase and confirming it with START key Thermal processing will last until the set time elapses or on reaching the product core temperature in the thermal processing ...

Страница 40: ...the following phases quick frying roasting warm keeping The essential condition for creating a successive phase is that the previous phase has a defined time If thermal processing phase 1 has the time set to infinity INF it will not be possible to create phase 2 because the first phase has no specific end Fig 19 The hold temperature keeping phase is an exception which can be set to infinity INF an...

Страница 41: ...essing program is made up of several phases which the appliance performs in ascending order thermal processing phase 1 phase 2 phase 3 etc moving from one to another automatically 1 After setting the parameters for the initial phase thermal processing phase 1 press key 11 Fig 20 to create a subsequent thermal processing phase 2 Set the required parameters for thermal processing phase 2 3 When crea...

Страница 42: ...ce if an automatic cooling phase has been set The automatic cooling phase can only be set from thermal processing phase 2 onwards After having set a high temperature thermal processing phase create a new phase and select automatic cooling from the thermal processing modes field 2 Fig 7 Once this mode has been selected the appliance will suggest factory set default temperature ventilation and humid...

Страница 43: ...pe group in the classic Recipes cook book meat fish poultry etc Proceed the following way after having created a thermal processing program press Functions key 13 Fig 22 to access Program functions screen select Save Program function key 14 Fig 22 in the following screen page press Save key 15 Fig 22 from the list select the group for saving the thermal processing program ...

Страница 44: ...mmary of phases of the selected program is displayed This mode is write protected and it is not possible to modify the thermal processing program parameters 1 If one or more thermal processing parameters are to be changed or automatic pre heating is to be activated deactivated press Advanced customisation key 18 Fig 23 Fig 23 The program is unlocked and the required changes may be introduced 2 Tur...

Страница 45: ...old and new program share some thermal processing aspects it may be copied 1 Select the group in which the thermal processing program is to be saved and then enter the name 2 Press Enter to confirm 3 Select the base thermal processing program open it and make changes by pressing Advanced customisation key 18 Fig 23 4 Execute the requested change 5 In Functions menu 20 Fig 25 select Save and then C...

Страница 46: ...in which to move the thermal processing program and confirm with Next key 16 Fig 22 Renaming Thermal Processing Program Open the thermal processing program and press Functions key 20 Fig 25 select Save and then Rename Fig 27 Type in the new name and press Enter Fig 26 Removing Thermal Processing Program 1 Open the thermal processing program for removing and press Functions key 20 Fig 25 select Sav...

Страница 47: ...egetables etc By selecting the desired product category a list of all thermal processing programs will open for the selected category Fig 27 Select the desired thermal processing program from the list by clicking the program RecipeTuner Interface Once a thermal processing program has been opened it can be modified simply by using RecipeTuner interfaces Depending on the type of thermal processing s...

Страница 48: ...evels from the lightest on the left to the most intense on the right Humidity When brazing dishes it refers to the residual humidity of the product at the end of thermal processing Dough rising It is possible to add various degrees of dough rising 20 minute phases and then perform automatic Dough rising and Roasting program Thermal processing method User interface Steaming Roasting Grilling Roasti...

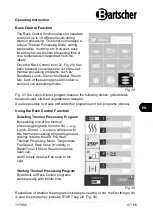
Страница 49: ...features the following dishes grilled steak breaded cutlet stir fried vegetables or lasagne It is also possible to create and add other programs and sub programs dishes Using the Rack Control Function Selecting Thermal Processing Program By selecting one of the thermal processing programs from the list e g Lunch Dinner a screen will open with this thermal processing program s general settings list...

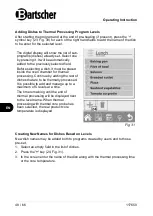
Страница 50: ... oven chamber for thermal processing Continue by adding the rest of dishes that are to be thermally processed It is possible to add and manage up to a maximum of 5 levels at a time The time remaining until the end of thermal processing will be displayed next to the level name When thermal processing with thermal core probe has been selected the real product core temperature is displayed Fig 31 Cre...

Страница 51: ... key is pressed i e when no thermal processing takes place In such a condition the selected levels are not activated They may be activated only after pressing START key and waiting until the end of pre heating if present one by one by clicking on the time indicator field to the right Modifying Thermal Processing Time Thermal Core Probe Setting It is possible to change the thermal processing time o...

Страница 52: ...closing the door will automatically reset the level settings Quick Entering of Dish During thermal processing and operation you may need to prepare a product that is not on the list It is possible to quickly enter a dish in the Rack Control list without having to save it with a specific name 1 Press the empty level and select sub program dubbed Tray 27 Fig 34 This represents a sub program for whic...

Страница 53: ... Creating New Rack Control Program In addition to already existing Rack Control programs customised programs may be created 1 Open the list of Rack Control programs and in the HOME screen press the Rack Control symbol The first program shown at the top is Manual 30 Fig 36 It makes it possible to create a new program and also to work in Rack Control mode without saving the program In the latter cas...

Страница 54: ...rol is designed to prepare different dishes separately on the individual levels The dishes may be introduced concurrently or at various times and as set times expire the appliance informs which level has reached the end of thermal processing By activating the EasyService function it is possible to have all of the dishes ready at a similar time This mode informs when it is necessary to insert dishe...

Страница 55: ...ppliance requests dishes to be inserted with a longer thermal processing time The cue is an acoustic signal and IN message Fig 38 displayed in the right field After opening and closing the door the acoustic signal is reset and the Countdown begins For remaining levels the time left to placing dishes in the oven is displayed in green Fig 37 In the same way the appliance signals when other dishes sh...

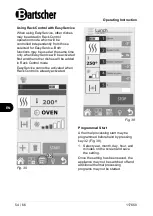
Страница 56: ...EasyService will be activated first and then other dishes will be added in Rack Control mode EasyService cannot be activated when Rack Control is already activated Fig 38 Programmed Start A thermal processing start may be programmed beforehand by pressing key 32 Fig 39 1 Select year month day hour and minutes on the screen and save the setting Once the setting has been saved the appliance may not ...

Страница 57: ...etting the temperature in the oven chamber you set the temperature that the appliance must maintain constant between the product core and the oven chamber Fig 40 As the core temperature rises the temperature in the oven chamber will increase concurrently While using ΔT function it is necessary to use the thermal core probe Temperature recommended for ΔT thermal processing is in the range of 15 C t...

Страница 58: ... be reached in a short time and to proceed with more delicate thermal processing Due to the safety reasons the cooling must be activated with closed door The door must be opened only after starting the program For this function the appliance is factory set for cooling the oven chamber to 50 C It is also possible for the user to set different required temperature minimum of 30 C After reaching that...

Страница 59: ... Export allowing for adjustment and display of range of functions and starting the appliance maintenance procedures 1 Configuration The following configuration of parameters may be executed in this menu Date and Time This function allows for setting date and time parameters and updating them for the current use of the appliance Fig 43 Fig 44 ...

Страница 60: ...he digital display Select this function set brightness and press Save key Acoustic Signal Volume This function lets you adjust the acoustic signal volume Fig 45 2 View LOG This function includes the chronological list of ALARM LOG The list ALARM LOG displays all errors that have been detected and shown on the appliance digital display during its operation 3 Advanced Operation Functions This functi...

Страница 61: ... a CLEAR USB flash drive is inserted it is possible to EXPORT RECIPE BOOK HACCP LOG this function should it be executed registers the thermal processing and all data connected with it times oven chamber temperature thermal core probe temperature start time and phase changes etc and WASH LOG After inserting a USB flash drive with for example new recipes new parameters or new languages it is possibl...

Страница 62: ...ciency clean the appliance regularly at the end of each working day and if necessary also in the meantime or when the appliance is not to be used for a longer time With regular cleaning you may avoid burning leftovers of baked goods and roasts 2 Remove food from the appliance 3 Provided the grate trays and GN containers were used remove them 4 Clean the thermal processing chamber with lukewarm wat...

Страница 63: ...mber and secure them with knurled screws Appliance Door Internal Glass Pane Double glazing facilitates cleaning The internal glass pan may be opened and removed when required 1 To this end rotate clockwise both latches top and bottom that hold the internal glass pane in place 2 Tilt the internal glass pane 3 Clean both sides of internal glass pane and appliance door with the use of appropriate age...

Страница 64: ...t be replaced It should be ordered as a spare part from the supplier 7 3 Maintenance Regularly at least once a year have an authorized and specialised personnel verify the appliance To this end contact the service company Before attempting any maintenance works disconnect the power supply close water supply and completely dry the appliance Before moving the appliance into a new location disconnect...

Страница 65: ...essing interruption automatic operation reactivation Replace the oven chamber sensor E17 Thermal core probe Thermal core probe error Manual operation restoration Replace the thermal core probe E05 Motor safety Motor alarm Thermal processing interruption manual operation reactivation Reactivate the operation manually press the rotary control knob if alarm persists contact the service company E11 Mo...

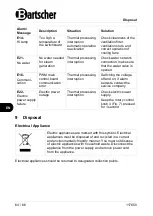
Страница 66: ...rror Thermal processing interruption Switching the voltage off and on if alarm persists contact the service company E22 Electric power supply failure Electric power outage Thermal processing interruption Check electric power supply Keep the rotary control knob 4 Fig 7 pressed for 1 second 9 Disposal Electrical Appliance Electric appliances are marked with this symbol Electrical appliances must be ...

Отзывы: