background image


User Manual 


Pegasus 70xx series 


Technical data subject to change without notice. 
Issue 01/2010 

Page 16 of 44 


4


Commissioning 


Before commissioning the devices, check that all components and documents are there.  


Pegasus 70xx Mobile Phone 


Battery 


Charger cable 


USB-Data cable 


CD-ROM (User Manual, Phonebook software, Tracking software) 


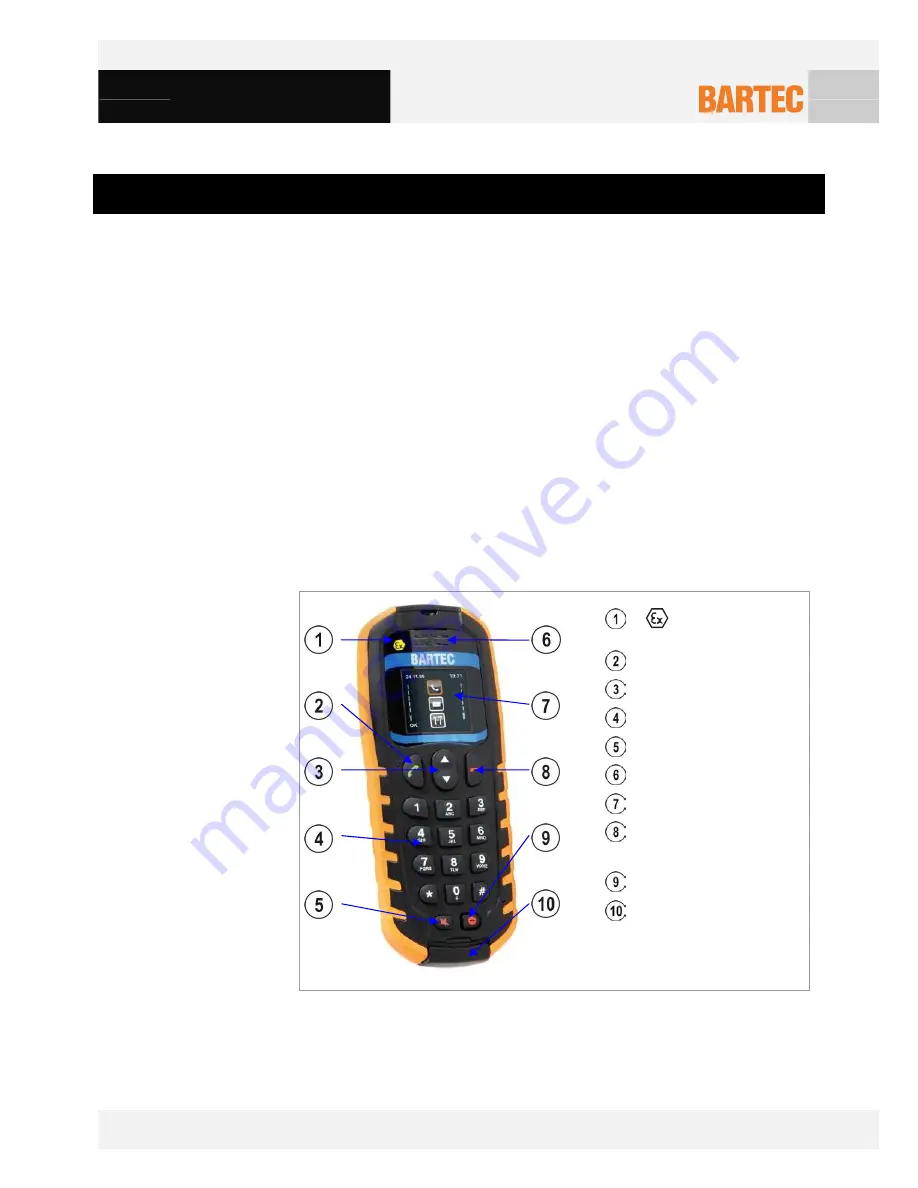
Safety instructions 


   Logo only on Pegasus  

  7010

 ex

 and 7020

ex


  Left soft key (to call or OK) 


2-Way navigation key 

 Keypad 

 Emergency 

call 

 Speaker 

 Screen 


Right soft key 


(to hang up or Back) 


Power On / Off 

 Cover 


(Mini USB interface,  


 SIM card slot, Micro SD  


card slot, Hard shutdown)


Figure 5: Pegasus 7010

ex

 front side


4.1


Purchased parts in packages

4.2


Functional Parts of the device

Содержание Pegasus 7010ex

Страница 1: ...rtec de Germany User Manual Pegasus 70xx Series Pegasus 7000 Type G7 C010 Q 1 0000 Pegasus 7010ex Type 17 C110 Q 1 0000 Pegasus 7020ex Type B7 C210 Q 1 0000 Document No 11 C110 7D0001 Status 17 Februa...

Страница 2: ...The user manual is written for all people who carry out assembly installation commissioning and service work on the product whereby the directives and standards must be observed For Europe 99 92 EC E...

Страница 3: ...ts use can still cause danger to life and limb of the user or damage the device and other property The Pegasus 70xx series is available in three versions Pegasus 7000 Type G7 C010 Q 1 0000 was develop...

Страница 4: ...instructions serve to show the information being described and are not necessarily true to scale and they may deviate slightly from the actual construction of the device Particularly important points...

Страница 5: ......

Страница 6: ...on Pegasus 7020ex type B7 C210 Q 1 0000 7 2 1 3 Ex protection marking 7 2 2 3 Technical data 7 2 4 Product Marking 8 3 Safety and Security 9 3 1 General Information 9 3 2 Notes of Handling 9 3 3 Batte...

Страница 7: ...4 6 Inserting the Micro SD card 21 4 7 SIM card 22 5 Operation 23 5 1 Getting started 23 5 1 1 PIN number 23 5 2 1 Navigation Principle 23 5 3 1 General Settings 24 5 4 1 Key lock 26 5 2 Phone settin...

Страница 8: ...es and also in the oil and gas industry PEGASUS is robust simple to use and comes in an attractive distinctive design Made by BARTEC stands for top quality long product availability and excellent serv...

Страница 9: ...fficient online tracking system The history function provides a map showing movement along a route This opens up new possibilities for transporters of hazardous goods and other logistical tasks You ca...

Страница 10: ...0 MHz Dimensions Height x Width x Depth 155 mm x 59 mm x 27 mm Weight approx 240 g IP rating IP 65 Ambient temperature 20 C to 60 C Storage and transport temperature 20 C to 60 C Charging temperature...

Страница 11: ...Edition EN 60079 0 2009 EC 60079 0 2007 EN 60079 11 2007 IEC 60079 11 2006 DE 0825 1 2004 VDE 0825 11 2007 Directives 94 9 EC 2 2 Specification Pegasus 7010ex type 17 C110 Q 1 0000 2 2 2 Technical dat...

Страница 12: ...t Edition EN 60079 0 2009 IEC 60079 0 2007 EN 60079 11 2007 IEC 60079 11 2006 DE 0825 1 2004 VDE 0825 11 2007 Directives 94 9 EC 2 3 Specification Pegasus 7020ex type B7 C210 Q 1 0000 2 2 3 Technical...

Страница 13: ...age 8 of 44 Ex Logo Only printed on the displayed Ex versions of the Pegasus 70xx series Pegasus 7010ex Pegasus 7020ex Differentiation of colors Pegasus 7000 with grey display border Pegasus 7010ex wi...

Страница 14: ...rols both the radio frequency and the power level of your cellular modem SIM cards not included in the scope of delivery of the device are needed for using the acquired devices The SIM cards can be ob...

Страница 15: ...as see directive 99 92 EC must be observed In particular appropriate clothing and footwear should be worn in view of the risk of dangerous electrostatic charges Do not wear rubber gloves or suchlike d...

Страница 16: ...ng or storing the battery the battery emits an unusual smell feels hot or appears abnormal in any other way Do not place the batteries in microwave ovens high pressure containers or on induction cookw...

Страница 17: ...a GSM modem Although research on health effects from RF energy has focused for many years on the current RF technology scientists have begun research on newer radio technologies such as GSM After revi...

Страница 18: ...before boarding any aircraft Use it on the ground only with crew permission Do not use it in the air To prevent possible interference with aircraft systems Federal Aviation Administration FAA regulat...

Страница 19: ...7000 is intended for use in industrial environment Pegasus 7010ex is intended for use in hazardous locations Zone 1 21 or IECEx Zone 1 21 or Class I II III Division 1 or Zone 2 22 or IECEx Zone 2 22 o...

Страница 20: ...re is no guarantee that interference will not occur in a particular installation If this equipment does cause harmful interference to radio or television reception which can be determined by turning t...

Страница 21: ...er cable USB Data cable CD ROM User Manual Phonebook software Tracking software Safety instructions Logo only on Pegasus 7010ex and 7020ex Left soft key to call or OK 2 Way navigation key Keypad Emerg...

Страница 22: ...ip type K20x8 WN5452 Torx 1 Belt clip Battery cover Type label Figure 6 Pegasus 7010ex rear side Micro SD card slot SIM card slot Hard shutdown Mini USB interface Figure 7 Pegasus 70xx cover Clock Pho...

Страница 23: ...nged outside the hazardous area Put the belt clip into the slot of the back of the Pegasus 70xx Turn the belt clip in position as shown in figure 10 Tighten the screw type K20x8 WN5452 Torx 1 to fix t...

Страница 24: ...unication or equivalent Turn your Pegasus Off before you change the battery Loosen the screw type K20x8 WN5452 Torx 1 on the belt clip Remove the belt clip as described in chapter 4 3 Lift the battery...

Страница 25: ...outside the hazardous area Open the cover to access the connections Connect the charger cable to the mini USB slot as shown on figure 14 The charging status of the battery is shown on the right side...

Страница 26: ...icro SD card may only be inserted or changed outside the hazardous area Turn your Pegasus Off Open the cover to access the connections Insert the micro SD card into the slot as shown in figure 16 Clos...

Страница 27: ...44 Danger The Micro SD card may only be inserted or changed outside the hazardous area Turn your Pegasus Off Open the cover to access the connections Insert the SIM card into the slot as shown in figu...

Страница 28: ...number Enter the 4 digit PIN or customized code and confirm it with OK For security reasons these digits will not appear on the screen If the SIM code is not accepted or the card is not recognised tur...

Страница 29: ...se the 2 way navigation key to select the settings menu and press the left soft key to enter the menu for customising your Pegasus 70xx Different menus are available for customising your Pegasus 70xx...

Страница 30: ...2 way navigation key to select Vibration On or Off and confirm it with the left soft key You can exit the sub menu by pressing the right soft key 5 1 3 4 Geofence Use the 2 way navigation key to selec...

Страница 31: ...the keys When the device is locked and you press a key the Press and key message appears Locked keys You will see the screensaver 5 1 2 Making a call You have different options to establish a call St...

Страница 32: ...n key to select the Dialpad menu and press the left soft key to enter the sub menu Dial a number and press the left soft key to start the dialling process You can cancel or stop the call by pressing t...

Страница 33: ...t soft key to start the dialling process write a message or delete the Phonebook entry You can exit the sub menu by pressing the right soft key 5 5 2 Receiving call 5 6 2 Known call The name and the n...

Страница 34: ...l The name and the number of the incoming call appear on the screen Press the left soft key to start the dialling process You can exit the sub menu by pressing the right soft key 5 10 2 Unknown call O...

Страница 35: ...avigation key to select your option in the Message menu and press the left soft key to enter the sub menu New message Write a new message and send to a contact s Incoming Received SMS are stored in th...

Страница 36: ...f 44 Enter the text in the field Press the left soft key to send the message Press the right soft key to delete the last character entered 5 3 3 Incoming All messages received are stored in this menu...

Страница 37: ...Forward the message Answer the message You can exit the sub menu or the message by pressing the right soft key Use the 2 way navigation key to select a message and press the left soft key to read it O...

Страница 38: ...have these installations checked by a qualified electrician to ensure that they are in a proper condition Servicing Adhere to the applicable regulations under Directive 99 92 EC IEC 60079 19 and IEC...

Страница 39: ...heeled bin symbol on the product means the product is covered by the European Directive 2002 96 EC The correct disposal and separate collection of your old appliance will help prevent potential negati...

Страница 40: ...EC Declaration of Conformity Pegasus 70xx series Technical data subject to change without notice Issue 01 2010...

Страница 41: ...Technical data subject to change without notice Issue 01 2010 Page 36 of 44...

Отзывы: