background image


RDG603A27 

– Issue 6 


Page 33 of 59 

SECTION 5 

– Operation 


 NOTICE: 

REFER TO THE ENGINE MANUAL PRIOR TO STARTING THE ENGINE. 

1.  Starting the engine for the first time 

  Remove ignition key. 

  Ensure all oil and coolant levels are checked. 

  Ensure both the engine and domestic batteries are connected.  Both battery master 

switches must be turned on.  Failure to do so may damage the domestic alternator. 

  Ensure that the raw water seacock is turned on. 

2.  Starting Procedure 

  Ensure there is no one in the engine compartment. 

  Ensure the engine compartment door is closed. 

  Ensure the gearshift control level is set to neutral and that all persons are clear of any 

moving parts. 

  Insert ignition key. 

  Turn key to on position.  The glow plug light will illuminate. 

  Observe  warning  lights  (and  gauges  on  deluxe  panel).  Note:  The  engine  water 

temperature overheat warning light will only come on for a brief period of time when 

the ignition is first turned on as a bulb check.  It will then only illuminate in the case of 

the engine coolant temperature exceeding the maximum safety level. 

  Wait for the glow plug warning light to go out. 

  Turn key to start and hold to crank. 

  Crank the engine for no more than 15 seconds. 

  Upon engine start, immediately release the key. 

  Key will return to on position. 

  The warning buzzer will stop and on the deluxe panel, the oil pressure gauge will show 

an oil pressure of 3.5 - 4.5 bar (51 

– 61 psi). 

  Should any warning light not go out, or if there is no reading on the oil pressure gauge, 

the buzzer will continue sounding.  In this case, stop the engine immediately and check 

the  relevant  system  (Note:  If  the  charge  light  does  not  go  out,  briefly  increase  the 

engine speed). 

  Once started check that sea water is coming out of the water cooled exhaust outlet in 

the hull of the boat. 

Содержание SHIRE 70 WB

Страница 1: ...ORIGINAL INSTRUCTION RDG603A27 Issue 6 WORK BOAT ENGINE MANUAL For the following engine models SHIRE 70 WB SHIRE 85 WB ...

Страница 2: ...ert symbol appears throughout the manual It means attention be alert as your safety is involved Please read and follow the message that appears after the safety alert symbol NOTICE This indicates a situation which can cause damage to the machine personal property and or the environment or cause the equipment to operate improperly CAUTION This indicates a hazardous situation which if not avoided co...

Страница 3: ... serial number in the space provided above Please quote the engine identification number during any enquiry or when ordering spare parts Information about the engine serial number and its location on the engine can be found in SECTION 2 of the manual Shire Engine Manuals and Shire Parts Books ...

Страница 4: ...e and PRM Gearbox Manuals and familiarise yourself with the engine and its parts before operation If the engine is fitted with Travel Power and or Hybrid options please also read the supplied manuals for them carefully The information and recommendations given in this manual are based on the latest information available at the time of publication E P Barrus reserve the right to change the specific...

Страница 5: ...at the back of this manual regarding hand over and commissioning of boat Failure to complete and return the registration form to E P Barrus will result in the warranty period starting from the date of engine manufacture NOT from the date of purchase PRM Gearboxes are covered by a two 2 year warranty Engine alternator starter motor and electrical components are only covered by a one 1 year warranty...

Страница 6: ...s and First time running sections in this manual use of an accessory or part not manufactured or sold by us or alteration or removal of parts Expenses related to crane out launch towing storage telephone rental inconvenience slip fees insurance coverage loan payments loss of time loss of income or any other types of accidental or consequential damages are not covered by this warranty For the Shire...

Страница 7: ...ntrol Panel Overview 14 3 Warning Light Procedure 14 4 Overall Dimensions of the Deluxe Control Panel 17 SECTION 4 Installation 18 1 Ventilation 18 2 Engine Beds 18 3 Pressurised Water Header Tank 18 4 Shaft Connection and Propeller Selection 20 5 Engine Anti Vibration Mounts 20 6 Engine Alignment 22 7 Engine Inclination 23 8 Electrics 24 9 Electrical Options 25 10 Engine Oil 25 11 Fuel 26 12 Cool...

Страница 8: ...oat with dry exhaust 35 SECTION 6 Service Procedure 36 1 Engine Oil and Filter Change 36 2 Air Filter Check and Change 37 3 Gearbox Oil Change 37 4 Disposal of Oil and Related Items 38 5 Primary Fuel Filter Drain 38 6 Primary Fuel Filter Change 39 7 Secondary Fuel Filter Change 40 8 Fuel System Bleeding 41 9 Cooling System 41 10 Belt Adjustment 42 11 Belt Maintenance 43 12 Belt Replacement 43 13 C...

Страница 9: ...ns 51 5 5kW Travel Power System 52 SECTION 9 Dealer List 53 SECTION 10 Shire Parts 55 SECTION 11 Declarations 57 1 Declaration of Conformity for Recreational Craft Propulsion Engine with the requirements of Directive 94 25 EC SHIRE 70WB 57 2 Declaration of Conformity for Recreational Craft Propulsion Engine with the requirements of Directive 94 25 EC SHIRE 85WB 58 SECTION 12 Shire Service Record C...

Страница 10: ...ntenance or repairs 2 Lifting DANGER CRUSH HAZARD NEVER STAND UNDER A HOISTED ENGINE IF THE HOIST MECHANISM FAILS THE ENGINE WILL FALL ON YOU CAUSING SERIOUS INJURY OR DEATH The Lifting points supplied with the engine are for lifting the engine gearbox only A suitable spreader bar must be employed to prevent over stressing either bracket during any lift 3 Rotating Shafts and Belts WARNING SEVERE H...

Страница 11: ...AZARD WAIT UNTIL THE EXHAUST COOLS BEFORE YOU TOUCH IT Exhaust gases may have temperatures as high as 650 C and contain elements which are harmful if ingested It is therefore essential that exhaust systems are gas tight and lagged to prevent accidental burning and inhalation of exhaust gases when inside the boat cabin 5 Launching and Lifting Boats Care must be taken when launching or craning new b...

Страница 12: ... away from the battery NO SMOKING Batteries contain sulphuric acid if splashed on skin or eyes flush well with water and seek medical advice Keep battery tops and battery compartment ventilated at all times If disconnecting the battery remove the earth lead FIRST and re connect it last If charging the battery ensure that the charger is switched off before connecting and disconnecting Do not tip th...

Страница 13: ...mple of the engine identification plate is shown below Figure 1 Figure 1 Engine Identification Badge Note There are a number of optional extras that may be fitted to an engine that are not listed here A list of common item service part numbers can be found in Section 10 Shire Parts Description 1 Engine Model 2 Serial Number 3 Indicates Model Type or Optional Extras WB Work Boat D Deluxe Panel 3 3 ...

Страница 14: ...B Shire 85WB Deluxe Control Panel Panel supplied as standard On certain engines a different control panel may be supplied as an option 3 Warning Light Procedure When the ignition is first turned on the control panel warning lights will come on as a bulb check When the engine is started the warning lights will go out Please note that the water temperature warning light and glow plug light operate s...

Страница 15: ...s first turned on for 5 8 seconds to indicate the heating system is operational When the light goes out the engine can be started Whilst the control panel is in operation all the gauges are backlit This does not indicate a fault and is a normal function for the control panel If any of the warning lights on the control panel come on whilst the engine is running please follow the correct procedure a...

Страница 16: ...the engine immediately Contact your local dealer Failure to stop the engine may result in permanent engine damage 5 50A Alternator Charge Warning Light This indicates that the alternator has stopped charging The engine can still be operated for a short period of time Contact your local dealer 6 150 240A Alternator Charge Warning Light This indicates that the alternator has stopped charging The eng...

Страница 17: ...RDG603A27 Issue 6 Page 17 of 59 4 Overall Dimensions of the Deluxe Control Panel All Dimensions are in mm Figure 3 Deluxe Control Panel Dimensions ...

Страница 18: ...ld be a minimum of 10mm thick extended rearward and be welded to the hull and forward to the bulkhead Webs or gussets must be welded in place midway to prevent flexing 3 Pressurised Water Header Tank WARNING SCALD HAZARD NEVER REMOVE THE HEADER TANK CAP IF THE ENGINE IS HOT STEAM AND HOT COOLANT MAY SPURT OUT AND CAUSE INJURY TIGHTEN THE HEADER TANK CAP SECURELY AFTER BEING REMOVED STEAM CAN SPURT...

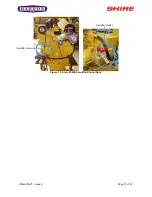
Страница 19: ... 6 Page 19 of 59 side of the tank should be connected to the lower pipe on the engine This is the water fill Figure 4 Shire 70 WB Header Tank Connections Figure 5 Shire 85 WB Header Tank Connections Crank Mounted Pump ...

Страница 20: ...ut steel packing plates under the mounts Packing plates 25mm thick are available Order RDG3906 Engine mount spacer Alternatively they can be manufactured locally Ensure that the engine has been installed for at least 24 hours before shaft alignment is checked to allow the mounts time to settle under the engine weight Ensure that the anti vibration mount centre screw is sufficiently raised so as no...

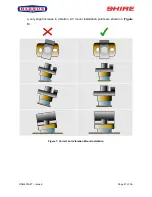
Страница 21: ...RDG603A27 Issue 6 Page 21 of 59 a very slight increase in vibration AV mount installation points are shown on Figure 9 Figure 7 Correct Anti Vibration Mount Installation ...

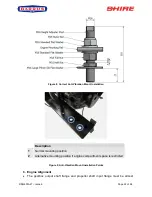
Страница 22: ...nstallation Description 1 Normal mounting position 2 Alternative mounting position if engine compartment space is restricted Figure 9 Anti Vibration Mount Installation Points 6 Engine Alignment The gearbox output shaft flange and propeller shaft input flange must be almost ...

Страница 23: ...the engine and shaft alignment as close as possible A dummy shaft may be required for this purpose Some types of flexible shaft couplings require the input and output to be misaligned check with the coupling manufacturer s installation instructions Minimum clearance of 25mm between rails and engine beds 7 Engine Inclination The engine installation angle is the angle of the crankshaft centre to the...

Страница 24: ...onnect the wiring extension harness multi plug to the panel plug and the other end to the engine Connect the start battery positive cable to the starter motor solenoid terminal The starter motor battery cable must have a cross sectional area of at least 50mm2 Twin Alternators Shire 70 WB Connect the domestic battery positive cable to the 240A alternator Pos Out terminal This ensures that the 50A a...

Страница 25: ... builder to ensure that this is correctly wired to the boats electrical system 10 Engine Oil WARNING BURN HAZARD WAIT UNTIL THE ENGINE COOLS BEFORE YOU DRAIN THE ENGINE OIL HOT ENGINE OIL MAY SPLASH AND BURN YOU NOTICE ENGINE OIL WITH A HIGHER API CLASS THAN CD IS UNSUITABLE FOR CANAL BOAT OPERATION AND WILL CAUSE ENGINE DAMAGE IF USED All Shire engines are supplied fully run in Check oil levels i...

Страница 26: ...o the primary fuel filter inlet hose The engine hoses are supplied with 3 8 10mm OD metal hosetails and should be securely fitted to the main supply and return pipes with compression fittings The engine hoses should have sufficient slack to absorb engine movement without placing strain on the hoses and be securely clipped to prevent accidental damage and chafing Initially fill the fuel system by t...

Страница 27: ...OLED EXHAUST MANIFOLD IS HOT AND MAY BURN YOU For the Shire 70 WB Yanmar recommend a prepared coolant mix of 50 clean tap water and 50 antifreeze For the Shire 85 WB John Deere recommend that Cool Gard is used Cool Gard is already mixed and must NOT have water added to it To fill the engine cooling system for the first time add coolant to the engine through the white plastic expansion bottle Open ...

Страница 28: ...ONTAIN SULPHURIC ACID NEVER ALLOW BATTERY FLUID TO COME IN CONTACT WITH SKIN EYES OR CLOTHING SEVERE BURNS COULD RESULT MAKE SURE THE CORRECT PERSONAL PROTECTION EQUIPMENT IS WORN Domestic battery banks that are too large create excessive loads on the domestic alternator Alternators running at maximum output for prolonged periods of time will eventually fail prematurely alternators that fail due t...

Страница 29: ...nstall so that they remain out in the open or cover up when not on use The control panel engine tachometer is supplied already calibrated to measure correct engine speed If a new control panel tachometer or alternative alternator is fitted the tacho will require re calibrating Control Panel Calibration Procedure Connect control panel plug to engine wiring loom plug Turn ignition on do not start en...

Страница 30: ...ter speed are the same 17 Calorifiers Optional These are not fitted as standard but are available as an option If calorifiers are fitted the following instructions must be complied with The temperature of coolant flowing to the calorifier from the engine can be between 85 and 90 C A blender valve must be incorporated in the calorifier hot water system outlet to lower the hot water temperature for ...

Страница 31: ...RDG603A27 Issue 6 Page 31 of 59 Figure 12 Shire 85 WB Calorifier Connections Calorifier Inlet Calorifier Outlet ...

Страница 32: ...rom skin tank calorifier and pipework Engine and gearbox oil levels are as specified Throttle and gear cables correctly adjusted and operating smoothly All pipework and cabling supported and not chaffing slack to allow movement of engine Engine control panel installed in a position where it is not out in the open Confirm engine control panel gauges and warning lights are all operational Suitable s...

Страница 33: ...nel Note The engine water temperature overheat warning light will only come on for a brief period of time when the ignition is first turned on as a bulb check It will then only illuminate in the case of the engine coolant temperature exceeding the maximum safety level Wait for the glow plug warning light to go out Turn key to start and hold to crank Crank the engine for no more than 15 seconds Upo...

Страница 34: ...PERSONAL PROTECTION EQUIPMENT IS WORN All Shire boat engines run on diesel fuel Please note that when the vessel is to be left for any period of time the fuel tank should be left full to eliminate the build up of condensation and formation of water in the fuel tank Engine to be turned off while refuelling The fuel type for all Shire boat engines is diesel DO NOT USE BIODIESEL 6 Diesel Fuel Additiv...

Страница 35: ...d benefit of using this product Diesel fuel additive is available from your Shire dealer in a handy 500ml container Part Number RDG80210219 7 Exhaust Back Pressure Work Boat with dry exhaust Use 100mm ID suitable machine flexible exhaust hose on both Shire 70 WB and 85 WB Do not step down to a smaller size ...

Страница 36: ... Operate the pump handle to empty the sump Note Remember to refit the blanking plug afterwards Place a drip tray under the engine to catch the small amount of oil that will escape from the oil filter Using a strap type oil filter removal tool slacken the filter from the engine block in an anti clockwise direction Remove the tool and spin off the filter Lightly oil the new filter O ring seal and in...

Страница 37: ... ultimately engine damage 3 Gearbox Oil Change WARNING BURN HAZARD WAIT UNTIL THE GEARBOX COOLS SLIGHTLY BEFORE YOU DRAIN THE GEARBOX OIL HOT OIL MAY SPLASH AND BURN YOU Change the gearbox oil while it is still warm Please refer to the gearbox manual for more information Remove the blanking plug in the gearbox drain pump 6mm Allen Key The smaller of the two oil extraction pumps is for draining gea...

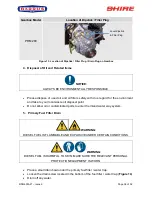
Страница 38: ...and take to your local waste oil disposal point Do not allow oil or contaminated parts to enter the inland water way system 5 Primary Fuel Filter Drain WARNING DIESEL FUEL IS FLAMMABLE AND EXPLOSIVE UNDER CERTAIN CONDITIONS WARNING DIESEL FUEL IS HARMFUL TO SKIN MAKE SURE THE RELEVANT PERSONAL PROTECTION EQUIPMENT IS WORN Place a small drain bowl under the primary fuel filter water trap Loosen the...

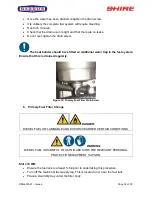
Страница 39: ...water trap in the fuel system Ensure that this is drained regularly Figure 14 Primary Fuel Filter Drain Screw 6 Primary Fuel Filter Change DANGER DIESEL FUEL IS FLAMMABLE AND EXPLOSIVE UNDER CERTAIN CONDITIONS WARNING DIESEL FUEL IS HARMFUL TO SKIN MAKE SURE THE RELEVANT PERSONAL PROTECTION EQUIPMENT IS WORN Shire 70 WB Ensure the fuel tank is at least full prior to undertaking this procedure Turn...

Страница 40: ...ce a small drip tray under the filter body Undo the centre bolt 11mm or 7 16 AF spanner and remove Pull down the bowl The filter element pulls down from the top cover Retain the metal fuel filter drain screw from the old filter and reuse in the new filter The part number for the drain screw is RDG9189022 Smear a small amount of clean fuel on all of the O ring seal that is supplied with the new fil...

Страница 41: ...IESEL FUEL IS HARMFUL TO SKIN MAKE SURE THE RELEVANT PERSONAL PROTECTION EQUIPMENT IS WORN Ensure the fuel tank is at least full prior to undertaking this procedure For Shire 70 WB refer to Yanmar Operators Manual fuel paragraph in Section 3 For Shire 85 WB refer to John Deere Operators Manual Lubrication and Maintenance 9 Cooling System DANGER SCALD HAZARD NEVER REMOVE THE COOLANT PRESSURE CAP IF...

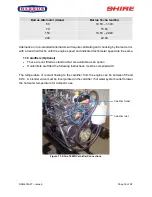
Страница 42: ...lt Adjustment WARNING SEVERE HAZARD KEEP HANDS AND OTHER BODY PARTS AWAY FROM MOVING ROTATING PARTS WEAR TIGHT FITTING CLOTHING AND KEEP YOUR HAIR SHORT OR TIE BACK REMOVE ALL JEWELLERY BEFORE COMMENCING WORK CHECK BEFORE STARTING THE ENGINE THAT ANY TOOLS OR RAGS USED DURING MAINTENANCE HAVE BEEN REMOVED FROM THE AREA Ensure the ignition key is removed before carrying out any adjustments Turn the...

Страница 43: ...ying out any maintenance Do not allow oil to contact the belt Oil attacks the construction of the belt This reduces the drive efficiency and ultimately cause it to fail prematurely Replace the belt if it cracks or splits and as the adjustment nears the limit of travel Some boat builders may remove one or more of the alternators during the installation of the engine It is essential that when the al...

Страница 44: ... Hold the belt in position over the top alternator pulley Rotate the engine if required by hand to guide the new belt into the vee Replace the seawater pump if required Re tension the belt as above Shire 85 WB Ensure the ignition key is removed before replacing any belts Turn the battery master switch to the off position before replacing any belts Insert a drive T bar into the square recess of the...

Страница 45: ...ack up and refit the wires To replace any gauge Release the panel from its mounting The gauges are accessible from the rear of the panel Unplug the wire connectors unscrew and pull the gauge out of the panel Replace the gauge and refit Reattach the wiring connectors Periodically squirt a lubricant into the key switch slot when the key has been removed see Section 8 Service Schedule A lubricant suc...

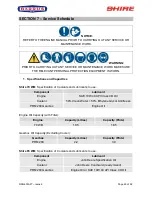
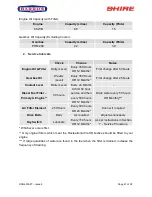
Страница 46: ...Lubricants to use Component Lubricant Engine SAE 10W 40 API Class CD Oil Coolant 50 Clean Water 50 Ethylene Glycol Antifreeze PRM 280 Gearbox Engine Oil Engine Oil Capacity with Filter Engine Capacity Litres Capacity Pints 70 WB 10 5 18 5 Gearbox Oil Capacity Excluding Cooler Gearbox Capacity Litres Capacity Pints PRM 280 2 2 3 9 Shire 85 WB Specification of Coolants and Lubricants to use Componen...

Страница 47: ...aily Level Every 24 Months Diesel Fuel Filter Primary Engine 50 hours At first 50 hour service and then every 500 hours OR 12 Months Drain water every 50 hours OR Monthly Air Filter Element 250 Hours Every 500 hours OR 24 Months Sooner if required Drive Belts Daily As required Adjust as necessary Key Switch Lubricate Every 150 hours OR 12 Months As per instructions in Section 7 Service Procedure W...

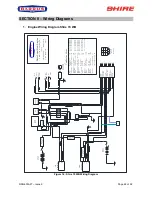
Страница 48: ...der Oil Switch Oil Sender WK G 1 Red White 2 Black 1 2 View From Back of Plug Red White Starter Relay 85 86 30 87 7kw Alt Relay 25A 15A 40A 15A White Red 2 Grey Red 2 Red 2 Red 2 White 2 BARRUS 85 86 30 87 Brown Grey White Red 1 White Red 2 Black Blue Yellow Brown Yellow Blue Yellow Blue Green Yellow Purple Black 1 Red 1 White Red White Red 2 Black 2 White 2 Dash Panel live Ignition on Trigger to ...

Страница 49: ... connector No 6 11 Pin connector No 7 11 Pin connector No 8 11 Pin connector No 9 11 Pin connector No 10 11 Pin connector No 11 11 Pin connector No 1 2 Pin Connector Conductor Sizes 1 Brown 2 Grey 3 White Red 4 Black Blue 5 Yellow 6 Brown Yellow 7 Blue Yellow 8 Blue 1 9 Green Yellow 10 Purple 11 Black Rear View Of Loom Multi Plug 1 2 3 4 5 6 7 8 9 10 11 Domestic Battery Brn Yell Boat Builder To Fi...

Страница 50: ...RDG603A27 Issue 6 Page 50 of 59 3 Deluxe Control Panel Wiring Diagram Figure 18 Deluxe Control Panel Wiring Diagram ...

Страница 51: ... QUALIFIED ELECTRICIAN Travel Power AC systems installed by qualified electrician and to BMEA code of practice for Electrical and Electronic installation in Boats BS EN ISO 13297 ac Figure 19 Travel Power wiring diagram Figure 19 shows the 12 24 volt part of the wiring for the 8kW Travel Power system For the 230 volt wiring diagram please refer to the Travel Power manual ...

Страница 52: ...vel Power System This unit is energised by a 12v ignition operated supply The installer can wire to a convenient plug on the existing loom for this purpose When the 12v relay RDG1396 is placed into the spare relay holder on the engine the black two way plug is energised when the ignition is turned on The wire colours in the plug are Black Earth Red Live ...

Страница 53: ...399 enquiries tontomarine co uk Mobile Marine 01297 631821 mobilemarine btconnect com Darthaven Marina 01803 752242 admin darthaven co uk DORSET Purbeck Marine 01202 686592 purbeckmarine aol com Rob Perry Marine 01297 631314 sales robperrymarine co uk EAST SUSSEX Peter Leonard Marine 01273 515987 info plmarine com ESSEX French Marine Motors Ltd 01206 305233 01255 850303 info frenchmarine com HAMPS...

Страница 54: ...en Goldsbrough Boats 01564 778210 andy sgboats com WILTSHIRE Foxhangers Marine 01380 828795 info foxhangers co uk WORCESTERSHIRE J L Pinder Son 01527 876438 sales jlpinderandsons co uk Starline Narrowboats 01684 874774 narrowboats starline demon co uk YORKSHIRE Rodley Boat Centre 01132 576132 John snowdenz ntlworld com MONMOUTHSHIRE Castle Narrowboats 01873 830001 castlenarrowboats btinternet com ...

Страница 55: ...047600 RDG6816 8kW Alternator Belt RDG0047601 RDG6830 50A Alternator Belt GB T12732 1996 120A Alternator Belt R123432 240A Alternator Belt RDG0047511 50A 24V Alternator Belt R500277 55A 24V Alternator Belt RDG0047600 80A 24V Alternator Belt RDG0047983 Belt Driven Sea Water Pump RDG907A2 Impellor for Belt Driven Sea Water Pump RDG010A2 Belt Driven Sea Water Pump Belt RDG004A196 Crank Mounted Seawat...

Страница 56: ...use 15amp RDG3245 4 Dash Panel Live Sire 70 WB only 15amp RDG3245 Shire 70 WB Engine Oil Engine Oil is available from your Shire Dealer in convenient 5 litre containers Part Number RDG6110 Shire 85 WB Engine Oil and Coolant Engine oil is available from Barrus in a 20 litre container The part number is VC83070 020 Engine coolant John Deere Cool Gard is available from Barrus in a 20 litre container ...

Страница 57: ...l file Specify in more detail Mandatory standard Annex 1 B Exhaust Emissions B 1 Engine Identification B 2 Exhaust emission requirements EN ISO 8178 1 1996 B 3 Durability B 4 Owners Manual ISO10240 Annex 1 C Noise Emissions See Declaration of Conformity of the craft in which the engine s has have been installed This declaration of conformity is issued under the sole responsibility of the manufactu...

Страница 58: ...ecify in more detail Mandatory standard Annex 1 B Exhaust Emissions B 1 Engine Identification B 2 Exhaust emission requirements EN ISO 8178 1 1996 B 3 Durability B 4 Owners Manual ISO10240 Annex 1 C Noise Emissions See Declaration of Conformity of the craft in which the engine s has have been installed This declaration of conformity is issued under the sole responsibility of the manufacturer I dec...

Страница 59: ...ssion of Boat and Hand Over to Customer Refer to the Installation Check List Page in this Manual Date Signed Dealer Stamp Actual Hours Signed Dealer Stamp Actual Hours Signed Dealer Stamp Actual Hours Signed Dealer Stamp Actual Hours Signed Dealer Stamp Actual Hours Signed Dealer Stamp Actual Hours Signed Please refer to Owner s Manual for service intervals PDI 1st 2nd 3rd 4th 5th 6th ...

Отзывы: