background image

2.


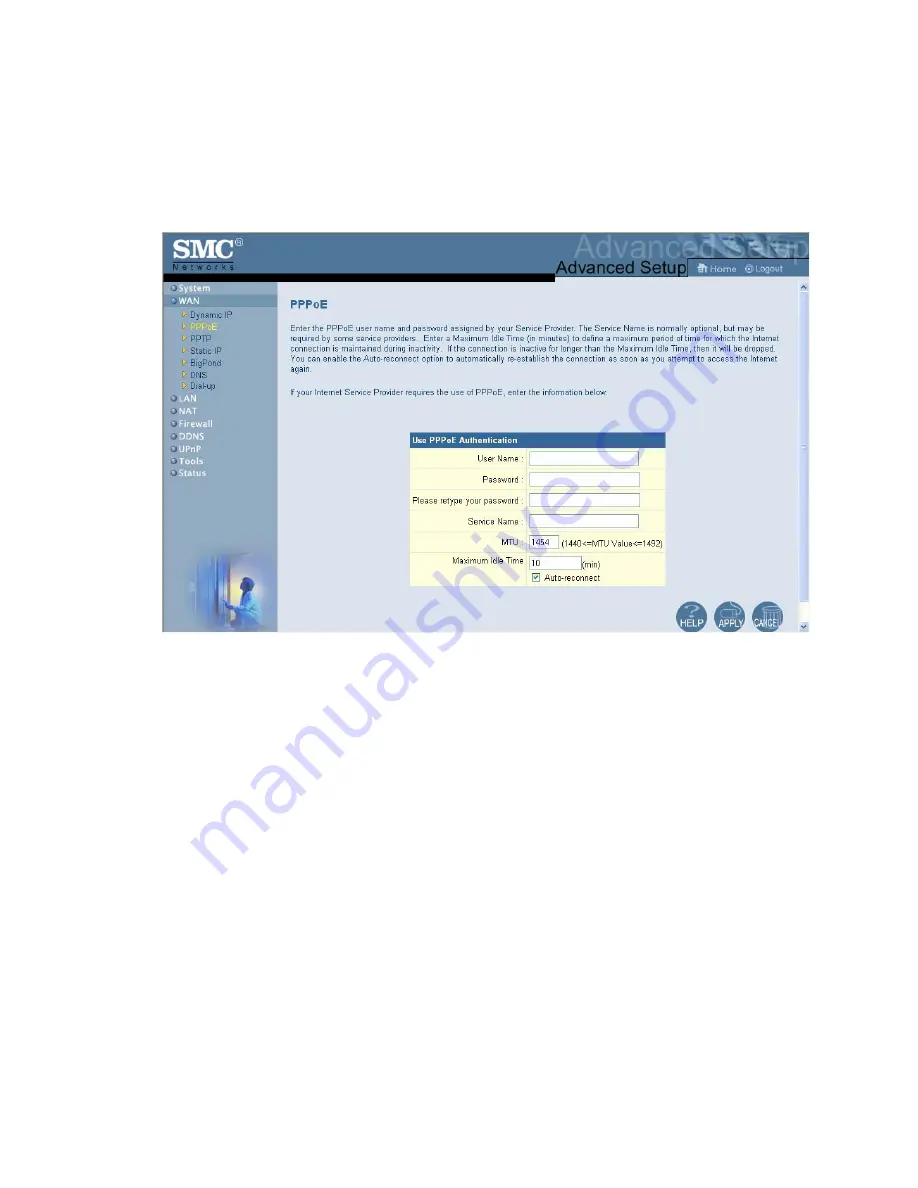
Enter the User Name and Password for the account provided to you by your ISP in 
the appropriate fields. Additionally for verification please re-type your password 
entry in the next field. While 10 minutes is the default this value can be adjusted as 
you see fit. 30 minutes would probably be a better value in this field. Click “Apply” 
when finished.  


Содержание SMC7008ABR

Страница 1: ...ns of the VPN tunnel Part A General Setup Note Please insure the router is plugged into the WAN connection and the Configuration PC is plugged into one of the 4 Ethernet ports prior to starting the setup procedures 1 Open your Web browser and enter the following in the Address field http 192 168 2 1 2 The Barricade login screen will appear Leave the password field empty and click on login ...

Страница 2: ...3 On the main page of the Barricade Web console click Advanced Setup This will take you through all the steps necessary to configure the Barricade completely ...

Страница 3: ...4 Select System in order to set the Time Zone setting and to change the Password ...

Страница 4: ...5 Select the correct Time Zone for your location Leave the Automatic Time Setting checked to enable the automatic time correction service Click Next to proceed ...

Страница 5: ...nge Password screen type lower case galileo in the New Password field Confirm this entry by entering the lower case galileo again in the Re enter Password for Verification field 7 Click Apply to complete this step ...

Страница 6: ...een is where you configure the Local Area Network settings of your Barricade Unless you have an existing network with Domain information there is no reason to change these settings Click Apply to complete this step ...

Страница 7: ...ay 192 168 2 1 11 The next few steps will be to configure the Barricade router for Internet access There are generally two different configurations used by most ISP s If you use a DSL Modem your ISP probably requires you to manually enter your TCP IP settings If you have a DSL connection or if you know you use a Static IP address please move to Part B Configuring Your Barricade for Static IP Addre...

Страница 8: ...ur Barricade for Static IP Addressing 1 Select Static IP Address and click on More Configuration 2 Enter the IP Address subnet mask and gateway provided to you by your ISP in the appropriate fields Click Apply when finished ...

Страница 9: ...ver will find that name in its index and find the matching IP address 198 137 240 92 Most ISPs provide a DNS server for speed and convenience Since you are connecting to the Internet with static IP settings it is likely that your ISP also provided DNS server addresses 3 Enter the DNS server address es in the spaces provided Click Apply when finished ...

Страница 10: ...Part C Configuring Your Barricade for Dynamic IP Addressing 1 Select Dynamic IP Address and Click More Configuration ...

Страница 11: ...2 If you have a Host name provided by your ISP enter it here and Click Apply to continue ...

Страница 12: ...3 Enter DNS Information as provided by your ISP and Click Apply to finish the process ...

Страница 13: ...Part D Configuring Your Barricade for PPPoE configuration 1 Select PPPoE PPP over Ethernet and click on More Configuration ...

Страница 14: ...ur ISP in the appropriate fields Additionally for verification please re type your password entry in the next field While 10 minutes is the default this value can be adjusted as you see fit 30 minutes would probably be a better value in this field Click Apply when finished ...

Страница 15: ...Part E Configuring Your Barricade for Dial up configuration 1 Select Dial up from the main WAN screen Then select More Configuration ...

Страница 16: ...he only connection make sure you indicate by checking the correct box This is used for those users that only have a dial up connection The default idle time is 1 minute which is extremely short Realistically this value should be changed to either 30 or 60 minutes ...

Страница 17: ...xtract the files The preferred form to download is Self extracting This will eliminate the necessity of having special software to extract the files After downloading the latest update execute the self extracting file which will create a directory with the name SMC and copy the extracted files The actual update file has the extension of BIN This information will be important later on in this proce...

Страница 18: ...rmware Upgrade to begin the update process 3 If you did not download the latest update from the SMC Website you may do so at this time Normally you should enter the file name and Click Apply to update the firmware ...

Страница 19: ...ost password How do you reset the Barricade to factory defaults To reset your Barricade 7008 ABR to factory defaults please use the steps outlined below 1 Power off the router for about 30 seconds and then turn it on 2 Wait for the router to sync up about 10 seconds 3 Depress the RESET button for 8 seconds and release it To verify a successful reset the power light will flash rapidly all 8 port li...

Страница 20: ...mance problems such as chronic disconnects o Setting MTU size is a process of trial and error start with the maximum value of 1500 then reduce the size until the problem goes away In order to find the optimum size for the MTU setting you will need to utilize the extended portions of the PING command The parameters are case sensitive PING f l 1500 fpnet galileo com f Set Don t Fragment flag in pack...

Страница 21: ...rts com Select Tests Tools Then select Dr TCP You will need to download install the latest copy of this program DR TCP This program will allow you to make the necessary changes to the MTU size on each workstation Change the MaxMTU value Click Apply and then reboot the workstation ...

Отзывы: