Barco RETRO GRAPHICS 2100LC R9001319 Скачать руководство пользователя страница 52

A-2

Appendix A : Standard Source Set Up Files

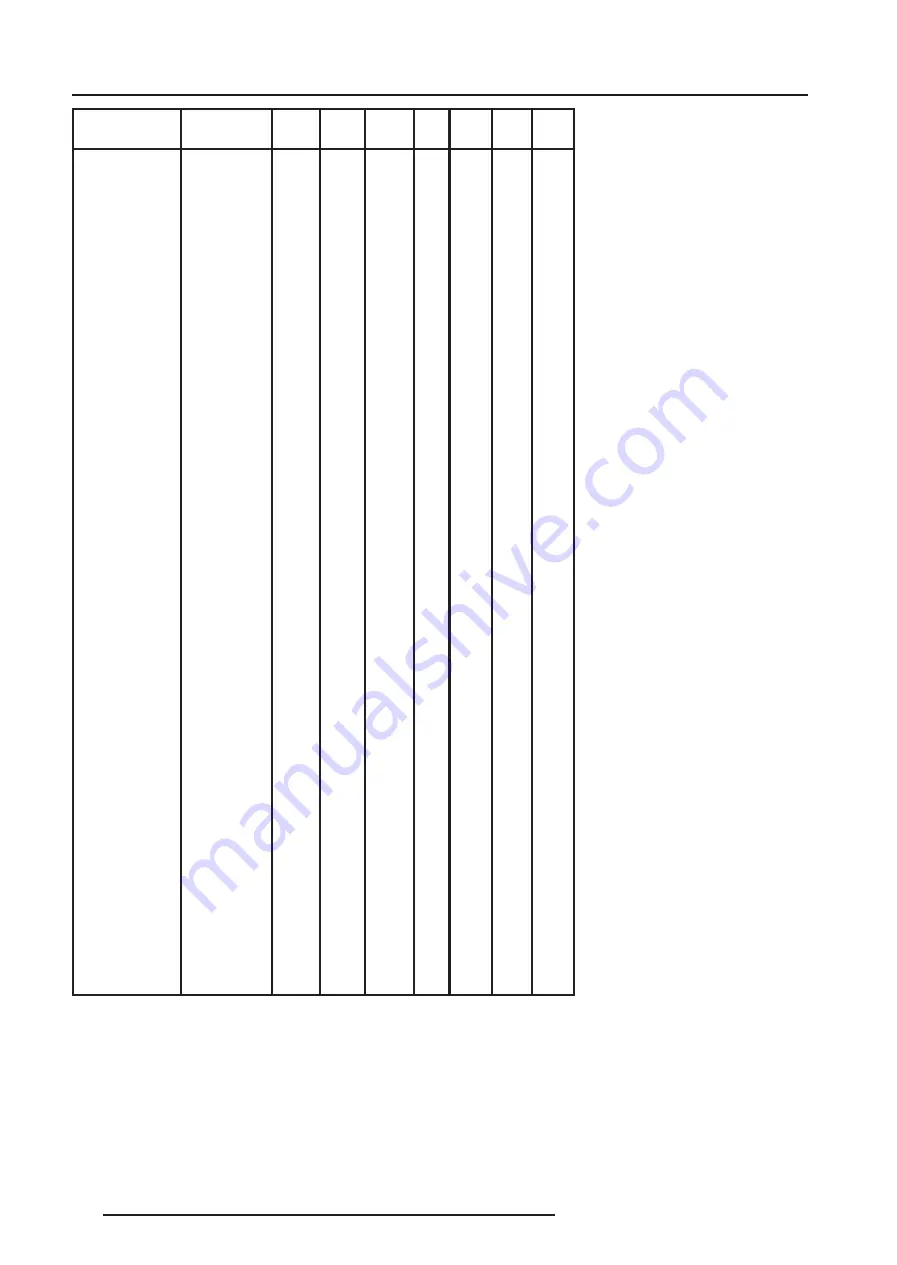
5975958A RETRO GRAPHICS 2100LC 210198

NAME

RESOLUTION FVERT FHOR FPIX

PTOT PACT LTOT LACT

Hz

kHz

MHz

EWS_60

1280 X 1024

60,000 63,900 107,352 1680 1280

1064 1024

EWS_60V

1280 X 1024

60,282 63,657 110,000 1728 1280

1056 1024

EWS_72

1280 X 1024

72,000 76,968 130,076 1690 1280

1069 1024

EWS_75

1280 X 1024

75,025 79,976 135,000 1688 1280

1066 1024

SG_60_2

1024 X 768

60,000 48.780 64,390 1320 1024

812

768

SG_60_3

960 X 680

60,000 43,200 54,432 1260 960

720

680

ED

735 X 480

59,940 31,470 27,000 910

735

525

480

PC98_1

640 X 400

56,416 24,823 21,050 848

640

440

400

PC98_2

1120 X 375I

79,987 32,835 47,840 1457 1120

411

375

PC98_3

1120 X 750

60,000 50,000 78,569 1571 1120

833

750

MAC_6

832 X 624

74,550 49,722 57,280 1152 832

667

624

MAC_7

1024 X 768

74,910 60,150 80,000 1330 1024

803

768

PAM500

640 X 400

60,000 26,400 22,810 864

840

440

400

PAM800

1120 X 375I

89,872 36,443 50,000 1372 1120

406

375

FMTO_2

640 X 400

55,370 24,370 21,060 864

640

440

400

FMR

640 X 400I

84,700 36,440 28,570 784

640

431

400

SUNXGA60

1024 X 768

59,984 48,287 64,125 1328 1024

805

768

SUNXGA70

1024 X 768

70,041 56,596 74,250 1312 1024

808

768

SUNXGA77

1024 X 768

77,069 62,040 84,375 1360 1024

805

768

SUNEWS67

1280 X 1024

67,189 71,691 117,000 1632 1280

1067 1024

SUNEWS76

1280 X 1024

76,107 81,130 135,000 1664 1280

1066 1024

S1152_66

1152 X 900

66,004 61,846 94,500 1528 1152

937

900

S1152_76

1152 X 900

76,637 71,809 108,000 1504 1152

937

900

Содержание RETRO GRAPHICS 2100LC R9001319

Страница 1: ...OWNER S MANUAL RETRO GRAPHICS 2100LC R9001319...

Страница 2: ...BARCO PROJECTION SYSTEMS Date 240898 Rev02 OWNER S MANUAL RETRO GRAPHICS 2100LC R9001319 Art No R5975958A...

Страница 3: ...ce Produced by BARCO NV August 1998 All rights reserved Trademarks are the rights of their respective owners BARCOnv ProjectionSystems Noordlaan5 B 8520Kuurne Belgium Tel 32 56 368211 Fax 32 56 351651...

Страница 4: ...CONNECTIONS 4 Front Input Connections 4 1 Signal input connection to the projector 4 1 Connecting a Video source to the Video in 2 input 4 1 Connecting a Audio source to the Audio in B input 4 1 Conn...

Страница 5: ...FF AUDIOA AUDIO B AUDIO C 8 8 Fade 8 9 Geometry 8 9 Shift 8 9 Size 8 10 Side Keystone 8 10 Blanking 8 11 Options 8 12 INSTALLATION MODE 9 Starting up the Installation Mode 9 1 Configuration 9 1 OSD Co...

Страница 6: ...cluded in the technical documentation for this equipment FEDERAL COMMUNICATION COMMISSION FCC STATEMENT This equipment has been tested and found to comply with the limits ofaclassAdigitaldevice pursua...

Страница 7: ...d or plug is damaged or frayed b If liquid has been spilled into the equipment c If the product has been exposed to rain or water d If the product does not operate normally when the operating instruct...

Страница 8: ...Panel Description and Function Gaining access to the front control panel To reveal the keyboard in the front portion of the retro projector push with one finger on the indicated place of the keyboard...

Страница 9: ...pwards when in the adjustment mode 12 Control disc To make menu selections when in the adjustment mode Also allows to increment or decrement an adjustment in the adjustment mode Control disc up up arr...

Страница 10: ...r AUDIO OUT are selected 19 Audio In 3 audio inputs on 2 Cinch RCA connectors for audio L R Audio B is a fixed wire input not to be interchanged 20 Lens Mounting Projected picture output 21 IR Receive...

Страница 11: ...TEXT is off no warning message will be displayed 13 FREEZ To freeze the projected image the picture will freeze but the sound will continue 14 ENTER To start up the adjustment mode or to confirm an a...

Страница 12: ...in the on 1 position on the rear control panel and also ensure the internal mains power plug is in place The projector will not activate unless these two conditions are correctly undertaken Power cord...

Страница 13: ...l control panel When 0 is depressed the projector is switched off When 1 is depressed the projector is switched on The projector is switched ON and OFF using the power mains switch ON OFF on the front...

Страница 14: ...git button 2 on the RCU Front Input Connections Signal input connections to the projector 1 Connecting a Video source to the Video in 2 input 2 Connecting a Audio source to the Audio in B input 3 Conn...

Страница 15: ...pp 3 dB All inputs are non floating inputs Connect the possible audio input signals for port 4 to the AUDIO B input when the audio lock is OFF see also chapter Controlling RGB input selection For port...

Страница 16: ...ternal loud speakers front input sockets 2 Connecting a S Video source to the 4 mini DIN input port 3 Separate Y luma C chroma signals for higher quality playback of Super VHS signals 1 x 4 pins plug...

Страница 17: ...120 MHz analog interface Order number R9826570 VGA interface Order number 120V R9828079 Order number 230V R9828070 MAC interface Order number 120V R9828059 Order number 230V R9828050 MAGIK interface...

Страница 18: ...5975765 Peripheral Equipment Input Connections 1 Connecting a computer 2 Connecting a RCVDS05 3 Connecting a VS05 4 Connecting an IR Remote Receiver 800 WARNING POWER DOWN ALL DEVICES BEFORE STARTING...

Страница 19: ...o the projector can be of standard or HDTV frequency in case of HDTV compatible projec tors or Component Video for projectors with Component Video input Connect the audio output to the default input A...

Страница 20: ...plastic cover insert the card for RCU You can cut out the insert cards in appendix C of this manual Battery installation in the RCU How to use the RCU Projector address Picture controls with direct a...

Страница 21: ...CU it is necessary to enter the projector address into the RCU only when that address is between 1 and 9 The projector with the corresponding address will listen to that specific RCU When address 0 ze...

Страница 22: ...s a visual indication on the screen of the current contrast setting while pressing the or buttons RCU If the bar scale is not visible on the screen press TEXT key once and retry the above indicated ke...

Страница 23: ...s a visual indication on the screen of the current sharpness setting while pressing the or buttons RCU If the bar scale is not visible on the screen press TEXT key once and retry the above indicated k...

Страница 24: ...ndication on the screen of the current treble level while pressing on the or buttons The bar scale and numeric indicator increase to the right when pressing the button higher treble reproduction and i...

Страница 25: ...gain Balance control Adjust the balance with the and button until the desired balance is obtained When TEXT is on a bar scale and a indicator below the bar scale between L and R give a visual indicati...

Страница 26: ...selected item When your password is wrong The error message Invalid pass word is displayed on the screen Press ENTER to continue and to return to the Service menu Factory programmed password 0 0 0 0...

Страница 27: ...ect with or then ENTER EXIT to return Select with or then ENTER EXIT to return Starting up the Random Access Adjustment Mode RANDOM ACCESS ADJUSTMENT MODE FILE SERVICE PICTURE TUNING AUDIO TUNING GEOM...

Страница 28: ...file Press the control disc forwards or backwards to select LOAD and press ENTER to display the Load menu The Load menu displays the corresponding files depending on the installed filter During a loa...

Страница 29: ...f the three methods to change the value a Press ENTER to activate the digits and enter directly with the numeric keys on the RCU or local keypad the new value or b Press ENTER to activate the digits P...

Страница 30: ...ge This can be corrected by forcing the field polarity to neg or pos Use the ENTER key to toggle between auto pos and neg Vertical refresh sync async The way of updating the image information on the L...

Страница 31: ...ied file is entered in the list of files Press EXIT to return to the Copy selection menu No copies are made Use the control disc to select a file name and press ENTER to select The Copy menu will be d...

Страница 32: ...The Picture Tuning menu will be displayed The next items are available Sync Slow Fast Still Video Color Balance Gamma Press ENTER to toggle between name and index name The files in the file list will...

Страница 33: ...right or to the left to adjust blue range 0 to 2 5 in comparison with the green color value 1 Pressing the control disc forwards or backwards to select Fixed Color Balance or Custom Color Balance If...

Страница 34: ...is still displayed Highlight Mute with the control disc and press ENTER to toggle between Mute on or Mute off Volume Balance Bass and Treble When a sound control is selected by highlighting the item...

Страница 35: ...e only necessary if the projector is mounted under a non standard projection angle Blanking Options The following ways are possible to adjust a geometry function Using the control disc to adjust or En...

Страница 36: ...ll be increased in height The top side of the image is fixed and only the bottom side can be adjusted Side keystone Highlight Side Keystone by pressing the control disc up or down and press ENTER to s...

Страница 37: ...disc forwards or back wards and then press ENTER to select Select with or then ENTER EXIT to return Select with or then ENTER EXIT to return Adjustmentoftheblankingonthebottomoftheimage Correctbypres...

Страница 38: ...he same side keystone correction for all files YES or NO YES the same keystone correction will be used for all installed files NO the keystone has to be adjusted file per file Press ENTER to toggle be...

Страница 39: ...eric chars Select with or then ENTER EXIT to return ADJUSTMENT MODE Select a path from below RANDOM ACCESS INSTALLATION SERVICE Source 01 INSTALLATION CONFIGURATION OSD COLOR INTERNAL PATTERNS Select...

Страница 40: ...ric chars INTERNAL PATTERNS OUTLINE HATCH COLOR BARS MULTIBURST CHECKER BOARD PURITY PAGE CHAR ALPHANUMERIC CHARS Select with or then ENTER EXIT to return Select with or then ENTER EXIT to return INST...

Страница 41: ...ts which are connected together with the more item If the desired item is not in the list of the displayed menu select more with the control disc and press ENTER to display the other items in the serv...

Страница 42: ...RUN TIME LAMP RUN TIME HISTORY MORE Select with or Reprogram with or or numeric keys ENTER to confirm EXIT to return CHANGE LANGUAGE ENGLISH FRENCH Select with or then ENTER EXIT to return I C DIAGNOS...

Страница 43: ...ed BARCO service centre proj address to change the address of the projector see Change Projector Address in this chapter software version installation Allows for the possible installations configurati...

Страница 44: ...ess will be filled in The first digit is highlighted Enter the new projector address with the digit keys on the RCU or the front local key panel or press the control disc to the right or to the left t...

Страница 45: ...ess ENTER ENTER displays the Lamp Run Time History menu EXIT returns to the adjustment selection menu A listing with the lamp serial number and the corresponding run count will be displayed The actual...

Страница 46: ...ith ENTER EXIT to return Adjust red with or blue with or Select with or then ENTER Barco Logo Highlight the BARCO LOGO by pressing the control disc forwards or backwards in the Service menu and press...

Страница 47: ...UT BALANCE 60Hz TRACKING I C DIAGNOSIS MORE I2 CDiagnosis Gives an overview of the correct working of the I C controlled IC s Highlight I2 C diagnosis by pressing the control disc forwards or backward...

Страница 48: ...mote control and the other side in the connector on the rear of the projector labelled hard wire remote IR remote receiver 800 Hardwired RCU RCVDS05 VS05 Switcher Source Numbers 90 99 LCD Projector Co...

Страница 49: ...l of groups of projectors The software is invaluable during staging events because it allows the control of menu functions directly without displaying menus that can be disruptive during your presenta...

Страница 50: ...cable To connect an IBM PC or compatible to the projector To connect a RCVDS 05 to the projector To connect a IR receiver to the RCVDS or to the projector To be used as extension cable for all other...

Страница 51: ...400 70 087 31 469 28 322 900 720 449 400 COMPUSC4 1024 X 480I 29 945 30 694 39 779 1296 1024 512 480 VGA_72V 640 X 480 72 800 37 856 31 496 832 640 520 480 VGA_GR 640 X 480 59 941 31 469 25 175 800 64...

Страница 52: ...835 47 840 1457 1120 411 375 PC98_3 1120 X 750 60 000 50 000 78 569 1571 1120 833 750 MAC_6 832 X 624 74 550 49 722 57 280 1152 832 667 624 MAC_7 1024 X 768 74 910 60 150 80 000 1330 1024 803 768 PAM...

Страница 53: ...Focus the image by turning the Main Lens Barrel Tube in the clockwise or anti clockwise direction until the middle region of the picture is focused Attention Do not turn out the lens too far otherwis...

Страница 54: ...a new tissue 6 When using acetone or ethyl ether mixture proceed as follows Fold the cloth or tissue several times to form a pad Soak the folded end of the pad in the acetone Starting at the diameter...

Страница 55: ...1 6 87 21 27 7 1 6 87 21 277 1 6 87 21 277 1 6 1 3 8 7 6 2 8 5 352 725 1387 6285 6 1 3 8 7 6 2 8 5 5 9 6 1387 6285 6 6 7 21 6 7 21 1 3 8 7 6 2 8 5 352 725 1387 6285 6 1 3 8 7 6 2 8 5 5 9 6 1387 6285 6...

Отзывы: