13. Configurator, Warp User Interface
13.6 Making an adjustment via drag and drop
How to make the adjustment
1. Click on the selected node and hold down the mouse button.
2. Move the node in the desired direction.
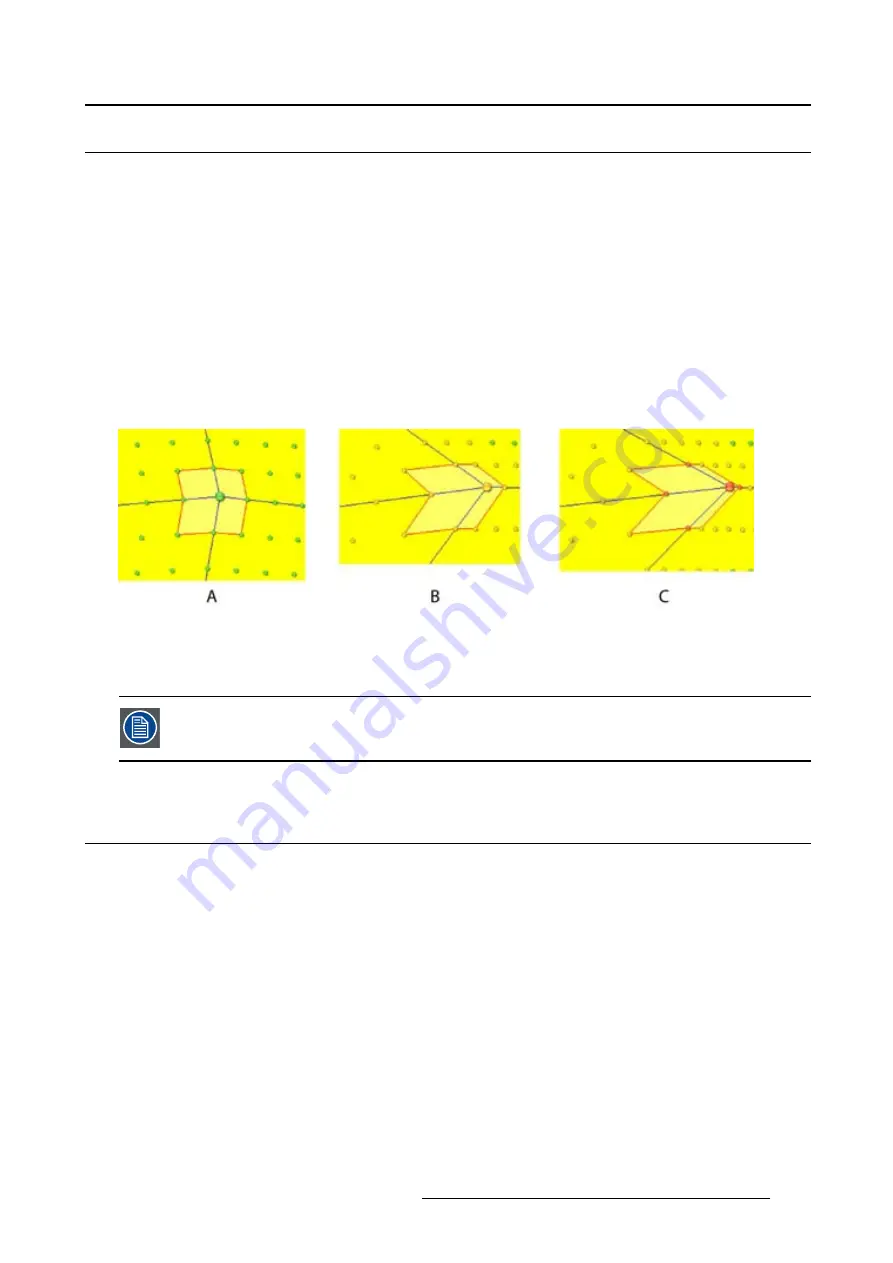
The position of all the other nodes in the active area is recalculated with regard to the new position of
the active node. (image 13-11)
As long as the dots remain green, the warping board can execute this new position. The coordinates
and the status icon of the selected active node are also green;
When the dots become orange, a possible problem can occur on the warping board. The coordinates
values change also to orange and the status icon goes to the error state.
When the dots become red, the warping board is possibly not able to execute these settings. The
coordinates values change also to red and the status icon goes to the warning state.
Image 13-11
A Normal status indication
B Error status indication
C Warning status indication
To solve this problem, go to a higher resolution (more active nodes) and change
fi
rst
some adjacent nodes before returning to the original node.
13.7 Making an adjustment via the Floater menu or keyboard
About the arrow keys
Click in on the arrow keys of the
Floater
menu is the same as pressing
Ctrl
+
arrow key
on the keyboard.
How to make the adjustment
1. Select the active node to move.
2. Before starting, set
fi
rst the adjustment step. Click on the drop down box next to
Step
in the
Floating
menu and select the number of pixels one step represents. (image 13-12)
3. Click on the arrow keys to move the node in the desired direction. Each click represents a jump of x
pixels where x is the number set in Step.
R5976924 PROJECTOR TOOLSET 16/04/2009
195
Содержание Projector Toolset
Страница 1: ...Projector Toolset Reference manual R5976924 05 16 04 2009...
Страница 4: ......
Страница 10: ...Table of contents 6 R5976924 PROJECTOR TOOLSET 16 04 2009...
Страница 38: ...3 Menus Image 3 15 Clear short cut on snapshot 34 R5976924 PROJECTOR TOOLSET 16 04 2009...
Страница 48: ...4 Preferences Image 4 12 Selecting a workspace 44 R5976924 PROJECTOR TOOLSET 16 04 2009...
Страница 73: ...5 Configurator Image 5 27 Multi selection of projectors R5976924 PROJECTOR TOOLSET 16 04 2009 69...
Страница 74: ...5 Configurator 70 R5976924 PROJECTOR TOOLSET 16 04 2009...
Страница 96: ...6 Configurator General projector settings 92 R5976924 PROJECTOR TOOLSET 16 04 2009...
Страница 138: ...8 Configurator Projector adjustment settings Image 8 28 Color temperature 134 R5976924 PROJECTOR TOOLSET 16 04 2009...
Страница 165: ...9 Configurator Color alignment Image 9 9 Diagram preview set up R5976924 PROJECTOR TOOLSET 16 04 2009 161...
Страница 166: ...9 Configurator Color alignment 162 R5976924 PROJECTOR TOOLSET 16 04 2009...
Страница 170: ...10 Configurator Installation settings 166 R5976924 PROJECTOR TOOLSET 16 04 2009...
Страница 177: ...11 Configurator Communication settings Image 11 7 Infrared receivers on off R5976924 PROJECTOR TOOLSET 16 04 2009 173...
Страница 178: ...11 Configurator Communication settings 174 R5976924 PROJECTOR TOOLSET 16 04 2009...
Страница 189: ...12 Configurator Warping Image 12 16 Activate warp file R5976924 PROJECTOR TOOLSET 16 04 2009 185...
Страница 190: ...12 Configurator Warping 186 R5976924 PROJECTOR TOOLSET 16 04 2009...
Страница 215: ...13 Configurator Warp User Interface Image 13 38 Color value via RGB R5976924 PROJECTOR TOOLSET 16 04 2009 211...
Страница 216: ...13 Configurator Warp User Interface 212 R5976924 PROJECTOR TOOLSET 16 04 2009...
Страница 220: ...14 Update module Image 14 4 Version info 216 R5976924 PROJECTOR TOOLSET 16 04 2009...
Страница 231: ...16 Lens calculator Image 16 4 Screen width calculation R5976924 PROJECTOR TOOLSET 16 04 2009 227...
Страница 232: ...16 Lens calculator 228 R5976924 PROJECTOR TOOLSET 16 04 2009...
Страница 235: ...17 Service module Image 17 2 Upgrade projector R5976924 PROJECTOR TOOLSET 16 04 2009 231...
Страница 236: ...17 Service module 232 R5976924 PROJECTOR TOOLSET 16 04 2009...
Страница 244: ...Index 240 R5976924 PROJECTOR TOOLSET 16 04 2009...


