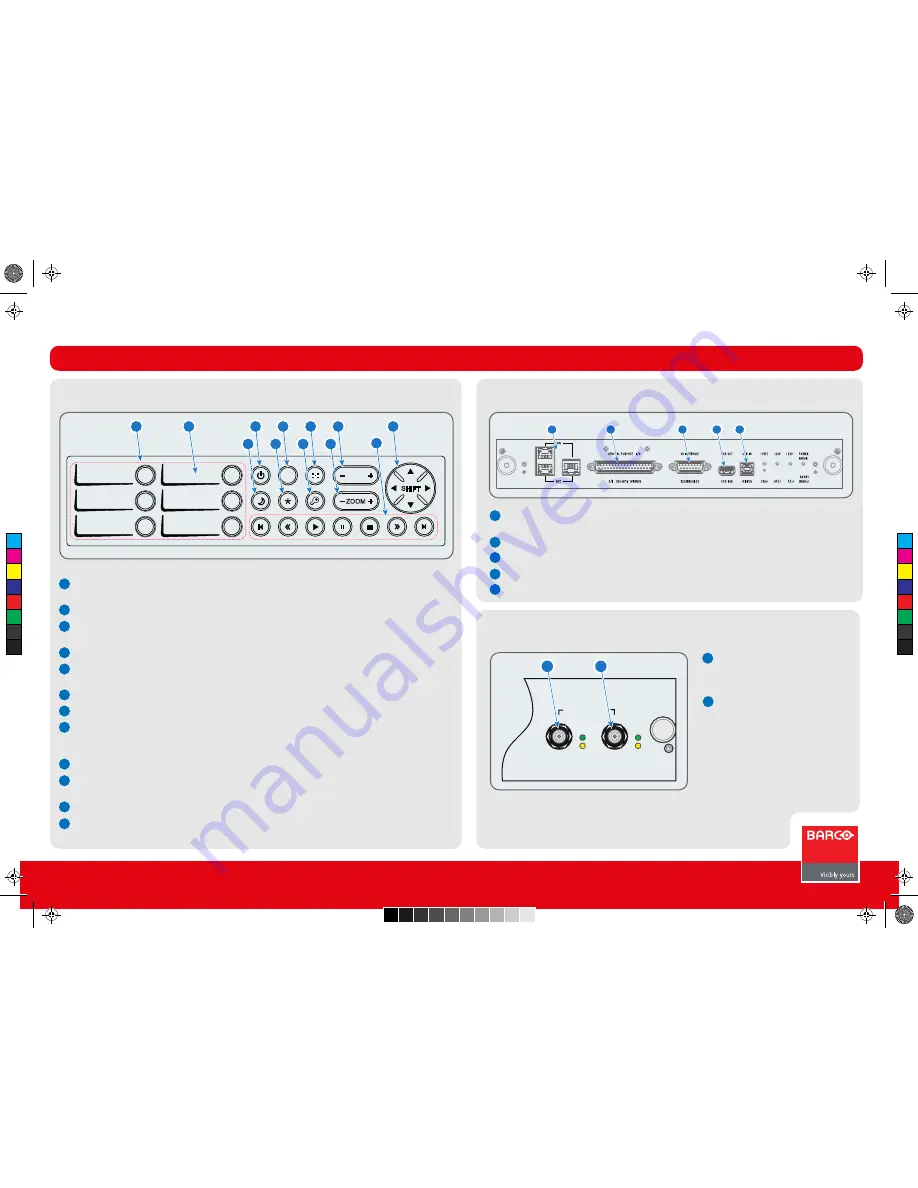
manualshive.com logo in svg
background image

Source connections

Source connections

Local keypad

Local keypad

Communication connections

Communication connections

DP2K S-series


Quick Start Guide

1

2

SMPTE 292/424 input, port A 
(maximum cable length of 30 m 
allowed)
 
SMPTE 292/424 input, port A 
(maximum cable length of 30 m 
allowed)

1

2

Local Area Network (LAN: 10/100/1000 base-T) with build in Ethernet switch. Only for as 
projector interface, not for content.
General purpose input/output (GPIO), can be programmed by macros.
3D interface to connect external 3D devices to the projector.
USB out: for future use.
USB in: for communication with the projector via RS232.

3
4
5

1

2
3

4
5

6
7
8

9

10

11

12

Numeric buttons

 or macro buttons (1 to 6) to start up a specific macro 

that setup the projector for a specific show. 

Marker area

 for macro name.

Standby button:

 switch the lamp on or off.

Important: The lamp cooling fans remain active for about 5 minutes.

Dowser button:

 opens or closes the electronic dowser.

Test pattern button:

 opens directly the internal test patterns. Press 

again to scroll to next pattern.

Lens focus button

 to focus the image on the screen.

Lens shift button

 to shift the image up/down or left/right.

Sleep button:

 press 3 seconds to put projector in sleep mode. Press 

sleep again to put projector in standby. This function can be part of a 
predefined macro.

Star button:

 user defined button.

Key button

 is used in the authorization procedure after servicing. Not 

used in normal operation.

Lens zoom

 to zoom the projected image in or out.

Media buttons

 to navigate through the content on the integrated media 

server.

General

Optional HD-SDI

Connections to an IMS or an IMB : consult the 
corresponding documentation of the manufac-
turer. 

SMPTE 292/424 IN

A

B

SEL

SYNC OK

SEL

SYNC OK

1

2

1

2

3

4

5

DOWSER

1                                            4

2                                            5

3                                            6

ZOOM

FOCUS

SHIFT

2

1

3

4

5

6

7

8

9

10

11

12

Trained projectionist

2

C

M

Y

CM

MY

CY

CMY

K

r5905465_00_userguide.pdf   2   17-12-2012   9:20:10

Содержание DP2K S-series

Страница 1: ...removes heat from lamp house Must be connected to external extraction system Important the extraction system must be running A flexible duct must be installed Touch panel position places where a touch panel can be mounted Status light shows the status of the projector Can be green yellow red or blue Mains power switch powers projector on and off Shuts off all electrical connections Important the l...

Страница 2: ...ling fans remain active for about 5 minutes Dowser button opens or closes the electronic dowser Test pattern button opens directly the internal test patterns Press again to scroll to next pattern Lens focus button to focus the image on the screen Lens shift button to shift the image up down or left right Sleep button press 3 seconds to put projector in sleep mode Press sleep again to put projector...

Страница 3: ...r Optional if the image is not aligned with the screen masking use the Lens adjustment buttons to correct the image on screen Be sure to notify the theatre technician General Ensure that the exhaust system is properly installed Press the Power Switch to switch the projector ON Allow up to one minute for the projector to finish the boot up sequence Note projector starts up in the same state as it w...

Страница 4: ...t but doesn t feel greasy then vacuum clean the dust filter Attach a clean dust filter to the cover plate Ensure that both latches and both mounting lips of the dust filter are engaged Install the dust filter assembly back at the front side of the projector Secure both captive screws Ensure that both mounting lips of the assembly are engaged in the projector chassis Lens Always wipe lenses with a ...

Страница 5: ... dust filter Attach a clean dust filter to the cover plate Ensure that both latches and both mounting lips of the dust filter are engaged Install the dust filter assembly back at the front side of the projector Secure the captive screw Ensure that the mounting lip of the assembly is engaged in the projector chassis Make a solution with a ratio of 30 gram handful sodium carbonate to 1 liter hot wat...

Страница 6: ...ver Check the image on screen for the proper alignment and color Optional if the image is not aligned with the screen masking use Configuration Lens Lens settings to correct the image on screen Be sure to notify the theatre technician No extra software installation required Make sure your PC and projector are connected to the same LAN Open your webbrowser and type in the hostname or IP address of ...

Страница 7: ...t Restart projector and server Try to play the movie again Let the projector lamp cool down for at least one minute prior to restarting Red Error condition Restart the projector if the status light turns green problem is resolved Check Communicator or Touch panel for red marked error messages If you find an error report it ot the theatre technician Yellow Warning condition Check Communicator or To...

Отзывы: