9. Image menu
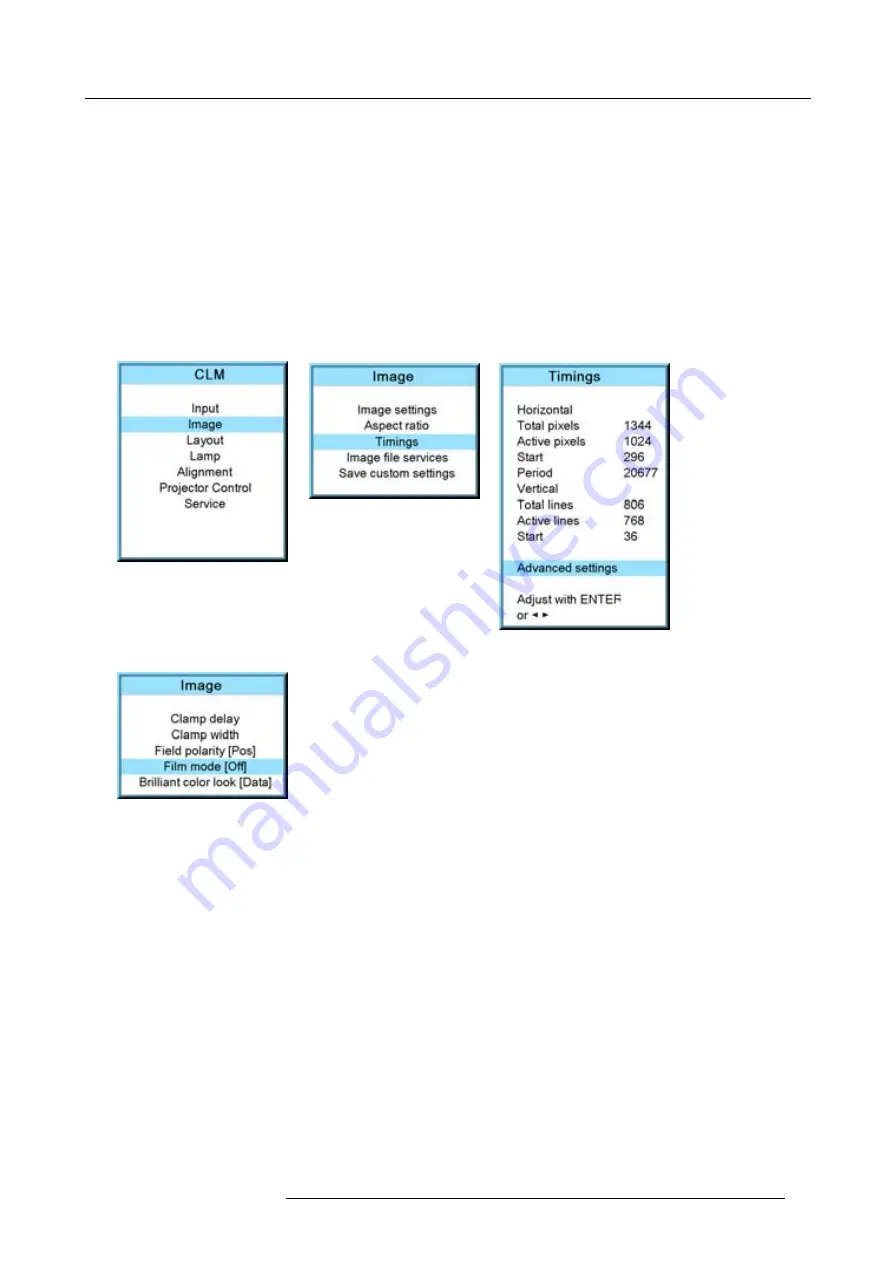
How to set up
1. Press
MENU
to activate the menus.
2. Use the
▲
or
▼
key to select
Image
and press
ENTER
.
3. Use the
▲
or
▼
key to select
Advanced settings
and press
ENTER
.
The Advanced settings menu is displayed.
4. Use the
▲
or
▼
key to select
Film mode
and press
ENTER
to toggle between [auto] or [off].
Auto
Detects for
fi
lm and it starts to avoid deinterlacing artefacts, and it results in a perfect artefact-free display.
Off
no detection for
fi
lm mode.
When
fi
lm with a banner is projected at the same time, and
fi
lm mode is auto, the banner will shown possible artefacts as the
software will detect a
fi
lm.
Image 9-75
Image 9-76
Image 9-77
Image 9-78
9.5.4
Advanced setting, brilliant color look
What can be done ?
The BrilliantColor™ technology is con
fi
gured to process the spoke regions of the color wheel as a secondary color which improves
the brightness of the display and gives the viewer a truly life-like image. The look means the shape of the curve of white added to
the image. The amount of added white can be different in the low light than in the high lights. Some prede
fi
ned looks, optimized for
either computer images or video images are selectable with the brilliant color look function.
Select [data] when projecting computer images.
Select [Vid 1] or [Vid 2] when producing video images.
The brilliant color look setting is stored per source.
How to switch
1. Press
MENU
to activate the menus.
2. Use the
▲
or
▼
key to select
Image
and press
ENTER
.
3. Use the
▲
or
▼
key to select
Advanced settings
and press
ENTER
.
The Advanced settings menu is displayed.
4. Use the
▲
or
▼
key to select
Brilliant color look
and press
ENTER
to toggle between [Data] or [Vid. 1] or [Vid 2].
R59770021 CLM R10+ 15/03/2010
89
Содержание CLM R10+ R9050100
Страница 1: ...CLM R10 Users manual R9050100 R90501001 R59770021 10 15 03 2010 ...
Страница 14: ...1 Safety 10 R59770021 CLM R10 15 03 2010 ...
Страница 22: ...2 General 18 R59770021 CLM R10 15 03 2010 ...
Страница 35: ...3 Physical installation Skew Image 3 28 Skew adjustment R59770021 CLM R10 15 03 2010 31 ...
Страница 36: ...3 Physical installation 32 R59770021 CLM R10 15 03 2010 ...
Страница 48: ...5 Connections 44 R59770021 CLM R10 15 03 2010 ...
Страница 64: ...7 Start up of the Adjustment mode 60 R59770021 CLM R10 15 03 2010 ...
Страница 74: ...8 Input menu 70 R59770021 CLM R10 15 03 2010 ...
Страница 115: ...10 Layout menu Image 10 61 Image 10 62 Image 10 63 Image 10 64 R59770021 CLM R10 15 03 2010 111 ...
Страница 116: ...10 Layout menu 112 R59770021 CLM R10 15 03 2010 ...
Страница 158: ...13 Projector control 154 R59770021 CLM R10 15 03 2010 ...
Страница 172: ...14 Service menu 168 R59770021 CLM R10 15 03 2010 ...
Страница 186: ...16 Servicing 182 R59770021 CLM R10 15 03 2010 ...
Страница 195: ...17 Projector covers removal and installation Image 17 18 Secure the lamp door R59770021 CLM R10 15 03 2010 191 ...
Страница 196: ...17 Projector covers removal and installation 192 R59770021 CLM R10 15 03 2010 ...
Страница 204: ...C DMX Chart 200 R59770021 CLM R10 15 03 2010 ...
Страница 210: ...D Specifications 206 R59770021 CLM R10 15 03 2010 ...
Страница 216: ...E Troubleshooting 212 R59770021 CLM R10 15 03 2010 ...
Страница 222: ...F Mounting optional Carry handle 218 R59770021 CLM R10 15 03 2010 ...
Страница 224: ...G Order info 220 R59770021 CLM R10 15 03 2010 ...
Страница 232: ...Index 228 R59770021 CLM R10 15 03 2010 ...


