background image

39

FPLMP138

FPLMP138

In

 more 

detail

 . . .

7.  Lubricate the cutting means (

26

) after each use to prolong their lifespan. Apply 

lubrication oil/grease along the edges of the cutting means (

26

).

20

26a

26b

26c

26

26d

26e

Torque wrench 

(

40

 - 

45

 Nm)

Grass catcher

1.  Inspect the grass catcher (

22

) before each use. Do not use it if you find any damage. 

2.  Clean the grass catcher (

22

) after operation using water and mild soap. 

3.  Let the grass catcher (

22

) dry thoroughly before storing to avoid mildew. 

Wires

Check the performance of the wires (

6

,

 25

) before each use. Ask a qualified specialist 

to adjust it if necessary.

WARNING!

 Do not use the product with a defective or loose wire(s)!

Air filter 

NOTE:

 A properly maintained air filter (

12a

) helps to prevent dirt from entering 

the engine. Entering dirt can cause blockages that can lead to premature engine 

wear or problems with starting or running the engine.

Wash the air filter (

12a

) every 

25

 hours (in dusty conditions or when airborne debris is 

present, clean more often). 

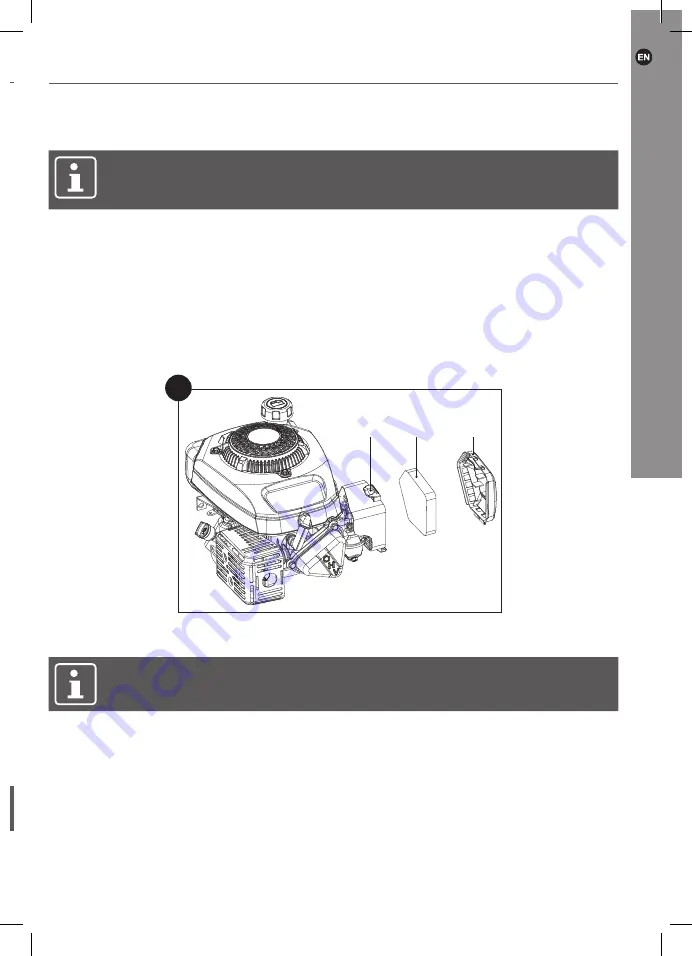
1.  Inspect the air filter (

12a

) regularly. Replace it with a new one if necessary. 

2.  Remove the cover (

12b

). 

3.  Remove the air filter (

12a

) and tap it on a solid surface to remove dust (Fig. 

21

). 

Clean it with clean water.

4.  Apply a small amount of foam air filter oil on the air filter (

12a

) to increase its 

performance. Wipe out surplus oil and put the air filter (

12a

) back into the case (

12

). 

21

12

12a

12b

Spark plug

NOTE:

 For good performance, the spark plug (

14a

) must be properly gapped 

and free of deposits.

Inspect the spark plug (

14a

) every 

25

 hours or before long-term storage over 

180

 days. 

Clean or replace with a new one if necessary (type: 

LD K7TC

). 

1.  Disconnect the spark plug connector (

14

) (Fig. 

22

). 

2.  Loosen the spark plug anti-clockwise using the spark plug wrench (

27

) and remove 

it carefully (Fig. 

23

).

Care and maintenance

3663602423287-GB-V04.indd   39

27/9/2018   14:55

Содержание FPLMP138

Страница 1: ...Petrol Lawnmower 138 cm3 Original Instructions FPLMP138_GB_V04_20180927 WARNING Read the instructions before using the product FPLMP138 EAN 3663602423287 3663602423287 GB V04 indd 1 27 9 2018 14 54...

Страница 2: ...reference Getting Started 02 Safety information 03 Your product 12 Before you start 16 Quick start 24 In more detail 26 Product functions 27 Operation 31 Care and maintenance 34 Troubleshooting 44 Re...

Страница 3: ...property 5 The operators must receive a proper training in the use adjustment and operation of the product including prohibited operations Preparation 1 While mowing always wear protective footwear a...

Страница 4: ...hanging direction on slopes 9 Do not mow excessively steep slopes near drop offs ditches or embankments 10 Avoid using the product in bad weather conditions especially when there is a risk of lightnin...

Страница 5: ...r any damaged parts check for and tighten any loose parts whenever you leave the product before refuelling 26 Never touch the exhaust exhaust guard or cooling fins when the engine is hot 27 Never care...

Страница 6: ...moved before the product is operated 3 Fuel fumes can ignite Never use the product in environments where there is a risk of explosion 4 Petrol engines produce toxic carbon monoxide exhaust fumes Breat...

Страница 7: ...on your clothes change your clothes and wash any part of your body that has come in contact with fuel before starting the engine again 21 If fuel is ignited put out the fire with a dry powder fire ex...

Страница 8: ...each in your work area We recommend to have dry powder fire extinguisher always available Residual risks Even if you are operating this product in accordance with all the safety requirements potential...

Страница 9: ...ption of signal words DANGER The signal word that indicates a hazard with a high level of risk which if not avoided will result in death or serious injury WARNING The signal word that indicates a haza...

Страница 10: ...ly stopped before touching the product Pay particular attention when working on the blades Objects thrown by the product could hit the operator or other bystanders Always ensure that other people and...

Страница 11: ...surfaces and structural parts that could cause burns if they are touched The product can also stay hot for a longer period of time after the operation Petrol engines produce toxic carbon monoxide exh...

Страница 12: ...tting Started Your product 1 2 3 4 6 7 8 5 9a 10 11 12 14 15 16 17 18 21 22 23 24 25 20 19 26a 26 27 28 26b 26c 26e 26d 9 13 4 1 2 3 4 5 6 7 8 9 10 11 12 13 14 15 16 17 18 3663602423287 GB V04 indd 12...

Страница 13: ...Spark plug 15 Muffler 16 Wheel 17 Oil tank cap 18 Lever for cutting height adjustment 19 Handle support 20 Bolt M8x35 mm x2 21 Rear deflector guard 22 Grass catcher a Hook x2 b Handle 23 Hook for reco...

Страница 14: ...pe SMV 1816211 blade thickness 2 5 mm Cutting width 40 cm Cutting height 25 75 mm Grass catcher volume 45 l Engine Engine model SE560 Engine type air cooled 4 stroke engine Engine displacement 137 7 c...

Страница 15: ...2 and may be used for comparing one product with another The declared vibration value may also be used to evaluate the exposure for the user caused by vibration in advance WARNING Depending on the ac...

Страница 16: ...erators and property 4 Ensure that you have all the accessories and tools needed for assembly and operation This also includes suitable personal protective equipment WARNING The product and the packag...

Страница 17: ...step and use the pictures provided as a visual guide to assemble the product easily Disconnect the spark plug connector 14 from the spark plug Reconnect it after assembly NOTE Take care of small part...

Страница 18: ...e handle bar with hook for recoil starter handle 23 should be fitted on the right hand side when standing behind the product Fig 2 2 7 19 23 3 Fix the lower handle bars 7 to the handle supports 19 usi...

Страница 19: ...r 1 with the ones on the lower handle bars 7 Align the hook for recoil starter handle 23 upwards Secure the connection using M8x43 bolts 5 and locking knobs 4 Fig 4 1 4 7 5 23 4 5 Fix the drive wire 6...

Страница 20: ...e wire 25 with the wire clip 8 to the lower handle bar 7 Fig 6 6 25 8 7 Grass catcher assembly 1 Attach the grass catcher s bag to it s frame Fig 7 7 22 Gr Alw 1 2 3 8 Fu Th su 1 2 3 Before you start...

Страница 21: ...th a 4 stroke engine Before operation it is necessary to add suitable fuel and engine oil separately 1 Place the product on a stable level surface We recommend laying a non flammable sheet under the p...

Страница 22: ...to allow for expansion Fig 10 9a 9 10 9 5 mm NOTE Petrol deteriorates over time It may be difficult to start the engine if you use petrol which has been kept for more than 30 days Towards the end of...

Страница 23: ...gine and should not be used 1 Unscrew and remove the oil tank cap 17 2 Gradually add good quality engine oil SAE 10W 30 Allow the oil to settle 3 Check the oil level frequently while filling Wipe off...

Страница 24: ...clutch Brake clutch Recoil starter handle Hook for recoil starter handle Lever for cutting height adjustment Oil tank cap Spark plug connector Primer Air filter case Fuel tank cap Pr St P P St R St Q...

Страница 25: ...Add fuel Add oil Press primer 3 times for cold engine Pull brake clutch Pull recoil starter handle until engine starts Pull drive clutch Operate Stopping Press primer 3times Pull brake bar Pull recoil...

Страница 26: ...ore detail Product functions 27 Operation 31 Care and maintenance 34 Troubleshooting 44 Recycling and disposal 46 Guarantee 46 EC declaration of conformity 47 In Th 1 2 3 B 1 2 D Us dri 1 2 3663602423...

Страница 27: ...t must not be used for any purposes other than those described Brake clutch 1 Pull the brake clutch 3 towards the upper handle bar 1 and hold it in position when starting the engine and during operati...

Страница 28: ...rter cord around your hand Only pull on the recoil starter handle 24 WARNING Do not suddenly release the recoil starter handle 24 Allow the rope to return slowly and in a controlled manner each time i...

Страница 29: ...bag to prevent possible injury Cutting height adjustment WARNING Before adjusting the cutting height stop the engine and wait until the blade 26 comes to a complete stop This product can be adjusted...

Страница 30: ...ever 18 engages between two of the grooves Primer The primer 11 is positioned beside of the air filter case 12 Push the primer 3 times before starting the cold engine Fig 16 11 16 12 G 1 2 3 4 5 6 St...

Страница 31: ...if necessary with a soft brush Blocked air vents may lead to overheating and damage the product 5 Stop the engine immediately if you are disturbed while working by other people entering the working a...

Страница 32: ...rting procedure 6 When you are ready to mow hold the brake clutch 3 with one hand and pull the drive clutch 2 towards the upper handle bar 1 Fig 17 step 4 The product starts moving forward and begins...

Страница 33: ...it 2 Pull the recoil starter handle 24 for several times to drain the fuel from the combustion chamber 3 Wait for 10 minutes until fuel vapours and refit the spark plug 14a Clean up any spilt fuel an...

Страница 34: ...the lawn is cut without missing any spots Fig 19 6 Circle around flower beds When reaching a flower bed in the middle of the lawn cut a row or two around the circumference of the bed 7 Pay particular...

Страница 35: ...t with a slightly damp cloth and mild soap Use a brush for areas that are hard to reach 2 In particular clean the air vents 10 after every use with a cloth and brush 3 Remove stubborn dirt with high p...

Страница 36: ...urs Engine oil check x replace x Air filter check x clean x replace x Spark plug check adjust x clean x replace x Spark plug cap clean x Fuel tank clean x Fuel tube clean Every 2 years replace if nece...

Страница 37: ...26 will become worn and lose some of the original shape The cutting efficiency will be reduced and the cutting means should be replaced 3 Keep the cutting means 26 sharp to ensure a good cutting perfo...

Страница 38: ...re each use Do not use it if you find any damage 2 Clean the grass catcher 22 after operation using water and mild soap 3 Let the grass catcher 22 dry thoroughly before storing to avoid mildew Wires C...

Страница 39: ...p it on a solid surface to remove dust Fig 21 Clean it with clean water 4 Apply a small amount of foam air filter oil on the air filter 12a to increase its performance Wipe out surplus oil and put the...

Страница 40: ...oft cloth if it is wet from fuel 6 Check the spark plug gap It should be 0 7 0 8 mm Fig 24 24 0 7 0 8 mm 14a 7 Replace with a new spark plug if either the electrode or the insulation is damaged 8 When...

Страница 41: ...6 Before re use refill the fuel tank 9 as described in the section Fuel and engine oil Fuel Checking engine oil NOTE Check the oil level and quality before each use The oil must be replaced after ever...

Страница 42: ...ecialist Do not attempt to make any adjustments by yourself Muffler Should it be necessary to modify or replace the muffler contact an authorised service centre or a similarly qualified specialist Do...

Страница 43: ...erm storage more than 30 days drain the fuel tank 9 as described in previous chapter 7 If you plan to store the product with fuel and oil it is important to reduce the risk of petrol vapours ignition...

Страница 44: ...lace spark plug 1 4 Spark plug connector is loose 1 4 Attach properly 1 5 Lever for cutting height adjustment is not in the correct position for the prevailing conditions 1 5 Move the lever to correct...

Страница 45: ...1 Clean air filter 5 2 Air vents are clogged 5 2 Remove debris from vents 6 Engine skips at high speed 6 1 Gap between electrodes of the spark plug is too close 6 1 Set gap between 0 7 0 8 mm 7 Engin...

Страница 46: ...onths starting from the day of purchase Please retain your receipt as a proof This guarantee specifically excludes losses due to Normal wear and tear including accessory wear Overload misuse or neglec...

Страница 47: ...ower Level 93 5 dB A Guaranteed Sound Power Level 96 dB A EN ISO 3744 1995 ISO 11094 1991 Certificate registration number GB 1067 6452 18 Issue 1 Test report No SHES180700812361 Conformity assessment...

Страница 48: ...d 3 Sheldon Square London W2 6PX United Kingdom Distributor B Q plc Chandlers Ford Hants SO53 3LE United Kingdom www diy com SFD Limited Trade House Mead Avenue Yeovil BA22 8RT United Kingdom www scre...

Отзывы: