background image

2

S

B

I M P LY

E T T E R !

B K

&

U

S

I

N

G

C

K

E

D

I

T

O

R

T

O

P

R

O

G

R

A

M

Overview

The Goal - Minimize Training Time and Effort  

Training clients has traditionally taken too much of an installer’s time and effort. Creating
hand written summary sheets and instruction books for customers is a waste of time.The
CK1.2 Keypad is designed to save time.With each keypad, B & K includes a pre-printed
customizable Operation Manual. Unlike other keypads, this manual has nothing to do with
setup or programming. It is a guide to operating the client’s home theater! Although the
flexibility of the CKEditor software enables you to program keypads in thousands of differ-
ent ways, the operations manual will show the customers how to operate their home the-
ater if you follow a few tips as you program.

TIP - Program To Operate As Shown In The Guide to

Operation  

1 You must create a DEVICE (a set of 1 to 4 dedicated LCD pages) for each remote control you want the

keypad to replace. Use the IR database or IR learning so that the CK1.2 Keypad can control all needed
functions.

2 The MAIN Power On and Power Off buttons turn on and off the entire zone (including any local compo-

nents or devices) with a macro.

3 Each of the MAIN LCD Device buttons issues a macro that reconfigures the system 

inputs and modes as necessary for the client to watch or listen to the selected source.

4 Punch Through  Volume and Mute have been programmed for all devices so that the client can always

adjust the volume regardless of which device has been selected.

Keypad Basic Controls and Displays  

2

Overview of Operations

The Owner’s Manual

A

UDIO

/V

IDEO

S

YSTEM

O

PERATION

I

N

Y

OUR

_____________

W

ITH

Y

OUR

B&K CK1.2 K

EYPAD

S

B

I M P LY

E T T E R !

B K

&

Page 1

S

B

I M P LY

E T T E R !

B K

&

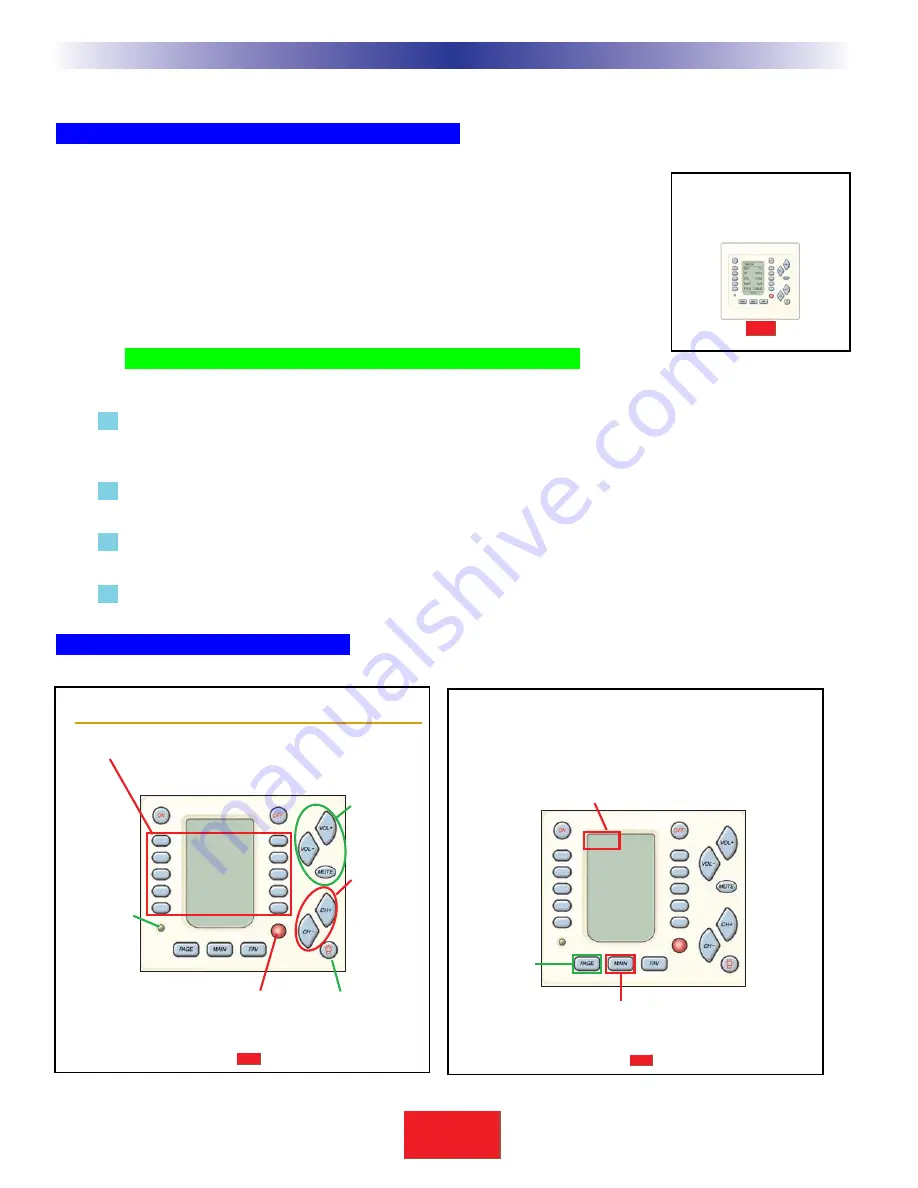
Basic Controls and Displays

Volume/Mute
Buttons 

control the
level of the
sound.

Change
Buttons 

Change to the
next channel,
chapter, song
or B & K sound
preset; depen-
ding on your
activity.

Power LED 

Lights up
when this
Zone/Room
is ON.

LCD Buttons

- Labels on the Screen change depending on what you

activity you have selected. For example, when you
select CD listening as the activity, you’ll see the labels
change to Play, Stop etc. so that you can control the CD.

MAIN
CD NEWS

SAT JAZZ

DVD CLASS

TAPE ROCK

HOUSE AUDIO

PAGE 1

Backlight Button

lights the keypad
display.

Remote Control Target

conceals an IR (Infrared) Sensor
which relays commands from your
remote controls to your components.

Page 2

S

B

I M P LY

E T T E R !

B K

&

Screen Title

- Main indicates that you are looking at the Main Menu, which

enables you to select what you want to watch/listen to in
this zone. When you have selected a new activity, the
screen title will display the change (for example: “CD” indi-
cates you can control the CD player).

Page Button

When other
pages of func-
tions are avail-
able, pressing
the page but-
ton will display
them.

Main Button

- The Main button always returns

you to the Main Menu so that
you can select a new activity or
turn the system on or off.

MAIN
CD NEWS

SAT JAZZ

DVD CLASS

TAPE ROCK

HOUSE AUDIO

PAGE 1

Содержание CK1.2

Страница 1: ...B K COMPONENTS LTD The B K CK1 2 Guide To Programming Keypad 2004 Customizing Saving Installation Time Automating REV B 0104 ...

Страница 2: ...d All other brand or product names are trade marks or registered trademarks of their respective companies or organizations B K Components Ltd sells its products through authorized dealers Buying from an authorized B K Components Ltd dealer insures that you have a FACTORY WARRANTY on your B K Components Ltd product A warranty on B K Components Ltd products is NOT VALID if the products have been pur...

Страница 3: ... Operation Manual 3 Utilizing FAV Favorite Macros 4 PROGRAMMING CONSIDERATIONS FOR THE CT610 310 600 5 Keypad Feedback 5 Programming the CT610 310 600 for Keypad Feedback 6 BKcSuite Determines Device Layout for the CK1 2 8 PROGRAMMING OVERVIEW 9 WINDOWS MENUS AND TOOLS 10 The Menu Bar and the Menus 11 File Menu 11 Program Menu 11 Communications Menu 12 Help Menu 12 The Toolbar and Shortcut Buttons...

Страница 4: ... Database 20 Discrete Codes Toggles and other New Words 20 Selecting a Code Set from the Database 20 Hidden Codes in Keypad Database 22 Shortcutting To Hidden Codes and Other Device IR commands 22 Testing 23 Downloading to TEST Pre Programmed IR Commands From The Database 23 Preparing the List of Buttons to be Learned 23 Using LCD Button Editor 24 Labeling and Deleting Buttons 24 Dragging and Drop...

Страница 5: ... for Toggle Commands in Macros 31 Programming the Power On Macro 32 Programming a Power Off Macro 36 Programming Activity Macros on MAIN LCD Device Buttons 37 Programming FAVORITE Macros 38 Inserting Macros Copying or Cloning a Macro 39 Programming Punch Through 40 Backlight On Time 41 Downloading to CK1 2 Keypad 42 Download Failures 43 Uploading from the Keypad to the PC 43 ADVANCED PROGRAMMING T...

Страница 6: ...s 48 Controlling the CK1 2 Via RS232 49 Overview 49 Examples of RS232 Macros 49 Purpose of Keypad ID Numbers 49 ID FF 255 is the Global Default 50 Resetting Keypad Unit ID 50 Sending Messages To A CK1 2 Via RS232 50 Need for Delay Between Messages 50 Enter Keypad ID In Hexadecimal 51 Device Number Mapping 51 Button Number Mapping 51 iv Table of Contents S B IMPLY ETTER B K U S I N G C K E D I T O ...

Страница 7: ...itor and vice versa However you must manually close such programs as Hotsync for the Palm Pilot and LapLink if they are running right click on any icons in the windows task bar representing these programs and exit them You Need an RS232 Connecting Cable Adapters As Necessary B K include a pre made cable suitable for connecting a Serial port to the CK1 2 keypad However if this is lost or misplaced ...

Страница 8: ...rammed for all devices so that the client can always adjust the volume regardless of which device has been selected Keypad Basic Controls and Displays 2 Overview of Operations The Owner s Manual AUDIO VIDEO SYSTEM OPERATION IN YOUR _____________ WITH YOUR B K CK1 2 KEYPAD S B IMPLY ETTER B K Page 1 S B IMPLY ETTER B K Basic Controls and Displays Volume Mute Buttons control the level of the sound C...

Страница 9: ...ess any button to issue the command 2 If there are more than 10 commands pressing the Page button will display any other features or controls you have asked your installer to provide Control a Device Without Listening To It 1 Touch the MAIN button to make sure that you are on the MAIN Menu Touch the Page button if you don t see the activity you want 2 Press and hold the MAIN button While holding t...

Страница 10: ...e learned or pre programmed IR commands This makes them incompatible with commands that have to be pressed and held like volume up or bass However by utilizing B K presets you can recall particular settings for bass treble etc The best approach is to program some useful presets with BKcSuite then recall them with a short two digit macros in FAVS 4 Overview of Operations Page 7 S B IMPLY ETTER B K ...

Страница 11: ...eypad Feedback in your systems so that the keypad displays zone input Programming Considerations for the CT610 310 600 SAT HBO CNN SHOW MSNBC MOVIE WEATH CINE DISC DISNY LEARN PAGE 1 RADIO 103 7 NEWS 92 1 JAZZ 88 5 CLASS 104 5 ROCK 105 9 POP PAGE 1 The keypad is displaying the currently selected source The USER selects RADIO on the remote control The remote sends an IR command to the CT610 310 600...

Страница 12: ...enty pos sible keypad status positions You must assign each input you use the correct keypad status jump An unused input should have it s keypad status TURNED OFF 1 Connect the B K to your PC open BKcSuite and select BASIC SETUP for the CT610 310 600 2 On the Basic Setup tab name the zones and the inputs including the dedicated inputs 6 Type in Section Title S B IMPLY ETTER B K U S I N G C K E D I...

Страница 13: ...will reappear in the lists for the other positions 4 Record the list of sources the names and the Keypad positions on your worksheets 7 Type in Section Title S B IMPLY ETTER B K T H E B K A U T O M A T E D H O U S E Programming Considerations for the CT610 310 600 Important Note Only assign a keypad position to an input that will be used by the keypads If an input does not have a source connected ...

Страница 14: ...ed In this example the devices corresponding to the settings you made for the receiver are made This master file will be used as a starting point for every keypad In the empty device spots you may insert devices for local TV s etc In this example the Dedicated Input is labeled SAT since each zone has it s own dedicated DSS receiver connected to the dedicated inputs Local Devices Added In this exam...

Страница 15: ...iles are saved with the file extension mxf all device files are saved with the extension mxd see D Save and Export below C Use the Program Menu In Order The Program Menu is your lifeline to a fast easy programming experience It is important that you do all of the tasks for each step before moving on to the next step In the tutorial you will see how important it is to download between several of th...

Страница 16: ... via shortcuts The floating Macro and Favorite window is used to view and edit macros The floating Hard Button window displays Phantom buttons that are useful for storing commands to be uti lized in macros The important thing to remember as you program is that most Windows conventions hold true in CKEditor Explore the program menus Hover your mouse over most of the buttons and controls and a ballo...

Страница 17: ...ces You ll need a grouping of hard buttons and LCD pages for every keypad that you are replacing That is called a Device With the Create Name Devices win dow you will be able to create name and rearrange up to twenty devices 2 IR Database Opens a new floating window to test and program IR code sets from the B K IR database 3 LCD Button Editor Opens a new floating window that allows you to arrange ...

Страница 18: ...ernet and link you to the B K website for additional technical support and resources Live Update Click on this after connecting to the Internet to download the newest version of CKEditor Firmware Version Connect your keypad to the PC and click on this to identify the firmware version of the key pad when asked to do so by technical support The Toolbar and Shortcut Buttons Hover your mouse over the ...

Страница 19: ...icates that the button is programmed with a learned IR code A learned code can be tapped or pressed and held for a sustained burst All buttons can be programmed with learned codes including all MAIN buttons hard and LCD except the buttons on FAV pages and the navigation buttons themselves An M or F flag indicates that the button is programmed with a Macro the F flag indicates the Macro is on one o...

Страница 20: ...Tree View will change the SIMULATOR to the selected PAGE and DEVICE Right click on a device to reveal the Device Context Menu Insert Page will insert an additional page to the device to a maximum of 4 Cut will copy the entire device and when pasted will delete the original Copy will copy the entire device without changing the original Paste will paste the copied or cut device into the selected dev...

Страница 21: ...PAGES The Edit and Label Buttons Window If the Edit and Label Buttons Window is closed reopen it by clicking on the shortcut button on the toolbar Whenever you SELECT a button the Edit and Label Buttons window displays the button name editable the Device and the IR Code from the database If you change the button name the IR Code list box displays both the name you created and the original database...

Страница 22: ... by selecting Button Labels You can change the name of any button When you change the name of a button it not only affects how the button appears in an LCD display it also changes how the button displays in the pull down Code list although the original name still appears beside the new label Shortcuts Copying Buttons You can create a SHORTCUT to another button by selecting it via the pull down lis...

Страница 23: ...the button you want the macro inserted in click on the INSERT button then click on the button containing the macro you want copied All of the macro steps are inserted into the new button in one step Make any changes you want to the new macro it is independent of the original the original is not affected by any changes you make nor is the copy affected by changes you make in the original DELETE You...

Страница 24: ...the first item of the Program Menu or by clicking on the Toolbar icon as shown here TIP Hover the mouse over the Toolbar buttons and a pop up label identifies it Creating Devices 1 Click on the position you would like to create a new device in Type the new name and hit either the ENTER or the TAB key on your keyboard then type another name in If you wish to leave a position blank simply TAB past i...

Страница 25: ...When all positions are filled you must delete one to do any rearranging of devices 6 To delete a device simply select it by clicking on it once then click on the DELETE key of your keyboard or the Delete Device button 19 Type in Section Title S B IMPLY ETTER B K T H E B K A U T O M A T E D H O U S E Programming Tutorial Both Tree View and the CK1 2 Keypad Simulator show the newly created devices I...

Страница 26: ...rete codes They distribute the discrete codes via service remotes etc For the first time those codes are collected and integrated into our database Not all components respond to the discrete codes in the Database A component has to be BUILT to respond to discrete codes The fact that other models from the same manufacturer do respond to discrete codes is the reason the codes are added to a code set...

Страница 27: ...until you find the Code Set that turns the component off When it turns off click on Save E After you find the correct Code Set click on SAVE When you do the LCD Button Editor window pops open You can correct any labels that you think could be more user friendly Feel free to rearrange buttons as you wish Moving LCD buttons with the LCD button Editor is exactly like moving Devices simply click and d...

Страница 28: ...den code list for shortcuts if you need one Shortcutting To Hidden Codes and Other Device IR commands You can create a SHORTCUT to another button with a Learned or pre programmed command OR a HIDDEN Code by selecting it via the pull down lists under Device and IR Code in the Edit and Label Buttons window TIP Discrete On and Off codes are listed in the Hidden Code lists as P ON and P OFF 1 On the s...

Страница 29: ...re two choices for downloading Partial Download This quickly downloads all of the pre programmed codes from the database This stage of programming before any learning or macro programming has been accomplished is really the only time you can use this option It does save you time Full Download This is the normal download you will use most of the time It takes a little longer but all commands macros...

Страница 30: ...then click on the Delete button in E Hide Page Check Boxes You must hide pages back to front If you want page 1 hidden move the buttons to page 4 then hide page 4 See Hiding pages section on the next page for more detail on HIDDEN pages Save and Cancel Only by clicking on SAVE will your work be saved No matter how many buttons you move or edit hitting CANCEL will discard all the work you have done...

Страница 31: ...ges In Favorites FAV or the Favorites device has five pages thus you cannot view all pages at once in LCD button editor However two scroll buttons normally grayed out become active when you are editing FAV By utilizing these buttons you can edit and view pages 1 through 4 or 2 through 5 Shortcuts Copying Existing Buttons Any button on MAIN or a Device not FAV buttons can be programmed with a short...

Страница 32: ...y only used when you are trying to isolate one command from a remote with a pre programmed macro Use a book or another opaque object in between the two remotes Press the button on the original remote then remove the obstruction for a moment then put it back Experiment with different timings Learning IR Codes One at a Time Select the Button Select the button that you want to teach to by single clic...

Страница 33: ...Editor starts at the top left moves across each row then moves down Select both the LEARN and the CONTINUE shortcut buttons The combination activates the batch learning capability of CKEditor Watch the INFO Window When the info window says READY press and hold the button on the original keypad When it says GOOD release the button Automatic SAVE and ReSelect During batch processing CKEditor automat...

Страница 34: ... functions from the RCVR device This creates a very simple RADIO device that is much easier for your clients to understand Many installers go a step further and HIDE all the pages in the RCVR device so that their clients cannot readjust and accidentally ruin the surround sound calibration Remember buttons on hidden pages are still programmable as macro steps If you right click on a device in Tree ...

Страница 35: ...he Manufacturer Model Category name you filed it as 5 Now select an EMPTY position on either MAIN page 1 or MAIN page 2 You cannot replace an existing device only an empty spot 6 Click on the ARROW pointing to the right at the MAIN pages then click on SAVE 29 Type in Section Title S B IMPLY ETTER B K T H E B K A U T O M A T E D H O U S E Programming Tutorial If you right click on a device in Tree ...

Страница 36: ...e somewhere and simply shortcut to it see page 22 for step by step info on shortcuts Discrete IR Codes vs Toggle IR Codes Manufacturers program their products to respond to IR codes with one action or many Toggle More than one action can occur when the code is sent by a keypad An example is a POWER button The manufacturer programs the TV to respond to a POWER command by turning it on if it was off...

Страница 37: ...d on one at a time Once the system is on they press MAIN and decide what they want to watch or listen to Professional Installations Require Bullet Proof Reliable Macros or a help list The use of Point Pray macros will create service calls and a lot of bad will Never leave a customer with a remote programmed to maybe work Finding Workarounds for Toggle Commands in Macros By creatively experimenting...

Страница 38: ...testing of delays and you can expect to do a lot of experimenting while programming 1 Select the Power On button on the MAIN page 2 Click on the RECORD icon 3 Take a look at the MAIN page both pages if you have two MAIN pages Decide which components you want to power on Start adding their Power On commands to the list by navigating to the device and page where the codes are located and clicking on...

Страница 39: ...television and the receiver have discrete input codes and the client s favored activity is watching Satellite Select the Audio receiver preamp zone controller by clicking its button on the MAIN menu Now click on the button with the SAT input command The new step appears in the list Select the TV by clicking its button on the MAIN menu Now click on the button with the correct input command The new ...

Страница 40: ...IN menu The new step appears in the list 7 Make sure the CK1 2 Keypad is connected and properly working through all emitters by using the original remote via the Infrared sensor to change everything to the wrong input and turn it all off Select the first step in the list by clicking on it Now click on the TEST button Observe the components Did they all turn on and switch to the correct input 34 Ty...

Страница 41: ...ivers to require 5 or more seconds of warm up time before they are responsive to new commands In a case like that you will need to add more delay between steps Select the Delay icon Now click on the preset amount of delay or enter any time between 1 second and 30 seconds in the Customize window The new step appears in the list Now drag the delay step to the correct location TIP Sometimes a change ...

Страница 42: ...ake the macro more reliable if you place the time consuming anchor the play command at the beginning of the macro Make sure that you turn the DVD player off before testing this kind of workaround You are testing the worst case you know that a toggle type power command will turn the DVD player off you are concerned about an event that might happen The DVD player is already off but the client presse...

Страница 43: ...w The DVD Activity Macro selects THX Surround Sound with 5 speakers with the TV on while the CD Activity selects Stereo with 4 speakers and forces the TV off For components that have play commands it is typically ok to have a Play command in the macro Watch out for components with toggle type play pause buttons That kind of Play Pause command should not be placed in an Activity Macro without a pre...

Страница 44: ...ady to program 1 In Tree View click on the sign next to the Device SAT CABLE that you will need to program the favorites from This expands the device so that you can see the Pages 2 On the Simulator click on the Favorite you would like to program and click the RECORD button 3 In Tree View click on one of the Pages of the device SAT CABLE you are using to make the favorite This instantly changes th...

Страница 45: ... brands require delays between commands However if the channel favorite has two identical digits you will most certainly require delay between the two identical commands 6 Click on the SAVE icon and continue to the next Favorite until all are complete Inserting Macros Copying or Cloning a Macro You can often speed programming by instantly inserting all of the steps of a previously programmed macro...

Страница 46: ...Punch Through CKEditor enables you to quickly set up common functions on all devices for the hard buttons Usually used only for Volume Up Down and Mute however you may occasionally find it convenient to punch through to the channel up and down Punch Through is not available for the LCD buttons 1 Open the Punch Through window by clicking on the shortcut button in the toolbar or by selecting Punch T...

Страница 47: ...rogrammed TV VCR1 MAIN 5 Repeat for any other groups of codes as you like Backlight On Time 1 Open the Backlight On Time window by clicking on the shortcut button on the toolbar or selecting it from the Program Menu 2 Enter the amount of time you would like the backlighting to stay on after the backlight button is pushed 41 Type in Section Title S B IMPLY ETTER B K T H E B K A U T O M A T E D H O ...

Страница 48: ...s the one you want to download to the keypad 4 Click on the Download to keypad shortcut button on the toolbar or choose Download from the Communications Menu 5 When the Download window appears select the Full Download checkbox and click on the Download button Do not move the mouse or touch the keyboard during the download 42 Type in Section Title S B IMPLY ETTER B K U S I N G C K E D I T O R T O P...

Страница 49: ...rive at a jobsite with an existing CK1 2 Keypad system that you would like to service edit or clone Simply upload the file to your PC save it with a new file name and you can edit the file send it to other remotes make a touch up and download back into the customer s remote TIP You cannot upload from the SR 10 1 only from the CK1 2 Keypad 1 Make sure the keypad has fresh batteries inserted correct...

Страница 50: ...l have to Press and Hold the button to issue the Macro When the client simply taps a MAIN activity button he she simply switches devices Two Functions on One LCD Button If the LCD button is programmed with an IR code from the Database then a tap will issue the code while a press and hold will issue both the preprogrammed code and a macro However the two functions on one button feature will not wor...

Страница 51: ... the devices with their IR programming to MAIN Page 2 Just drag and drop them using Create and Move Devices Program Menu 1 2 Now create new devices on MAIN Page 1 Duplicate the exact order of MAIN Page 2 3 Use LCD Button Editor to label page 1 of each of the first ten devices the ones on MAIN Page 1 without IR codes with a message that will be visible as long as the macro is working 45 Type in Sec...

Страница 52: ...e 2 and operates from there they will not get the status message during the macro Solve this by opening LCD Button Editor select MAIN as the Device and checking the HIDE checkbox for Page 2 46 Type in Section Title S B IMPLY ETTER B K U S I N G C K E D I T O R T O P R O G R A M Advanced Programming Tips As you can see when you pull down the list of devices there are two of each device You want to ...

Страница 53: ...evice has been suggested Once you have vented your feelings get out CKEditor and go to work There is a relatively simple way to make operation of a device like this much less confusing Here s how to go about it 1 Using LCD Button Editor move the top right button in every device that uses the TV to another location on another page if necessary 2 Now program each empty button on each device to short...

Страница 54: ... controls as shown above Using this system of a list that helps your client through a difficult process you can create devices that help them through any complex process For example here is a help list for a client who wants to occasionally record and cannot remember all of the steps to the process The installer creates a list of shortcut buttons that indicate the order of the steps top to bottom ...

Страница 55: ...from the Kitchen keypad it will issue the RS232 macro to all of the other keypads Each room s keypad will then issue a discrete Off command to each of the local TV s With some automation systems you could accomplish the same thing by assigning the RS232 message to a touch screen icon Example 2 Turn Off Junior s Stereo from any Keypad If Junior s room is equipped with a local stereo unconnected to ...

Страница 56: ...ages To A CK1 2 Via RS232 Creating an RS232 command to control the Keypad is simple The message has start with a paranthesis each param eter is separated from the next with a comma and you must end the last parameter with a semi colon and a closing paranthesis You can instruct any keypad or all of them to Jump to a Specific Page for Display Purposes 1 Jump to the Main Menu Page 1 or Page 2 2 Jump ...

Страница 57: ... B B37 B43 B B38 B44 B B39 B45 B B40 PAGE 1 1 MAIN DEVICE B51 B B46 B52 B B47 B53 B B48 B54 B B49 B55 B B50 PAGE 2 2 DEVICE B61 B B56 B62 B B57 B63 B B58 B64 B B59 B65 B B60 PAGE 3 3 DEVICE B71 B B66 B72 B B67 B73 B B68 B74 B B69 B75 B B70 PAGE 4 4 FAV B6 B B1 B7 B B2 B8 B B3 B9 B B4 B10 B B5 PAGE 1 1 FAV B16 B B11 B17 B B12 B18 B B13 B19 B B14 B20 B B15 PAGE 2 2 FAV B26 B B21 B27 B B22 B28 B B23 ...

Страница 58: ...4 Device 14 Discrete Commands 20 Download Failures 43 Downloading 23 Downloading Procedure 42 Dragging and Dropping 25 E Edit and Label Buttons Window 15 F Favorite Macros 4 Feedback 5 Flags 13 Full Download 23 H Hidden Codes 22 Hidden Hard Button 13 Hiding Pages 25 I ID 50 Importing and Exporting Devices 29 Inserting Macros 39 IRDatabase 20 K Keypad Feedback 5 Keypad Mapping 51 Keypad Unit ID 50 ...

Страница 59: ...610 8 Programming Overview 9 Programming Window 10 Punch Through 40 Push and Hold Macros 44 R RS232 Macros 50 S Serial Cable Pin Out 1 Serial Macros 49 Serial Port 1 Shortcuts 16 Shortcutting To Hidden Codes 22 Simulator 13 Status Messages 45 T Task Manager 1 Test the Code Set 21 Testing 23 Toggle Commands 20 Toolbar 12 Tree View 14 Turn Off ALL TV s 49 Two Functions on One LCDButton 44 U Unit ID ...

Отзывы: