background image

Bandit

63

Copyright 12/18

MODEL ZT1844

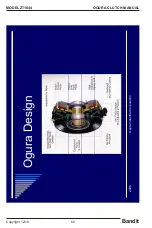
Ogura 

Industrial 

Corporation

2006

Pre-Installation 

Check

†

Engine 

Shaft

†

Key 

Length 

and 

Height


†

D

ire

ct

ion

 o

f R

ot

at

io

n


†

Backing Plate Restraint

OGURA CLUTCH MANUAL

Содержание ZT1844

Страница 1: ...______________________ Model ___________ S N ______________ Copyright 2 19 MODEL ZT1844 OPERATING PARTS MANUAL 6750 Millbrook Rd Remus MI 49340 1 989 561 2270 MANUFACTURED BY BANDIT INDUSTRIES INC PHO...

Страница 2: ...ings ca gov diesel Respirar gases de escape de motores diesel le expone a qu micos conocidos por el estado de California como causales de c ncer y defectos cong nitos u otros da os reproductivos Para...

Страница 3: ...ch near the cutter head with hands or feet or to be located near debris field with engine running 5 _____ The customer has received instruction and fully understands that the operators must always be...

Страница 4: ...hine equipment as ordered ________________________________________________ 5 Did all welds appear to be high quality ______________________________________________ 6 Was the overall machine to your li...

Страница 5: ...GE INTRODUCTION WARRANTY 2 SERIAL NUMBER LOCATIONS 6 SAFETY PROCEDURES 7 EQUIPMENT SPECIFICATIONS 12 DECALS 13 CONTROLS 17 MACHINE OPERATION 22 TRANSPORTATION PROCEDURES 24 MAINTENANCE 26 HYDRAULICS 3...

Страница 6: ...w a regularly scheduled preventative maintenance and repair program on the product using only factory approved replacement parts Any unapproved repairs or modifi cations may not only damage the machin...

Страница 7: ......

Страница 8: ...8 MODEL ZT1844 TYPICAL SERIAL NUMBER AND OR WORK ORDER NUMBER LOCATIONS 1 W O on top of frame 2 S N in between the tracks on the frame The engine information is located on the engine block SERIAL NUMB...

Страница 9: ...nery they are cautious they are very careful because they do not understand the machine This equipment is intended for use by adults who have been properly trained and are physically capable of operat...

Страница 10: ...cifi cally recommended or requested by Bandit Industries Inc DANGER DO NOT operate this machine unless all hydraulic control devices operate properly They must function shift and position smoothly and...

Страница 11: ...refer to clutch manufacturer s manual for proper service and operation DANGER DO NOT start to grind a stump unless you are completely sure there are not any utility lines in the area above or below t...

Страница 12: ...can occur if cutter teeth strike rocks metal or other hard objects DO NOT use in high or very high fi re hazard severity zones Operation of this equipment may create sparks that can start fi res arou...

Страница 13: ...al feet for every 100 horizontal feet Ascending or Descending Slope Side Slope 100 FT 30 5 m 100 FT 30 5 m 46 FT 14 m 46 30 FT 9 1 m 30 25 MAX 17 MAX The machine should never be parked on a slope at a...

Страница 14: ...nt EQUIPMENT SPECIFICATIONS EQUIPMENT SPECIFICATIONS ZT1844 Height 48 1 2 m Length 100 2 5 m Width 29 0 7 m Weight 26 5 Hp 1420 lbs 640kg 38 Hp 1540 lbs 700kg Cutter Wheel Height 22 0 6 m Cutter Wheel...

Страница 15: ...S DO NOT go near the rotating cutter wheel for any reason DO NOT go near the cutter wheel while the engine is running or the cutter wheel is coasting to a stop Contact with a rotating cutter wheel wil...

Страница 16: ...Copyright 12 18 MODEL ZT1844 Decal locations may vary these are general locations DECALS DECAL LOCATIONS 3 20 21 22 6 13 25 34 35 32 12 15 19 28 36 6 1 30 33 5 7 29 31 8 31 1 4 12 2 9 12 6 12 19 23 11...

Страница 17: ...Grease Daily Single Arrow 13 INST 53 Hydraulic Oil Hydrex XV 14 INST 73 Cutter Head Lock Hole 15 INST 74 Cutter Head Lock Pin 16 INST 81 Swing Speed Controls 17 INST 101 Canada Engine Decal 18 INST 11...

Страница 18: ...to be applied to must be clean and dry and at least 40 F 5 C before applying decal 3 When the need arises to replace a machine component with a decal attached be sure and replace the decal 4 Replacem...

Страница 19: ...Bandit 17 Copyright 12 18 MODEL ZT1844 CONTROLS MACHINE ORIENTATION REFERENCE RIGHT LEFT BACK FRONT...

Страница 20: ...5 Hp EFI 3600 Kohler CH980 38 Hp EFI 3600 CONTROLS COMPONENTS LOCATION SHOWN Basic Location of Controls Components 1 Cutter Head Up Down Swing Left Right 2 Left Track Forward Reverse 3 Right Track Fo...

Страница 21: ...Bandit 19 Copyright 12 18 MODEL ZT1844 7 8 9 10 11 15 CONTROLS CONTROLS COMPONENTS cont 16...

Страница 22: ...s running or the cutter wheel is coasting to a stop Contact with a rotating cutter wheel will result in serious bodily injury or death Emergency Stop 900 2931 47 Machine Harnesses will vary depending...

Страница 23: ...d LOW Engine R P M is controlled by moving the lever from one position to the other 6 Push Button Or Electric Throttle System if equipped Some engines may have a push button or electric throttle adjus...

Страница 24: ...tting action Gradually increase cutting action and work away at the stump by swinging cutter wheel left to right to left through stump in a sideways motion Smooth effortless cutting lengthens machine...

Страница 25: ...VER CUT THE STUMP FROM THE TOP The cutter wheel will throw debris up and toward the operator instead of down and under the machine MACHINE OPERATION CUTTING AREA DANGER DO NOT go near the rotating cut...

Страница 26: ...brakes on the trailer must correctly function when activated by the systems in the towing vehicle 10 The tires must be checked for cuts or damaged rims air pressure is correct and the axle lug nuts ha...

Страница 27: ...e ground or trailer bed While loading or unloading the stump grinder the cutter wheel should not be raised any higher than necessary to just clear whatever is under it You need to keep the center of g...

Страница 28: ...Bandit 26 Copyright 12 18 MODEL ZT1844 MAINTENANCE MACHINE ORIENTATION REFERENCE RIGHT LEFT BACK FRONT...

Страница 29: ...gh a small auxiliary tank for testing This immensely helps maintain safety in our manufacturing facility and while shipping NOTICE Expensive damage to the Bandit will occur if proper preparation is no...

Страница 30: ...r ANSI and OSHA standards 23 Remember to check EVERYTHING on the checklist 8 Grease cutter wheel and jack shaft bearings daily Use an EP 2 Lithium type grease only for all bearings Purge cutter wheel...

Страница 31: ...and retighten bearing lock collars to correct torque MONTHLY MAINTENANCE 3 Check hydraulic function pressures Check reset and maintain all hydraulic function pressure settings to a maximum of the spec...

Страница 32: ...and debris screen Clean as necessary Clean cooling fan and shroud on air cooled engines 18 Check air cleaner precleaner and vacuator valve Clean as necessary 19 Check track assembly for wear and damag...

Страница 33: ...nd mask the area there are containers of primer and paint available A small brush can be used to touch up the area 4 Also primer and most colors of paint are available in aerosol spray cans to simply...

Страница 34: ...the lubrication points This type of grease fitting can be obtained from most local automotive parts stores 4 4 2 1 3 6 1 2 4 4 3 CHECK DESCRIPTION DAY WEEK MONTH PROCEDURE 1 Jack Shaft Bearings X Pur...

Страница 35: ...he cutter wheel Every other pocket requires an additional spacer mounted between the angle pocket and the cutter wheel on each side of the cutter wheel A locking pin is provided to hold the cutter whe...

Страница 36: ...engine 10 Run the machine and cycle the cutter wheel on for 10 seconds and off for 5 seconds 10 15 times This process will stretch the new belt 11 Turn off engine and remove ignition key make sure the...

Страница 37: ...7 FIVE BARREL GAUGE UP TO 165 lbs 900 1919 66 DANGER Before attempting any type of maintenance disengage clutch or cutter wheel engagement wait for the cutter wheel to come to a complete stop position...

Страница 38: ...each side of the track assembly See Figure 4 12 Start the engine Make sure the engine is in the low idle position 13 Track the large half of the sprocket back through the tracks 14 Turn the engine off...

Страница 39: ...throwing teeth 1 Bad pocket 2 Dirt in pocket 1 Replace pocket 2 Clean pocket and replace teeth Always replace pockets in pairs across from each other Breaking teeth 1 Operator hitting rocks 1 Avoid ro...

Страница 40: ...ave operated a new machine for approximately an hour to shut down the machine and recheck all hydraulic fi ttings Relieve all pressure and retighten as needed DONOTGONEARHYDRAULICLEAKS Highpressureoil...

Страница 41: ...under increasing temperature and their ability to separate water from the fl uid Viscosity is temperature dependent Fluids with high viscosity index VI will thin out slower at higher temperature and t...

Страница 42: ...AULIC PARTS These typical hydraulic flows and relief pressure settings are with the engine at full RPM All settings are subject to change NOTICE NOTICE HYDRAULICS HYDRAULICS Equipment Model ZT1844 Tra...

Страница 43: ...pump and components Some component manufacturers require different specific hydraulic lubrication such as gear boxes undercarriage drives etc Refer to their manuals and maintenance section of this man...

Страница 44: ...y an hour to shut down the machine and recheck all hydraulic fi ttings Relieve all pressure and retighten as needed DONOTGONEARHYDRAULICLEAKS Highpressureoileasilypuncturesskincausingseriousinjury gan...

Страница 45: ...e sure all the controls are in the off position 2 Install pressure gauge into the test port see below 3 Start engine and adjust engine to full throttle 4 Engagethecontrolleverorswitchsothatthe cylinde...

Страница 46: ...e HYDRAULICS HYDRAULIC SYSTEM TROUBLE SHOOTING When returning hydraulic components for warranty make sure to box up all warranted parts to avoid additional damage while shipping Do not disassemble any...

Страница 47: ...C SCHEMATIC SPECIFIC SCHEMATIC FUNCTION MAY VARY DEPENDING ON OPTIONS OR COMPONENT MANUFACTURER PL RV1 152 bar HYDRAULIC TANK RV2 125 bar RV3 60 bar RV4 60 bar RIGHT TRACK MOTOR LEFT TRACK MOTOR SWING...

Страница 48: ...RED 16GA GND ACTIVATION C6 RED 14GA C5 RED 14GA C4 RED 16GA C3 YEL 16GA SWITCHED PWR 900 2932 06 FUSE RELAY BLOCK A5 BLU BLK 16GA START OUT 900 2910 93 LOCKING TOGGLE WHT 16GA ENGINE KILL 900 2907 41...

Страница 49: ...S N and model of the machine to ensure that you receive the correct replacement part See page 6 for typical serial number work order number locations NOTICE Bandit Industries Inc reserves the right to...

Страница 50: ...12 18 MODEL ZT1844 Parts may not be exactly as shown NOTICE 1 3 4 5 6 8 9 10 19 20 18 18 23 22 14 17 30 31 29 22 25 25 25 27 28 25 16 32 33 34 26 12 13 36 37 37 25 25 2 7 15 21 24 39 35 38 11 40 ENGI...

Страница 51: ...ter Bolt 3 8 16NC x 3 Hex Head Bolt b 900 4906 60 3 8 16NC Lock Nut c 900 4910 46 3 8 Mill Carb Washer 18 900 4906 50 Beltshield Mount Bolt 3 8 16NC x 1 19 900 1924 79 Engine to Hydraulic Pump Drive B...

Страница 52: ...2 1 3 38 39 12 12 12 12 35 37 12 12 34 34 12 12 12 12 12 34 34 12 12 35 7 8 6 11 11 11 11 11 5 4 10 12 11 11 12 12 13 14 32 31 30 29 28 27 26 26 22 21 23 24 23 22 21 19 19 20 20 40 15 16 17 18 14 13 3...

Страница 53: ...Shaft 18 900 4906 72 Cutter Wheel Shaft Bolt 1 2 13NC x 1 1 2 Hex Head Bolt 19 955 300086 Cutter Wheel Lock Pin 20 900 7900 96 Cutter Wheel Lock Pin Rubber Handle 21 208 3000 26 Lift Cylinder Pin 22 9...

Страница 54: ...18 MODEL ZT1844 Parts may not be exactly as shown NOTICE 19 6 6 6 6 6 18 6 6 2 2 2 2 1 7 8 6 6 6 6 6 6 9 10 11 12 13 13 14 2 2 2 2 15 6 6 11 6 6 6 6 6 10 9 16 6 6 6 6 3 3 4 4 3 8 7 1 6 3 4 4 3 3 5 6...

Страница 55: ...4924 16 1 2 Lug Nut 8 208 3001 05 Track Drive Sprocket 9 900 4906 81 Track Drive Motor Bolt 1 2 13NC x 5 Hex Head Bolt 10 900 3978 18 Track Drive Motor 11 900 4906 84 Track Drive Motor Nut 1 2 13NC Lo...

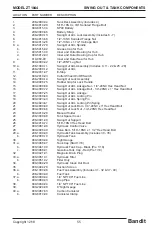
Страница 56: ...ts may not be exactly as shown NOTICE 29 30 31 32 32 33 2 2 2 2 2 2 2 2 2 2 34 6 6 6 6 7 7 7 7 8 24 2 2 2 2 23 11 26 26 26 26 28 28 28 28 25 27 13 14 15 16 18 20 19 10 22 12 21 9 36 37 38 31 39 40 1 1...

Страница 57: ...t Arm Linkage 18 208 3000 60 Swing Out Arm Locking Pin 19 900 4923 40 Swing Out Arm Spring Pin 20 900 4923 61 Swing Out Arm Locking Pin Spring 21 900 4909 80 Swing Out Lock Bolt 1 4 20NC x 3 Hex Head...

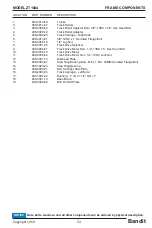
Страница 58: ...NUMBER DESCRIPTION 1 208 2000 28 Cutter Wheel Bar Assembly 2 900 4906 70 1 2 13NC x 1 Hex Head Bolt 3 a 208 3001 25 Cutter Wheel Bar Linkage b 208 1000 16 Cutter Wheel Bar Linkage 4 900 9940 86 1 2 x...

Страница 59: ...Bandit 57 Copyright 12 18 MODEL ZT1844 SERVICE RECORD SERVICE RECORD DATE DESCRIPTION AMOUNT...

Страница 60: ...Bandit 58 Copyright 12 18 MODEL ZT1844 SERVICE RECORD DATE DESCRIPTION AMOUNT SERVICE RECORD...

Страница 61: ...Bandit 59 Copyright 12 18 MODEL ZT1844 2006 Ogura Industrial Corporation PTO Clutch Brake Installation and Maintenance OGURA CLUTCH MANUAL...

Страница 62: ...Bandit 60 Copyright 12 18 MODEL ZT1844 Ogura Industrial Corporation 2006 Ogura Design OGURA CLUTCH MANUAL...

Страница 63: ...Bandit 61 Copyright 12 18 MODEL ZT1844 Ogura Industrial Corporation 2006 Outline Pre Installation Installation Maintenance OGURA CLUTCH MANUAL...

Страница 64: ...Bandit 62 Copyright 12 18 MODEL ZT1844 2006 Ogura Industrial Corporation Pre Installation OGURA CLUTCH MANUAL...

Страница 65: ...Bandit 63 Copyright 12 18 MODEL ZT1844 Ogura Industrial Corporation 2006 Pre Installation Check Engine Shaft Key Length and Height Direction of Rotation Backing Plate Restraint OGURA CLUTCH MANUAL...

Страница 66: ...Bandit 64 Copyright 12 18 MODEL ZT1844 Ogura Industrial Corporation 2006 Pre Installation Check Engine Shaft PTO clutches are almost always mounted on engine shaft OGURA CLUTCH MANUAL...

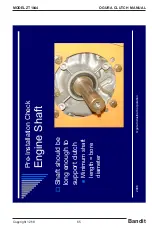
Страница 67: ...t 65 Copyright 12 18 MODEL ZT1844 Ogura Industrial Corporation 2006 Pre Installation Check Engine Shaft Shaft should be long enough to support clutch Minimum shaft length bore diameter OGURA CLUTCH MA...

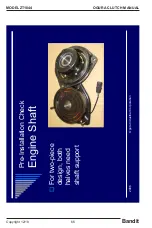
Страница 68: ...Bandit 66 Copyright 12 18 MODEL ZT1844 Ogura Industrial Corporation 2006 Pre Installation Check Engine Shaft For two piece design both halves need shaft support OGURA CLUTCH MANUAL...

Страница 69: ...Bandit 67 Copyright 12 18 MODEL ZT1844 Ogura Industrial Corporation 2006 Pre Installation Check Engine Shaft Engine shaft needs step OGURA CLUTCH MANUAL...

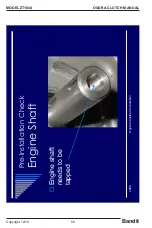
Страница 70: ...Bandit 68 Copyright 12 18 MODEL ZT1844 Ogura Industrial Corporation 2006 Pre Installation Check Engine Shaft Engine shaft needs to be tapped OGURA CLUTCH MANUAL...

Страница 71: ...ZT1844 Ogura Industrial Corporation 2006 Pre Installation Check Key Length and Height For clutch without through keyway keyway in rotor only key should be short enough that it will not hit pulley bear...

Страница 72: ...Copyright 12 18 MODEL ZT1844 Ogura Industrial Corporation 2006 Pre Installation Check Key Length and Height For clutch with open keyway on field side bearing race key may need reduced height OGURA CLU...

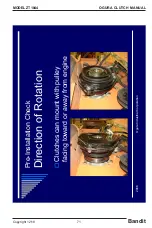
Страница 73: ...andit 71 Copyright 12 18 MODEL ZT1844 Ogura Industrial Corporation 2006 Pre Installation Check Direction of Rotation Clutches can mount with pulley facing toward or away from engine OGURA CLUTCH MANUA...

Страница 74: ...72 Copyright 12 18 MODEL ZT1844 Ogura Industrial Corporation 2006 Pre Installation Check Direction of Rotation Leaf springs are set at factory to run either clockwise or counter clockwise OGURA CLUTCH...

Страница 75: ...trial Corporation 2006 Pre Installation Check Direction of Rotation Check direction of rotation to verify that spring direction is correct Springs should operate in tension and not compression most en...

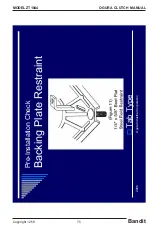
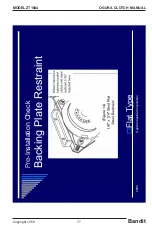
Страница 76: ...2 18 MODEL ZT1844 Ogura Industrial Corporation 2006 Pre Installation Check Backing Plate Restraint PTO backing plate only needs to withstand brake force This can be 2 10 ft lbs depending on clutch siz...

Страница 77: ...Bandit 75 Copyright 12 18 MODEL ZT1844 2006 Pre Installation Check Backing Plate Restraint Tab Type Ogura Industrial Corporation OGURA CLUTCH MANUAL...

Страница 78: ...Bandit 76 Copyright 12 18 MODEL ZT1844 2006 Pre Installation Check Backing Plate Restraint Rod Type Ogura Industrial Corporation OGURA CLUTCH MANUAL...

Страница 79: ...Bandit 77 Copyright 12 18 MODEL ZT1844 2006 Pre Installation Check Backing Plate Restraint Flat Type Ogura Industrial Corporation OGURA CLUTCH MANUAL...

Страница 80: ...Bandit 78 Copyright 12 18 MODEL ZT1844 2006 Pre Installation Check Backing Plate Restraint Rubber Bushing Type Ogura Industrial Corporation OGURA CLUTCH MANUAL...

Страница 81: ...Bandit 79 Copyright 12 18 MODEL ZT1844 2006 Ogura Industrial Corporation Installation OGURA CLUTCH MANUAL...

Страница 82: ...riate shaft pulley for clutch Set key in shaft keyway if required some clutches have internal key Slide clutch onto shaft Verify good contact with face of bearing inner ring Tighten center bolt and wa...

Страница 83: ...2006 PTO Clutch Installation 1 Installing Pulley Most installations require drive pulley to be installed before clutch Pulley must not contact radius of shaft shoulder Pulley must sit against shoulde...

Страница 84: ...ial Corporation 2006 PTO Clutch Installation 2 Installing Key If clutch requires key first set key in key way on shaft then mount clutch some clutches have internal key Do not force clutch onto shaft...

Страница 85: ...gura Industrial Corporation 2006 PTO Clutch Installation 4 Mounting Clutch Clutch should be mounted such that bearing race makes contact with Shaft step Drive pulley Washer All faces must be normal to...

Страница 86: ...ZT1844 Ogura Industrial Corporation 2006 PTO Clutch Installation 5 Installing Center Bolt Install center bolt and washer on end of tapped shaft Washer should be about 0 250 thick with OD ID of bearing...

Страница 87: ...poration 2006 PTO Clutch Installation 5 Installing Center Bolt Center bolt tightening torque is based on bolt grade Torque should be about 30 55 ft lbs In diesel or heavy vibration application adhesiv...

Страница 88: ...llation 6 Installing Restraint Install backing plate restraint If pin or slot type is used restraint may already be on machine frame or engine face After mounting verify slight axial and radial moveme...

Страница 89: ...nstallation 7 Connecting Power Attach terminal housing on clutch lead wire to corresponding power terminal Turn on electrical power on mower without starting engine if possible Turn on PTO switch to v...

Страница 90: ...orporation 2006 PTO Clutch Installation 8 Burnishing What is it Wearing mating of armature and rotor surfaces Why is it important To achieve greater initial torque How is it done Cycle clutch 20 50 ti...

Страница 91: ...pyright 12 18 MODEL ZT1844 Ogura Industrial Corporation 2006 Burnishing Recommendations Deck Size Cycles On Off 32 42 25 50 10 5 sec 48 52 25 50 10 10 sec 61 25 50 10 15 sec 72 25 50 10 20 sec OGURA C...

Страница 92: ...Bandit 90 Copyright 12 18 MODEL ZT1844 2006 Ogura Industrial Corporation Maintenance OGURA CLUTCH MANUAL...

Страница 93: ...Corporation 2006 Maintenance Most clutch parts do not require maintenance and can not be replaced Bearings are sealed for life of clutch Armature rotor and brake wear evenly and can not be replaced i...

Страница 94: ...844 Ogura Industrial Corporation 2006 Adjustment for Wear All Ogura one piece clutches are adjusted at factory no initial adjustment required As adjustable clutches wear they can be re gapped to exten...

Страница 95: ...2006 Adjustment for Wear If clutch fails to pull in or will not continue to pull in when hot air gap may need adjustment To make adjustments taking PTO off mower may be easier Necessary equipment 0 0...

Страница 96: ...Adjustment for Wear Identify clutch model from label located on back of field There are three inspection slots on brake shroud Place feeler gauge in slot between armature and rotor Slowly tighten bra...

Страница 97: ...ra Industrial Corporation 2006 Adjustment for Wear Almost all Ogura clutches use 24UNF brake bolt thus one turn of brake nut equates to approximately 0 04 of axial movement for reference only feeler g...

Страница 98: ...Bandit 96 Copyright 12 18 MODEL ZT1844 Ogura Industrial Corporation 2006 Adjustment for Wear OGURA CLUTCH MANUAL...

Страница 99: ...dit 97 Copyright 12 18 MODEL ZT1844 Ogura Industrial Corporation 2006 Adjustment for Wear Model Type Air Gap Range GT1 GT1A 0 012 0 024 GT2 GT2 5 0 015 0 024 GT3 5 GT4 GT5 0 016 0 024 OGURA CLUTCH MAN...

Страница 100: ...ustment for Wear Setting gap towards low range will increase cycle life between adjustments Caution do not set gap below minimum or clutch may be damaged Once gap is set rotate armature and rotor chec...

Страница 101: ...strial Corporation 2006 Adjustment for Wear Apply full voltage to clutch Rotate armature and rotor to verify no contact between armature and brake shroud If there is contact back off brake nuts and re...

Страница 102: ...opyright 12 18 MODEL ZT1844 2006 Ogura Industrial Corporation Thank YouEVERYTHING ABOUT AN OGURA CLUTCH WORKS For more information on Ogura clutches visit us on the web at www ogura clutch com OGURA C...

Отзывы: