background image

14 

The motor is a non-serviceable item and should be replaced with a new 
motor and drive coupling Kit. 
 
Part Nos. 12V  UNITS = R4510-sk 12 100 X 


  24V UNITS =  R4510-sk 24 100 X  

 
Quote your units serial number when ordering Ref. page 19).. 


The motor can be replaced without affecting the integrity of the hydraulic 
circuit. 
 
To remove the motor: 
 
Undo the two M6 socket head cap screws and remove the motor, coupling 
and water seal O ring. 
 
If the coupling is worn or damaged replace. Lubricate the slots with a small 
quantity of good quality grease. 
 
If any hydraulic fluid is found in the coupling area the shaft seal must be 
replaced – see service kit ML+40sk for instructions.  
 
Reassemble by replacing the O ring, engage the coupling between the 
motor and pump shafts, ensure the motor locates correctly in the pump 
spigot. 
Using low strength thread locking compound, replace and tighten the two 
M6 socket head cap screws. (13.5 Nm). 
 
Caution  
 
Keep all parts clean during dismantling and reassembly.


Содержание RAM T1

Страница 1: ...ENGLISH RAMT1 T2 MarineLinearActuator User Manual bandg com simrad yachting com...

Страница 2: ...liable for any inaccuracies or omissions There may also be differences between the specifications in the manual and the product as a result of ongoing development for which we accept no liability Thi...

Страница 3: ...ta Dimensions Actuator Selection Location Tiller bolt Mounting Foot Quadrant Considerations Coil Connections Maintenance Servicing Fault finding Hydraulic Fluid Commissioning Dismounting the unit from...

Страница 4: ...stems the unit must be properly bonded to earth and the supply cables screened Caution In operation this unit can rotate the vessels wheel rapidly Keep clear of the wheel when this unit is engaged to...

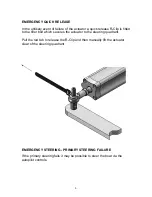
Страница 5: ...the tiller bolt which secures the actuator to the steering quadrant Pull the red tab to release the R Clip and then manually lift the actuator clear of the steering quadrant EMERGENCY STEERING PRIMARY...

Страница 6: ...When the clutch is disengaged the cylinder is free and moves with the primary steering To operate the unit in autopilot mode the course com puter energises the clutch solenoid coil and runs the bi dir...

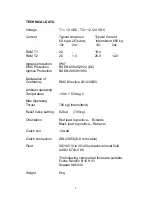
Страница 7: ...6 1993 Declaration of Conformity EMC Directive 2014 30 EU Ambient operating Temperature 15 to 55 deg C Max Operating Thrust 700 kg Intermittent Relief Valve setting 62 bar 730 kg Orientation Red lead...

Страница 8: ...8 DIMENSIONS...

Страница 9: ...power boat or long keel yacht Also consider the rudder an unbalanced rudder will require more torque than a semi balanced or balanced design Hard over time Tiller arm Rudder Deg Typical Max Torque RAM...

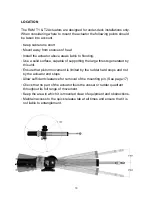
Страница 10: ...e of supporting the large thrusts generated by this unit Ensure that piston movement is limited by the rudder hard stops and not by the actuator end stops Allow sufficient clearance for removal of the...

Страница 11: ...mm An application of Loctite 638 or equivalent where shown is recommended Tighten the M12 nut to 27 Nm Torque MOUNTING FOOT The four M8 nuts bolts and washers supplied are suitable for mounting the ac...

Страница 12: ...r an 8 4 213 mm radius with total rudder angle of 70 degrees CONSIDERATIONS Allow sufficient clearance for removal of the mounting pin Ref page 17 and rod end from the tiller bolt COIL CONNECTIONS PIN...

Страница 13: ...mounting bolts and tiller pin Examine electrical cables and connections for damage and corrosion Lubricate the mounting pin and rod end with marine grade grease SERVICING In the unlikely event that n...

Страница 14: ...motor coupling and water seal O ring If the coupling is worn or damaged replace Lubricate the slots with a small quantity of good quality grease If any hydraulic fluid is found in the coupling area th...

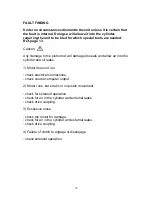
Страница 15: ...amage its seals and allow air into the cylinder and oil leaks 1 Motor does not run check electrical connections check course computer output 2 Motor runs but erratic or no piston movement check for so...

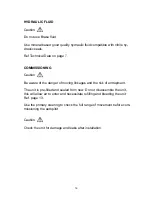
Страница 16: ...Be aware of the danger of moving linkages and the risk of entrapment The unit is pre filled and sealed from new Do not disassemble the unit this will allow air to enter and necessitate refilling and b...

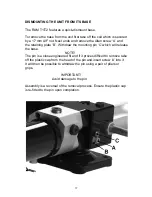
Страница 17: ...ate B Withdraw the mounting pin C which will release the base NOTE The pin is a close engineered fit and if it proves difficult to remove take off the plastic cap from the head of the pin and insert s...

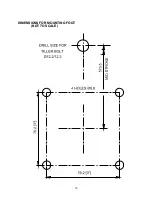
Страница 18: ...18 DIMENSIONS FOR MOUNTING FOOT NOT TO SCALE...

Страница 19: ...________________________________ ________________________________ CONTACT DETAILS For inquiries in general contact Simrad or B G www simrad yachting com or www bandg com For inquiries of spare parts c...

Страница 20: ...988 12093 001...
Отзывы: