B&G LCD CHART Скачать руководство пользователя страница 18

B&G LCD Plotter 

Part 2 - Operating Information


HB-0847-02


2-13 

 
2.12 

INFORMATION WINDOWS IN NAVIGATION MODE


Press DATA to display the following windows: 


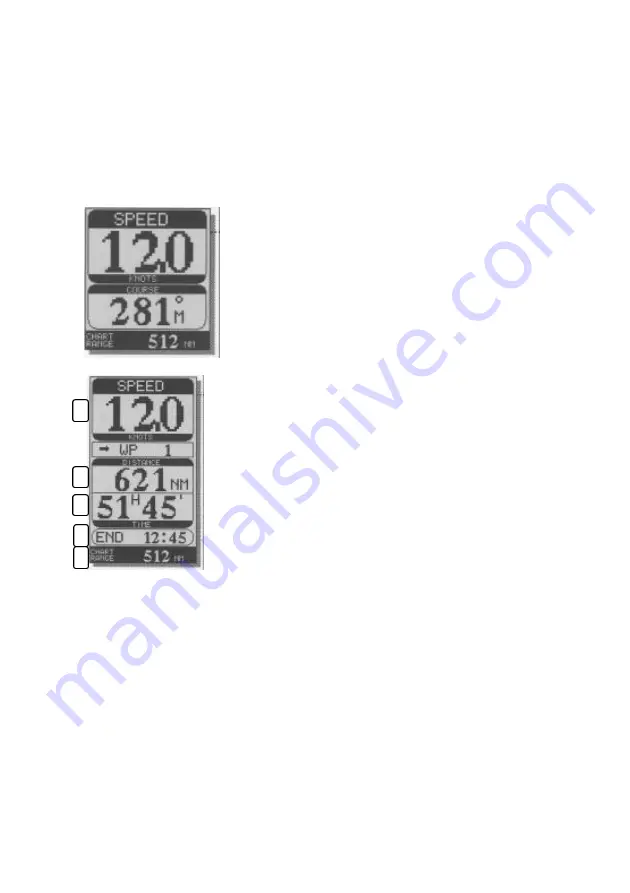
2.12.1  Speed Windows


If no route is plotted, this small window will appear 

containing only the boat speed (knots), the course 

and chart range.


The calculation of time of travel is based upon 

information previously collected from the data input. 


a) - Speed over ground in knots 

b) - Distance to the next waypoint 

c) - Time to reach next waypoint from present position 

d) - Arrival time 

e) - Chart range 

a


b


c


d


e


www.bandgservice.co.uk


+44 (0)1590 689699

Содержание LCD CHART

Страница 1: ...HB 0847 02 B G LCD CHART USER S GUIDE AND INSTALLATION www bandgservice co uk 44 0 1590 689699...

Страница 2: ...G LCD Chart The electronics chart is an aid to navigation designed to facilitate the use of authorised government charts not to replace them Only official government charts and notices to mariners co...

Страница 3: ...nd Gatehouse Ltd Authorised Service Centre The customer is responsible for packing transportation and insurance charges 4 The warranty does not cover damages or malfunction caused by the improper use...

Страница 4: ...47 02 Brookes and Gatehouse LCD Chart All rights reserved No part of this publication may be reproduced in any form or by any means without prior consent in writing www bandgservice co uk 44 0 1590 68...

Страница 5: ...ut easy to use format Information is fed from your position fixer and or instrument system and may be viewed in a choice of display configurations Flexible user friendly software allows for easy progr...

Страница 6: ...art Details 2 10 2 9 Displaying Navaid Information 2 10 2 10 Displaying Port Services 2 11 2 11 Information Windows in Cursor Mode 2 12 2 11 1 no route present 2 12 2 11 2 route present 2 12 2 11 3 wa...

Страница 7: ...17 2 recalling a route 2 20 2 17 3 deleting a route 2 20 2 17 4 reversing a route 2 20 2 18 Tracks 2 20 2 18 1 switching a track on 2 21 2 18 2 switching a track off 2 21 2 18 3 tracking density 2 21...

Страница 8: ...erating Information HB 0847 02 2 3 CONTENTS Contd 2 21 2 depth page 2 25 2 21 3 speed page 2 25 2 21 4 true wind log 2 26 2 21 5 position log 2 26 2 22 Position Offset Calibration 2 26 www bandgservic...

Страница 9: ...activates and deactivates the Autozoom feature Cursor Keys provides cursor control in all directions allows selections in Menu windows selects Automatic Mode or Manual Mode of operation Enter Key in m...

Страница 10: ...r a short introductory screen press the ON key once to activate screen illumination Repeatedly press the ON key to select the desired intensity setting Press any other key except OFF to continue Menu...

Страница 11: ...n is made between the boat s present position and the cursor by way of an elastic band The geographic position of the cursor is given by the point of intersection of the two lines and is shown in the...

Страница 12: ...CLEAR key To change to cursor mode simply press the cursor key to activate the cross hair This mode of operation is used to insert and delete markers and for viewing navaid information etc The inform...

Страница 13: ...gher level of detail but increases the viewing of pre existing information Its operation maybe likened to a magnifying glass CHARTS INTRODUCTION The LCD Plotter comes with a map of the World already l...

Страница 14: ...e autozoom function is automatically selected The maximum level of detail corresponds to that of a port plan and is approximately equivalent to one metre per pixel or 1 8 NM Always verify that the rub...

Страница 15: ...nction 4 Use the CURSOR left right keys to select ON or OFF from the menu 5 Press ENTER to accept 2 9 Displaying Navaid Information Lights To display navaid information move the CURSOR over the light...

Страница 16: ...t a b c d e f g a Information and port authorities b Sanitary and first aid services c Customer services d Tourist services and shops e Fuel f Water g Engine boat and electronic servicing Note Port Se...

Страница 17: ...this window will display the following information Cursor position the position will change until the waypoint is fixed by ENTER Chart range When the cursor is placed on a segment of the route a wind...

Страница 18: ...ed this small window will appear containing only the boat speed knots the course and chart range The calculation of time of travel is based upon information previously collected from the data input a...

Страница 19: ...trip a Average speed b Time from departure c Trip distance previous distance from departure d Total distance e Clear to start trip a Speed over ground b Course c Waypoint bearing of the target waypoi...

Страница 20: ...rrent position of the boat active only when the GPS is connected a Day month year local or Greenwich Mean Time b Boat position c GPS Status and number of satellites This will be replaced with DIFF if...

Страница 21: ...selection It can be eliminated by pressing the DATA key 2 13 6 Leg 5 A leg is the portion of a route contained between 2 waypoints 2 13 7 Waypoint 6 Indicates an important point in the route often on...

Страница 22: ...ill appear 2 14 3 Delete a Waypoint Position the cursor with the arrow keys on the waypoint to delete and press CLEAR 2 14 4 Delete all Waypoints Press the CLEAR key repeatedly until the message NO MO...

Страница 23: ...sing the ENTER key or to exit press any other key Other Route functions are available through the Go To sub menu Refer to section 2 20 for further details 2 16 ROUTE FUNCTIONS FROM THE MAIN MENU 2 16...

Страница 24: ...INFO and press ENTER twice to open the two relative setting windows Use the arrow keys to insert the data and press ENTER to confirm 2 17 MANAGING ROUTES 2 17 1 Storing a Route To store a route press...

Страница 25: ...ARE YOU SURE will appear Confirm with ENTER or exit with any other key If no route is stored the message NO WAYPOINTS PRESENT will appear 2 17 4 Reversing a Route Press the MENU key and select ROUTE C...

Страница 26: ...te When the limit is reached the message TRACK FULL will be displayed To continue tracking press the MENU key select TRACK select STORE and then press ENTER to confirm 2 18 4 Storing a Track Press the...

Страница 27: ...ys on the mark and press CLEAR 2 19 3 Storing a Mark Press the MENU key and select MARKS Next select STORE and press ENTER to confirm The memory catalogue will appear containing a name by default To n...

Страница 28: ...rogressive number will be changed starting from the selected waypoint that will become number one The previous waypoint will be deleted If no waypoints are stored the message NO WAYPOINTS PRESENT will...

Страница 29: ...new one will be the selected port and the LCD Plotter will track the new route to reach it The previous route will be erased from the screen but not cancelled from the memory 2 20 5 Go To a Port Pres...

Страница 30: ...reading may be obtained by moving the time line with the CURSOR left right keys This depth is then displayed at the top of the chart 2 21 3 Speed Log The Speed Log shows speed readings in a graphical...

Страница 31: ...fixers have intrinsic errors which cause the displayed position of the vessel to be incorrect with respect to the background display of the chart This difference in position is caused either by the se...

Страница 32: ...ON CONTENTS Para Page 3 1 Installation Information 3 2 3 2 Precautions 3 2 3 3 Panel Mounting 3 2 3 4 Bracket Mounting 3 3 3 5 Electrical Connections 3 3 3 5 1 power 3 4 3 5 2 data in 1 3 4 3 5 3 data...

Страница 33: ...must be performed in a totally dry environment The rear connectors that are not connected to cables must remain protected by their appropriate caps 3 3 Panel mounting The plotter must be fixed to the...

Страница 34: ...n the packaging The U shaped section of the bracket should be secured to the panel using 4 flat head screws 6mm diameter Irrespective of the type of mounting chosen be sure that the connecting cables...

Страница 35: ...pply is switched by the ON OFF button on the unit and may be used to power GPS antennas Sentences decoded DBT GGA GLL GSV HDM MTW MWD RMA RMC VDR VHW VLW VTG VWR VWT ZDA Cable N1000231 Red VAUX Black...

Страница 36: ...DA Cable N1000221 Violet NMEA INPUT White NMEA INPUT 3 5 5 Data Out 2 Optional NMEA output port used for connecting to other NMEA compatible devices Sentences transmitted APA APB BWC GGA GLL RMB RMC V...

Страница 37: ...PART 4 DIAGNOSTIC DATA CONTENTS Para Page 4 1 Accessing the Diagnostic Function 4 2 4 2 Demo Mode 4 2 4 3 Input Test 4 2 4 4 Memory Reset 4 2 4 5 Keyboard Test 4 3 4 6 Serial Port Test 4 3 4 7 Checksu...

Страница 38: ...before turning on the system The plotter executes zoom operations automatically to verify that it is working correctly Press any key to exit 4 3 Input Test This checks the connections between the plo...

Страница 39: ...with DATA OUT1 1 DATA IN 4 with DATA OUT1 2 DATA IN 2 1 with DATA OUT2 1 DATA IN 2 2 with DATA OUT2 2 Without these connections the test will display the message Faulty Press DATA to exit 4 7 Checksu...

Страница 40: ...IFICATION CONTENTS Para Page 5 1 Mechanical Characteristics 5 2 5 2 Electrical Characteristics 5 2 5 3 Memory Characteristics 5 2 5 4 Interface Characteristics 5 3 5 4 1 NMEA input summary 5 3 5 4 2 N...

Страница 41: ...output over 250 mA Operating Temperature 0 C to 55 C Storage Temperature 20 C to 60 C Display Transflexive Monochromatic LCD Illumination Adjustable Cold Cathode Contrast Adjustable Contrast Keyboard...

Страница 42: ...hrough the Water VTG Course Over Ground and Speed Over Ground VWR Apparent Wind Speed and Angle VWT True Wind Speed and Angle ZDA Time and Date 5 4 2 NMEA Output Summary APA Autopilot sentence A APB A...

Отзывы: