background image

IT5000-C / IT6000-C

3/8” IT Tool

www.BAND-IT-IDEX.com

Document # P48850 Rev. C

© Copyright

BAND-IT-IDEX, Inc. 2015

All rights reserved

Page 19 of 36 

BAND-IT-IDEX, Inc.
A Unit of IDEX Corporation
4799 Dahlia Street
Denver, CO 80216-3070 USA
P: 1-800-525-0758
F: 1-800-624-3925

Operating 
Manual

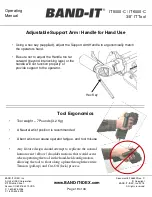
• Using a hex key (supplied), adjust the Support Arm/Handle to ergonomically match 

the operators hand.  

Hex Key

Adjustable Support Arm / Handle for Hand Use

• Be sure not to adjust the Handle too far 

outward (beyond interlocking legs) or the 
handle will not function properly or 
provide support to the operator.

Tool Ergonomics

Tool weight – 7 Pounds (3.2 Kg)

A Neutral wrist position is recommended

A bent wrist can cause operator fatigue, and tool misuse

Any fixture design should attempt to replicate the natural 
human wrist / elbow / shoulder motions that would occur 
when operating the tool in the hand-held configuration, 
allowing the tool to float along a plane through the entire 
Tension (pull-up) and Cut-Off (lock) process.

Содержание IT5000-C

Страница 1: ...C Copyright BAND IT IDEX Inc 2015 All rights reserved Page 1 of 36 BAND IT IDEX Inc A Unit of IDEX Corporation 4799 Dahlia Street Denver CO 80216 3070 USA P 1 800 525 0758 F 1 800 624 3925 Operating...

Страница 2: ...8 9 Air System Air System Requirements 10 Air Control Regulator 11 12 Air System Settings 13 Tool Operation Tie Clamp Installation Procedure 14 IT Tool Orientation Requirements 15 Tie Clamp Inspection...

Страница 3: ...e manual before unpacking setting up or operating this equipment Pay attention to all danger and caution statements Failure to do so could result in serious injury to the operator or other personnel o...

Страница 4: ...de d baller installer ou actionner cet quipement Pr tez l attention tous les rapports de danger et d attention Le manque de faire ainsi a pu avoir comme cons quence les dommages s rieux l op rateur ou...

Страница 5: ...y stopped by releasing the tool trigger If a remote trigger is used the system must be connected to allow for immediate disabling of the tool When applying clamps care should be taken to insure finger...

Страница 6: ...del Identification This machine is designed to automatically install clamps with repeatability and control The tool consists of a tension system and a cutting system both pneumatically controlled The...

Страница 7: ...tional accessories vary depending on the tool options The remote trigger option is a combination of a plumbing modification inside the tool and a sold separately foot pedal package see pg 19 for addit...

Страница 8: ...Manual Maintenance Cover w Tension Block Assembly Serial Location Tool Head with Knife and Cutter Blade see below Quick Connect Air Couplings Cut Off Cylinder Tension Cylinder Tool Mounting Locations...

Страница 9: ...IDEX Corporation 4799 Dahlia Street Denver CO 80216 3070 USA P 1 800 525 0758 F 1 800 624 3925 Operating Manual Packaging Option 0 Box includes IT tool owners manual air controller module coiled air...

Страница 10: ...Moisture Content 20 RH Although cylinders are permanently lubricated premature wear can be caused by contaminants in the air supply or the presence of water and oil The tool s internal valves can als...

Страница 11: ...essure Regulator with Gauge Factory set to 70psi suggested setting for IT6000 Do not set higher than tool manual listed maximum pressure pg 13 To adjust remove screw nut pull down on knob and twist Pu...

Страница 12: ...ahlia Street Denver CO 80216 3070 USA P 1 800 525 0758 F 1 800 624 3925 Operating Manual Hole layout for mounting to a wall Regulator Mounting Holes Hole layout for mounting to a bench For proper perf...

Страница 13: ...st again if necessary Repeat until the desired pressure is shown on the tension pressure gage Tension pressure may need to be adjusted to provide adequate tension for the specific application Initial...

Страница 14: ...l length extending into tool must be at least 2 5 6 4 cm long 4 Do not activate tool while inserting clamp tail because this can cause tie tail to jam in the Tension Block Assembly 5 Ensure proper too...

Страница 15: ...proach the assembly in the same orientation that it will finish a clamp installation Typically around 20 relative to the surface of the work piece The tool head should come close to the buckle and wor...

Страница 16: ...the preformed JR clamp and cuts the remaining tail When installing a JR clamp a visual check is recommended to verify the presence of the locking lip after the clamp has been applied Tie Clamp Inspec...

Страница 17: ...erence Band target area must be wider that the band and tool head with some additional clearance for variation side to side Do not install clamps at an angle Buckle locations cannot be over air gaps A...

Страница 18: ...ont of tool head Step 2 Install M4x5 screw to hold clip in place Do not exceed 6 newton meters N m torque 53 inch pounds in lb Over tightening will cause the screw thread to strip Tool orientation is...

Страница 19: ...le Support Arm Handle for Hand Use Be sure not to adjust the Handle too far outward beyond interlocking legs or the handle will not function properly or provide support to the operator Tool Ergonomics...

Страница 20: ...nnel Flat width D Must be wider than the blade A 0 96 24 4mm 2 Raised width E Must be wider than flip cover B 1 38 35 1mm when between 0 23 1 5 5 8 38 1mm tall Must be wider than the pins C when talle...

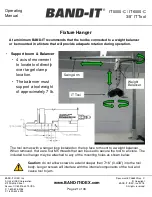
Страница 21: ...Fixture Hanger Weight Balancer IT Tool Swing Arm Support boom Balancer 4 axis of movement to locate tool directly over target clamp location The balancer must support a tool weight of approximately 7...

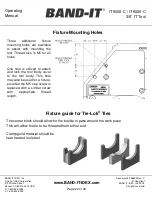
Страница 22: ...to pass around the work piece This will allow the tie to be threaded from either end Clamp guild material should be heat treated tool steel Three additional fixture mounting holes are available to as...

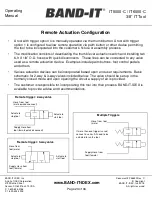
Страница 23: ...emote actuation device Examples include palm buttons foot control pedals and others Various actuation devices can be incorporated based upon end user requirements Basic schematic for 2 way 3 way valve...

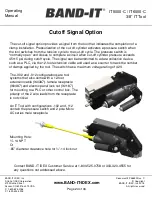
Страница 24: ...r pressure exceeds 45 15 psi during cutoff cycle The signal can be transmitted to a data collection device such as a PLC via the 12 foot extension cable and used as a counter to track the number of cl...

Страница 25: ...page Evaluate the clamp tail dimple pattern If elongated dimples are present the problem may be with the Tension Block or Front Gripper If a problem is indicated follow the instructions in the Mainten...

Страница 26: ...tool stalls does nothing further happen no sound of the cylinder moving Check for pinched air lines Check cutoff timing Does the cylinder sound as though it moves but the knife does not extend Remove...

Страница 27: ...instructions at appropriate service intervals Do not remove factory applied lubrication from inside tool unless performing a thorough maintenance procedure and then replacing with fresh lubricant imme...

Страница 28: ...istance Contact BAND IT IDEX Customer Service at 1 800 525 0758 or 303 320 4555 for more information Part numbers are subject to change Part Description I51065 Maintenance Cover Assembly includes asse...

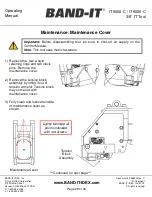
Страница 29: ...gs and two clevis pins Remove the maintenance cover 2 Remove the tension block assembly by lifting it out of tension arm slot Tension block may come out with maintenance cover 3 Fully clean and lubric...

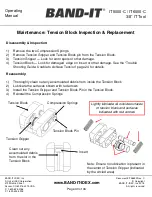
Страница 30: ...r damage See the Trouble Shooting Guide Unable to Achieve Tension page 24 for details Reassembly 1 Thoroughly clean out any accumulated debris from inside the Tension Block 2 Lubricate the surfaces sh...

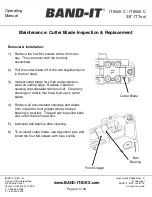
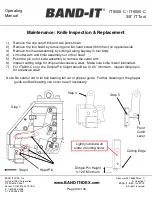
Страница 31: ...l fully assembled 2 Pull the cutter blade off of the two alignment pins in the tool head 3 Inspect cutter blade for chips and excessive wear on cutting edge Replace if blade is causing unacceptable cl...

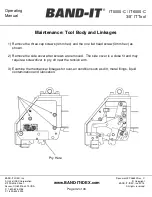
Страница 32: ...0 525 0758 F 1 800 624 3925 Operating Manual 1 Remove the three cap screws 4mm hex and the one flat head screw 3mm hex as shown 2 Remove the side cover after screws are removed The side cover is a clo...

Страница 33: ...ay in tool body 4 Lift cutter arm and knife assembly out of tool head 5 Push the pin out of knife assembly to remove the cutter arm 6 Inspect cutting edge for chips and excessive wear Make sure knife...

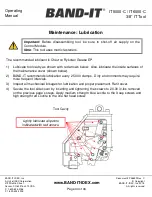
Страница 34: ...elow Also lubricate the inside surfaces of the maintenance cover shown below 2 BAND IT recommends lubrication every 25 000 clamps Dirty environments may require more frequent intervals 3 Inspect all m...

Страница 35: ...r Control Module then turn supply valve on Gently kink the coiled air supply tube connected to the bottom Quick Connect Air Coupling then activate the Tool Trigger This action causes the tool to cut o...

Страница 36: ...les may include up to 12 month limited warranty Limited meaning that wear parts are not included such as blades and grippers BAND IT must be given the opportunity to physically examine all warranty cl...

Отзывы: