bancor LECTOR K2S Скачать руководство пользователя страница 11

Page 11 of 14 


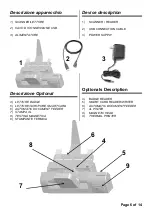
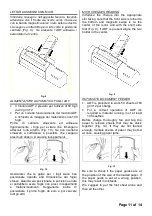
LETTURA ASSEGNI CON MICR 


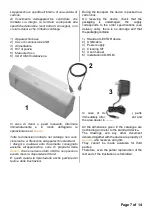
Introdurre  l’assegno  nell’apposita  fessura,  facendo 
attenzione  che  il  fronte  sia  rivolto  verso  il  basso  e 
con la banda magnetica verso il lato esterno destro. 
L’assegno va introdotto per il lato corto in posizione 
centrale  (Fig.  9).  Se  presente  l’ADF  allineare  i 
pareggiatori al centro 


Fig. 9 

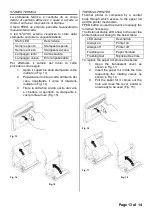
ALIMENTATORE AUTOMATICO FOGLI ADF 


Il modulo ADF è previsto per l’utilizzo di 50 fogli 
da 80 gr/m^2


Per un corretto funzionamento del modulo ADF 
è richiesto un rodaggio dei materiali di circa 100 
fogli. 

Prima 

di 

caricare 

smazzare 

ed 

allineare 

rigorosamente  i  fogli  per  evitare  che  rimangano 
attaccati  l’uno  all’altro  (Fig.  10).  Se  non  risultano 
smazzati  a  sufficienza  è  possibile  che  vengano 
presi fogli doppi o si causino inceppamenti. 


Fig. 10 

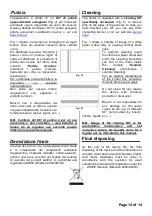
Assicurarsi  che  le  guide  per  i  fogli  siano  ben 
posizionate  rispetto  alla  dimensione  del  foglio 
stesso.  Qualora  sia  posizionate  in posizione errata 
si  potrebbero  avere  foglio  non  presi,  inceppamenti 

malfunzionamenti. 

Suggeriamo 

inoltre 

di 

posizionare  il  primo  foglio  da  solo  e  poi  caricare 
tutti gli altri. 

MICR CHEQUES READING 
Introduce  the  cheque  into  the  appropriate 
slot taking care that the front side is turned to 
the  bottom  and  magnetic  swipe  is  on  the 
center  of  the  lector  and  with  the  short  side 
first  (Fig.  9).  If  ADF  is  present  aligne  the  two 
holder in the center. 


Fig. 9 

AUTOMATIC DOCUMENT FEEDER 


ADF  is  projected  to  work  50  sheets of 80 
gr/m^2 per charge 


For  a  correct  operation  of  ADF  it’s 
required  a  material  running  in  of  at  least 
100 seethes. 

Before  charge  thoroughly  fan  and  tap  the 
paper  to  release  sheets  that  may  be  stuck 
together  (Fig.  10).  If  they  are  not  fanned 
enough,  multiple sheets of paper may be fed 
at once, causing paper jams.


Fig. 10 

Be  sure  to  check  if  the  paper  guides  are  at 
the position of the size of the loaded paper. If 
the  paper  guide  is  set  at  a  wrong  position, 
this may result in misfeeds.  

We  suggest  to  put  the  first  sheet  alone  and 
then all the other. 

Содержание LECTOR K2S

Страница 1: ...Page 1 of 14 ISTRUZIONI PER L USO INSTRUCTIONS FOR USE LECTOR K2S bancor 20129 MILANO Italy via l vanvitelli 44 tel 39 022664215 fax 39 022362992 e mail info bancor it...

Страница 2: ...enza preavviso Tutte le informazioni e materiali non possono essere riprodotti senza l espresso consenso di bancor s r l Contents LETTER FROM MANUFACTURER 3 GENERAL INSTRUCTION 4 5 DEVICE DESCRIPTION...

Страница 3: ...dell apparecchio Letter from manufacturer Dear Customer this device has been manufactured in accordance with EU 89 336 and 73 23 regulations All tests checks have been carried out according to EN 60 9...

Страница 4: ...allaggio non devono essere lasciati alla portata dei bambini in quanto potenziali fonti di pericolo General instructions The installation must be carried on by qualified personnel in accordance with t...

Страница 5: ...mentatore Per eventuali riparazioni rivolgersi unicamente a Centri d Assistenza Tecnica autorizzati bancor Do not touch the device with wet or humid hands or feet Do not use the device barefoot Do not...

Страница 6: ...TTORE SCRITTORE SMART CARD 6 AUTOMATIC DOCUMENT FEEDER 7 STAMPA 4L 8 TESTINA MAGNETICA 9 STAMPANTE TERMICA Device description 1 SCANNER READER 2 USB CONNECTION CABLE 3 POWER SUPPLY Optionals Descripti...

Страница 7: ...non possono essere messi a disposizione di terzi E quindi vietata la riproduzione anche parziale del testo e delle illustrazioni During the transport the device is packed in a carton box On receiving...

Страница 8: ...ondensazione Tensioni d alimentazione 12 Vdc dall alimentatore Formato documenti min 40x40 mm max 216 x 297mm Technical specifications BASIC DEVICE DIMENSIONS A B C 380mm 150mm 150mm Weight kg 1 50 Wo...

Страница 9: ...do il comando di Calibrazione come proposto dal programma stesso Alla fine di queste operazioni il dispositivo pronto per l uso Dopo queste operazioni l apparecchio pronto all uso Starting Unpack the...

Страница 10: ...alimentatore esterno Per resettare il dispositivo tenere premuto il pulsante di reset nero per qualche secondo Instructions for use Fig 8 CHEQUES AND OR DOCUMENTS READING Introduce the cheque into the...

Страница 11: ...sia posizionate in posizione errata si potrebbero avere foglio non presi inceppamenti e malfunzionamenti Suggeriamo inoltre di posizionare il primo foglio da solo e poi caricare tutti gli altri MICR...

Страница 12: ...el vano come indicato in Fig 12 3 Chiudere il blocco cartuccia verde e il coperchio della stampante Fig 11 Fig 12 4 LINES PRINTER 4 line printer allow you to print high resolution logo and information...

Страница 13: ...di rotazione indicato in Fig 14 3 Tirare la carta fino a farla uscire dal vano e chiudere lo sportello la stampante cos pronta all uso Fig 15 Fig 13 Fig 14 Fig 15 THERMAL PRINTER Thermal printer is c...

Страница 14: ...llici chimico plastici solidi e non deve avvenire nel rispetto del sistema di raccolta dei prodotti elettrici in conformit alla legislazione RAEE Direttiva 2002 96 CE Cleaning The device is equipped w...

Отзывы: