


Page 10 of 14
Modo d’uso
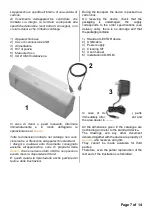
Fig. 7
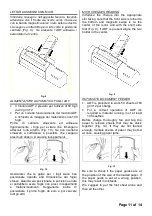
LETTURA ASSEGNI E/O DOCUMENTI
Introdurre l’assegno nell’apposita fessura, facendo
attenzione che il fronte sia rivolto verso l’operatore
(Fig. 7).
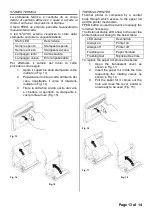
USO DELLE CARTE DI CREDITO
•
Lettore/scrittore di smart card
Orientare
la
carta
con
il
chip
rivolto
fronalmentee e verso il basso; introdurla fino in
fondo (Fig. 8 – 1 e 2).
•
Lettore badge
Posizionare la carta con la banda magnetica in
basso, rivolta verso l’operatore; introdurla dal
lato destro del gradino del lettore e farla
scorrere dentro il lettore sino alla sua
fuoriuscita sul lato sinistro (Fig. 8 - 3).
PULSANTI ED INDICATORI
•
Un led verde segnala che il dispositivo è
alimentato tramite alimentatore esterno
•
Per resettare il dispositivo tenere premuto il
pulsante di reset nero per qualche secondo.
Instructions for use
Fig. 8
CHEQUES AND/OR DOCUMENTS READING
Introduce the cheque into the appropriate
slot taking care that the front side is turned to
the operator (Fig. 7).
USE OF CREDIT CARDS
•
Reader/writer of smart card
Position the card introduce with the chip
on the forehead and downwards side;
insert the card up to the bottom of the
device. (Fig. 8 – 1 and 2)
•
Badge reader
Position the card with the magnetic band
downwards, in front of the operator; insert
the card from the right side of the reader
step and slide it in the reader until it goes
out on the left side (Fig. 8 – 3).
PUSHBUTTON AND INDICATORS
•
A green led means that the external
power supply is feeding the equipment.
•
Press the black reset pushbutton for
some seconds to reset the device.


