1.18 Use Cases
125
2. set
"Timer Trigger Source"
=
"UserOutput0"
.
3. set
"Timer Trigger Activation"
=
"RisingEdge"
.
I.e. a rising edge on
UserOutput0
will start
Timer1
.
4. Then set the
"Timer Duration"
property to the desired exposure time in
us
.
5. In
"Setting -
>
Base -
>
Camera -
>
GenICam -
>
Acquisition Control"
set the
Trigger
Selector =
"FrameStart"
.
I.e. the acquisition of one frame will start when
6.
Timer1
is active:
"Trigger Source"
=
"Timer1Active"
.
7.
Exposure
time will be the trigger width:
"Exposure Mode"
=
"TriggerWidth"
.
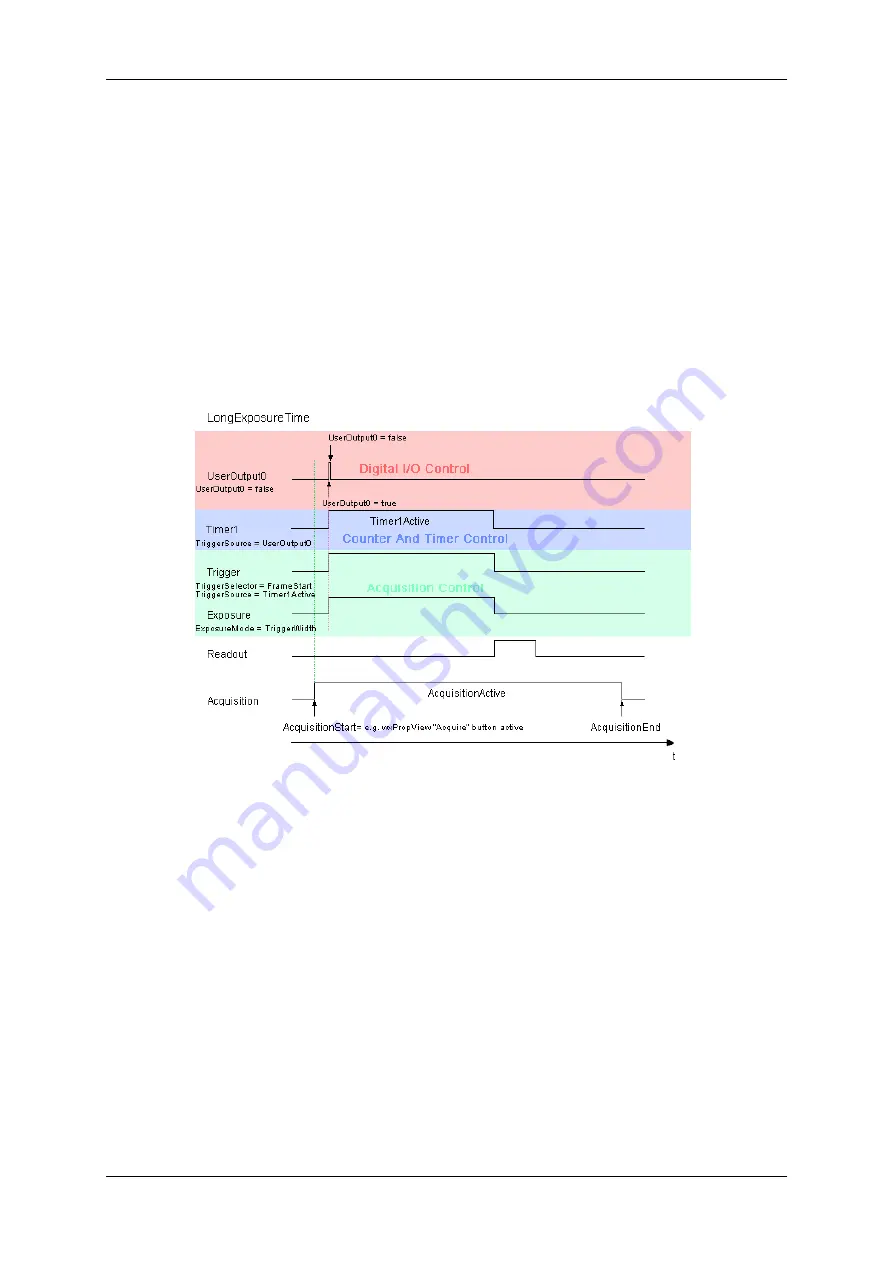
The following diagram illustrates all the signals involved in this configuration:
Figure 1: Long exposure times using GenICam
To start the acquisition of one frame a rising edge must be detected on
UserOutput0
in this example but other
configurations are possible as well.
1.18.1.2.2
Setting up the device
The easiest way to define a long exposure time would be by using a single timer. The length of the timer active
signal is then used as trigger signal and the sensor is configured to expose while the trigger signal is active. This
allows to define exposure time with micro-second precision up the the maximum value of the timer register. With a
32 bit timer register this results in a maximum exposure time of roughly 4295 seconds (so roughly 71.5 minutes).
When writing code e.g. in C# this could look like this:
private static void configureDevice(Device pDev, int exposureSec, GenICam.DigitalIOControl ioc)
{
try
{
// establish access to the CounterAndTimerControl interface
GenICam.CounterAndTimerControl ctc = new mv.impact.acquire.GenICam.CounterAndTimerControl(pDev);
// set TimerSelector to Timer1 and TimerTriggerSource to UserOutput0
ctc.timerSelector.writeS("Timer1");
MATRIX VISION GmbH
Содержание MATRIX VISION mvBlueNAOS
Страница 1: ...mvBlueNAOS Technical Manual English Version 2 14...
Страница 2: ......
Страница 8: ......
Страница 22: ...14 MATRIX VISION GmbH...
Страница 151: ...1 18 Use Cases 143 Figure 6 Selected LUT Selector and click on wizard will start wizard tool MATRIX VISION GmbH...
Страница 157: ...1 18 Use Cases 149 Figure 16 Back level adjustment The image will look like this now MATRIX VISION GmbH...
Страница 183: ...1 18 Use Cases 175 Figure 2 Sample settings MATRIX VISION GmbH...
Страница 210: ...202 Figure 2 PuTTY Setting up the serial interface you will see the test message MATRIX VISION GmbH...
Страница 286: ...278 Test setup front side MATRIX VISION GmbH...
Страница 292: ...284 MATRIX VISION GmbH...


