background image


44  


BAE PD-VS-014-05


Integration in Rockwell Studio 5000 

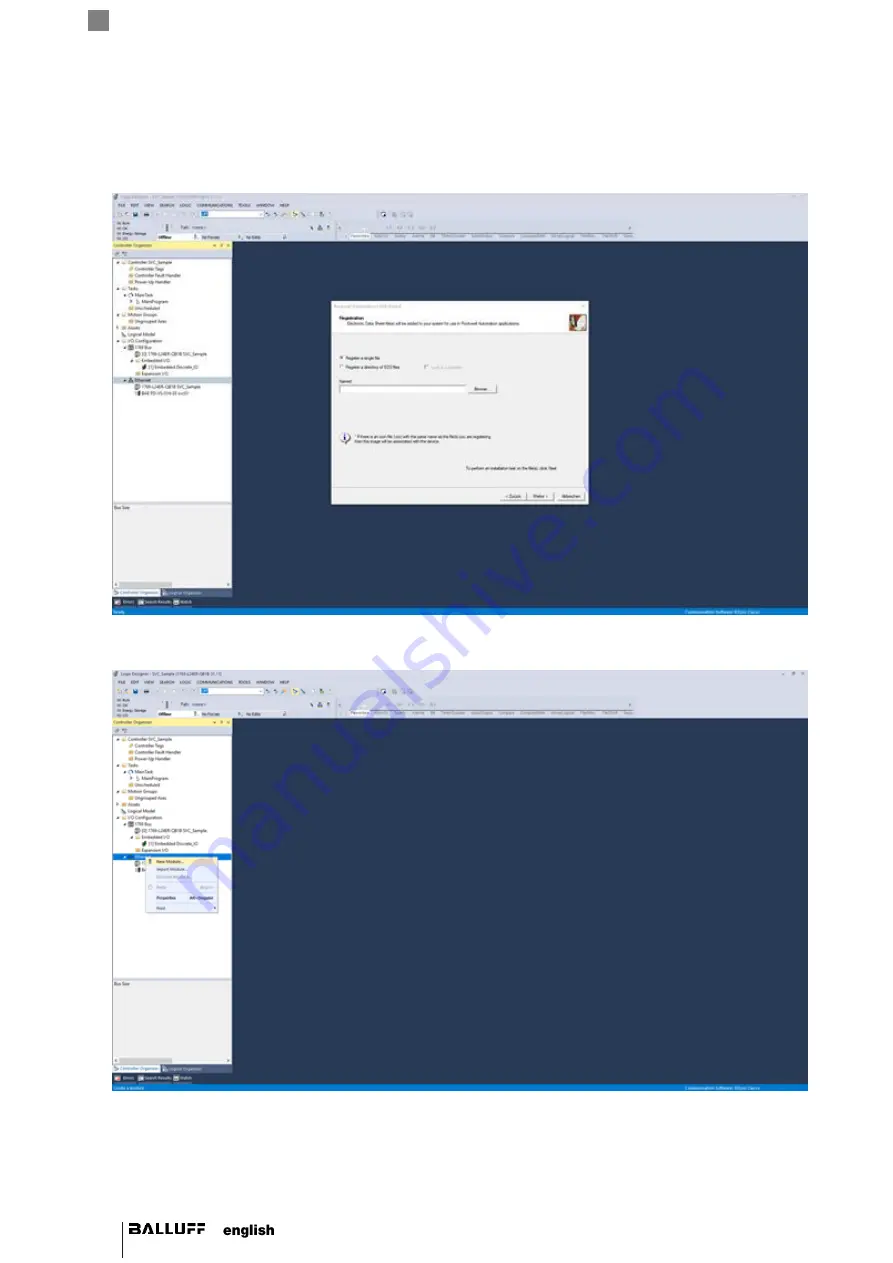
This example shows how the Balluff SmartVision Controller connected to a CompactLogix or ControlLogix PLC. 

1.  Start EDS Hardware Installation Tool in the Logix Designer and register EDS file. 


2.  Right-click Ethernet on the corresponding scanner card. Select a new module. Note: The function is not available in 

online mode! 


Содержание BAE0103

Страница 1: ...BAE PD VS 014 05 SmartVision Controller...

Страница 2: ......

Страница 3: ...2 1 Transport 16 3 2 2 Unpack and check supply unit 16 3 2 3 Identification data of the device 16 3 2 4 Ambient and environmental conditions 17 3 3 Wall mount 18 3 3 1 Mounting via mounting bracket 1...

Страница 4: ...stem settings 32 5 4 1 Adapting the network settings 33 5 4 2 Setting the system time 34 5 5 Selecting the communication interface for the process data 35 5 6 LAN Interface 36 5 6 1 LAN parameters in...

Страница 5: ...ff SmartVision Controller is an inspection system for automated industrial environments Some outstanding properties are Closed system based on an industrial PC Fieldbus connection PROFINET EtherNet IP...

Страница 6: ...Benutzerdefin iert 1 3 6 ASCII code Characters transmitted in ASCII code are set in apostrophes e g L 1 3 7 Symbols NOTE A note indicates important information that helps you optimize usage of the pro...

Страница 7: ...dress MAC Media Access Control MTBF Mean Time Between Failures NC Not connected PC Personal Computer PLC Programmable Logic Controller RGB Red Green Blue RX Receiver SSD Solid State Drive TX Transmitt...

Страница 8: ...published under various open source licenses Some licenses require that the source code and modifications be published These sources are published on the Product homepage The license texts for all sof...

Страница 9: ...standing when installing the Balluff SmartVision Controllers 2 Please always let the inner components cool down before touching them to avoid physical injury or property dam age 3 Ensure that the Bal...

Страница 10: ...ler to the supply current and the effect an over load of power circuits has on the overcurrent protection device and supply circuit cabling should be checked and considered carefully When dealing with...

Страница 11: ...ence suppression may be violated Information as to which system expansions are suitable for installation can be obtained from the technical customer service or from your outlet The warranty is void if...

Страница 12: ...batteries into fire do not solder the cell body do not open do not short circuit do not switch poles do not heat above 100 C dispose off according to regulations and protect against direct sunlight h...

Страница 13: ...ATTENTION The dust filter replacement must not occur if the equipment is still running Disconnect the equipment from the mains voltage Work steps 1 Loosen the side cover knurled screw 2 Open the side...

Страница 14: ...n Controller into an existing network Additionally the Balluff SmartVision Controller offers two fieldbus connectors Via USB 3 0 and Gigabit Ethernet ports you can connect USB3 Vision and GigE Vision...

Страница 15: ...us Profinet Cooling Active Front I O 4x USB 3 0 for industrial cameras 4x Gigabit Ethernet for industrial cameras 4x USB 2 0 1x Support port DisplayPort 2x Support port RS232 2x LAN RJ45 2x Fieldbus R...

Страница 16: ...ller may only be switched on after approx 12 hours 3 2 2 Unpack and check supply unit Please consider the following points during unpacking We recommend that you keep the original packaging Please kee...

Страница 17: ...al conditions due to corrosive vapours or gases The free space in the area around the air vents has to be at least 10 cm to ensure sufficient ventilation for the IPC The air vents of the enclosure mus...

Страница 18: ...there are two possibilities 1 Mounting via mounting bracket 2 Mounting via profile rail only if the rail is pre assembled 3 3 1 Mounting via mounting bracket Use the supplied mounting bracket see gra...

Страница 19: ...nstallation of the device with wall mounting kit With the wall mounting kit you have the possibility to realize a space saving assembly Material Bore diameter Mounting Concrete 8 mm Dowel 8M 50 mm Scr...

Страница 20: ...BAE PD VS 014 05 Product specification 3 4 1 Mechanical data Housing material Sheet steel galvanised powder coated black Degree of protection IP20 Weight approx 2 7 kg Dimensions W D H 216 x 191 x 88...

Страница 21: ...W 3 4 3 Operating conditions Ambient temperature 10 to 50 C 10 to 80 relative humidity Storage temperature 10 to 70 C 10 to 95 relative humidity Operation Internally WARNING The Balluff SmartVision Co...

Страница 22: ...ial cameras Fieldbus Profinet Profinet interface Gigabit Ethernet LAN Two Gigabit Ethernet interfaces for integrating the Balluff SmartVision Controller in a local network Gigabit Ethernet industrial...

Страница 23: ...nts 3 6 1 Status LED ATTENTION Power switch does not disconnect the equipment from the grid WARNING If you keep the switch held down for more than 4 seconds during operation then the system executes a...

Страница 24: ...MB s Yellow Activity LED Activity Yellow flashing 3 6 3 Cleaning The outside of the Balluff SmartVision Controller Camera can be cleaned with a soft cloth Persistent dirt can be removed with a cloth t...

Страница 25: ...ARNING The Balluff SmartVision Controller and accessories must be supplied by Limited Power Source LPS according to UL IEC 60950 1 or Class 2 source according to UL 1310 Connect the power supply via D...

Страница 26: ...wser are being supported Google Chrome version 32 0 and above Mozilla Firefox version 24 0 and above Microsoft Internet Explorer version 11 and above Microsoft Edge version 40 and above NOTE JavaScrip...

Страница 27: ...using the camera simulation File Device see chapter Tool Box Image capturing tools Set up camera Active camera in the BVS Cockpit Manual logs Here you can find the log files of the Balluff SmartVisio...

Страница 28: ...an industrial camera start BVS Cockpit and select in the action menu Configuration the Set up cam era tool NOTE More information about the configuration interface of the BVS Cockpit can be found in th...

Страница 29: ...d the latest update file from our website https www matrix vision com and save it locally on your com puter 2 If an inspection program is running please stop it and make sure that the camera is not ac...

Страница 30: ...tool Set up camera 3 Select the camera in Active Camera 4 Click on Show in Device Control A dialog will appear and you will see the information about the camera including the firmware version Addition...

Страница 31: ...industrial cameras with the system and the analyzing of a control is done via the digital I Os the interaction of the Balluff SmartVision Controller via the Gigabit Ethernet LAN conntector or the fie...

Страница 32: ...ller adding port 10000 at the end This address can look like this https svc 000110 10000 Please take care of the https because it is a secured connection The certificate is a self created one and for...

Страница 33: ...ase select Network Interfaces and you will reach the overview of the network interface settings By default the Gigabit Ethernet LAN female connector 1 internally mentioned as enp0s31f6 is set to get t...

Страница 34: ...from 192 168 200 1 to 192 168 203 1 Each connector has its own DHCP server If you connect a GigE Vision industrial camera which is set to get an IP ad dress assinged via DHCP will get an IP address a...

Страница 35: ...S Cockpit Manual under Connection to the customer control system Communication via fieldbus The data are transferred as TCP or UDP packets via the LAN interface The pertinent protocol is described in...

Страница 36: ...interface For each instance following ports are used Instance Port 1 36701 2 36702 3 36703 4 36704 5 6 1 LAN parameters in BVS Cockpit To communicate via UDP you have to set the Mode in the system me...

Страница 37: ...IO consists of the following components IO controller e g PLC IO device here the Balluff SmartVision Controller In a PROFINET network IO controllers and IO devices are connected to each other using a...

Страница 38: ...nted slot based in the project planning software The GSDML file makes the possible data modules inputs outputs for the Balluff SmartVision Controller available For the configuration of the Balluff Sma...

Страница 39: ...ion files menu command An Manage general station description files dialog will appear 3 Select directory and GSDML file The Install button becomes active only if a GSDML file is selected 4 Click on In...

Страница 40: ...ff Vision Solutions SmartVision Controller The module is added as PROFINET IO 1 Open the dialog Devices networks 2 Select Network view 3 Assign Balluff SmartVision Controller to PROFINET IO controller...

Страница 41: ...roller data The number of process data buffer size of the Balluff SmartVision Controller can be selected by deleting or inserting a corresponding module min 16 bytes max 512 bytes For each used camera...

Страница 42: ...and EtherNet IP NOTE After switching the fieldbus and after setting a few fieldbus parameters an internal restart of the fieldbus module is necessary This process will take some seconds until the dia...

Страница 43: ...y input data camera to PLC Start byte Length Description 0 64 Process data of 1st instance at port 9000 The process data protocol is described in Fieldbus interface Fieldbus protocol of Balluff SmartV...

Страница 44: ...luff SmartVision Controller connected to a CompactLogix or ControlLogix PLC 1 Start EDS Hardware Installation Tool in the Logix Designer and register EDS file 2 Right click Ethernet on the correspondi...

Страница 45: ...balluff com BAE PD VS 014 05 3 Select Balluff SmartVision Controller Module BAE PD VS and apply to the configuration 4 The input output and configuration tags are automatically created in the controll...

Страница 46: ...46 BAE PD VS 014 05 5 Set the desired IP address and connection parameters for the Balluff SmartVision Controllers under Module Proper ties...

Страница 47: ...ching the fieldbus and after setting a few fieldbus parameters an internal restart of the fieldbus module is necessary This process will take some seconds until the dialog is re freshed and the adjust...

Страница 48: ...S Cock pit releases 2 3 0 sometimes also with er ror code 0x80070035 Update BVS Cockpit to a version 2 3 0 which al lows accessing the shared folders with following credentials Login expert Password e...

Страница 49: ...10 11 12 13 14 15 16 B A E P D V S 0 1 4 0 5 1 3 BAE Balluff Accessory Equipment 5 6 PD Programming Device 8 9 VS Vision Solution 11 13 014 SmartVision Controller 15 16 05 Operating System Linux No 9...

Отзывы: