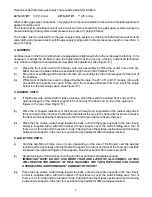
7. GREASE DRAWER, WATER PANS:
(i)
A Grease Drawer is provided at the very left of each Broiler to collect the grease from the Grease
Trough above.
(ii)
Depending on the size of the Broiler, one or more Water Pans are provided to collect any drippings
from the broiling area above. Water Pans assist in making cleaning simple and easy. Water should
at all times be present, and replenished as needed, to reduce flare-ups and flash-back and to
prevent the bottom of the broiler from getting too hot.
.
(iii)
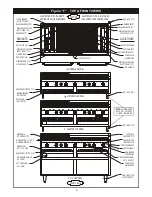
One Grease Deflector is provided to prevent burning matter from getting into the Grease Drawer
and igniting the accumulated grease there. To install this Grease Deflector, clip its bottom edge to
the left side of the Water Pan next to the Grease Drawer, push down all the way, then slide the Pan
back into place. (See Figure “F”)
(iv)
Grease Drawer, Grease Deflector and Water Pans should be cleaned daily or even more frequently,
if necessary.
8. GRIDDLE PLATE (Optional):
The Griddle plate should not cover more than 50% of the broiling area. The Griddle Plate should be placed
on top of the top grates, which for this purpose should be in the flat position.
9. SMOKER BOX (Optional):
(i)
This Smoker Box consists of a Wood Chip Drawer and two covers, the longer one in the back and
the shorter one with the handle in the front. On the F and C models this Smoker Box rests on the
Wire Rack (optional). On the “L” models this Smoker Box slides onto supports (optional) located in
the Water Pan. (See Figure “F”)
10. LIGHTING INSTRUCTIONS:
(i)
Turn all Broiler and any Carry-Over Valves to the “OFF' position.
(ii)
Open main gas shut-off valve.
(iii)
Allow air to bleed from the gas line through the individual Pilot Burners or, if applicable, open one of
the Carry-Over valves.
(iv)
Light each individual Pilot Burner (see Figure “B”),or Carry-Over Lighter Tube (see Figure “C”) if
applicable, by inserting a lit taper, or lighter, through the 1/2” diameter lighter holes located above
the Control Panel.
Note
: Adjustment screws for the Pilot Valves (see Figure “B”) are adjusted to provide a 1/4” (6 mm)
high flame. If adjustment is required, it should be done by a factory authorized technician only.
(v)
Turn the burner control valve to 'ON' to light the burners. If any burner fails to light, turn the burner
valve to 'OFF', wait five minutes, then repeat the above procedure.
(vi)
After all burners have been lit properly, turn each burner valve 'OFF' and make sure that the Pilot
Burners, or Carry-Over tube(s), stay lit.
Each burner may now be adjusted to the desired flame size by turning the individual burner valve handle.
TO SHUT DOWN THE UNIT, TURN ALL VALVES 'OFF'. WAIT FIVE MINUTES BEFORE ATTEMPTING
TO RE-LIGHT.
NOTE:
The individual Pilot Burners will stay lit until the Gas Supply to the whole Broiler is turned 'OFF' while
gas to the Carry-Over Lighter Tube(s) can be shut off by turning the corresponding Gas Valve to the 'OFF'
position.
5


