6 | Baker Hughes
Copyright 2020 Baker Hughes Company. All rights reserved.
Metal Seal
For the two piece bonnet configurations:
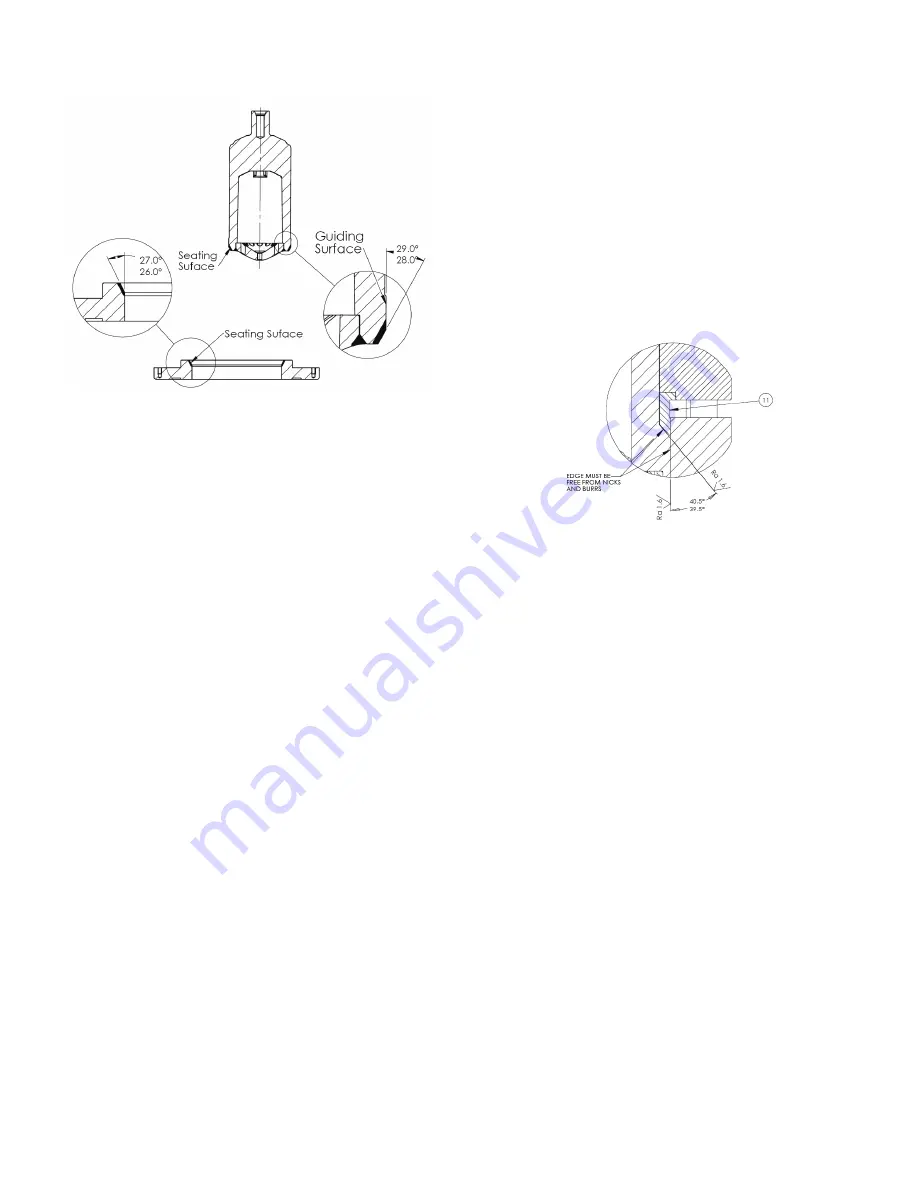
Prior to reassembly, the metal seal (11) should be inspected for
cracks or signs of wear. The metal seal can be reused if it is free
from scratches, erosion, corrosion, or any other type of damage.
If slight wear exists on the metal seal, a new layer of coating should
be re-applied to the original condition by the factory or a Masoneilan
Authorized Repair Center.
Prior to reassembly of the valve, inspect the inside of the valve
body around the area where the metal seal seats. It is common to
find slight ridges or depressions from where the seal was originally
seated. During initial assembly these depressions aid in the sealing
of the valve, however these areas can become leak paths during
reassembly if the surface is not restored to its original finish as
described below.
Figure 4
To prevent this potential leakage, machine the seating angle of the
bonnet at 40 degrees by approximately 0.1 inches (2.5 mm) deep,
thus causing the metal seal to seat further down inside the valve
body (on a new un-deformed surface). Refer to Figure 4 for details.
If this procedure is required more than twice please consult factory.
Valve Plug
If the valve plug needs to be repaired see instructions for Valve
Re-assembly.
Valve Reassembly
Pinning the Valve Plug
The valve plug assembly consists of a stem (16) that is threaded
into The valve plug assembly consists of a stem (8) that is threaded
into the valve plug (6). To secure this assembly, the stem (8) is then
pinned (9) to the valve plug (6).
If the valve plug (6) or stem (8) needs to be replaced, an entire
assembly should be purchased from the factory to ensure product
strength and integrity. Re-machining of these parts in the field can
seriously impair the mechanical strength and integrity of the valve
plug stem assembly.
Completing Valve Body Assembly
Proceeds as follows:
Seat Ring Installation
1.
After checking all sealing surfaces to ensure they are
thoroughly clean, assemble the seat ring gasket (10B) in the
valve body (1). Make sure the gasket is centered properly in
the body.
This gasket (or similar part) can be kept after lapping for
future lapping use.
Figure 3
The gasket used for lapping must not be reused for the body
reassembly.
3. Place seat ring (5) or seat ring diffuser (Not Shown) in the
body, noting the seating angle is up.
4. Spread a fine layer of high quality lapping compound (600 grit)
on the seating surface.
5. Assemble the cage (4) and (if applicable) cage retainer (Not
Shown) and the plug assembly (Items 6, 8 & 9) into the valve
body (1) per the valve plug assembly instructions.
6. Assemble the bonnet (2) and the guide bushing (7).
7. Place an appropriate tool on the valve stem (8) thread to allow
for manual rotation.
8. Lap by slightly rotating the valve plug in alternate directions.
9. After several rotations, lift the valve stem, turn it 90 degrees,
and repeat the operation.
10. Lapping can be repeated, but should be limited as much
as possible so that the seat remains sufficiently narrow to
guarantee tightness.
11. After lapping, disassemble the parts to clean them and then
reassemble, making sure the seating angles are within
tolerance. See Figure 3.
Note: For more details on the lapping procedure and
seating angles, please consult the factory and provide
the valve serial number (found on the serial plate on the
actuator).
Gaskets
Gasket seating surfaces must be free of dents, scratches,
corrosion, or other types of damage. Clean mating surfaces as
required and replace any non-conforming parts. Spiral wound
gaskets (10) must always be replaced after disassembly.
Seal Rings
Seal rings (14), back-up rings (22), retaining ring (Not Shown),
and conical springs (Not Shown) can be reused if they are free of
scratches, erosion, corrosion, or other damage.


