background image

33

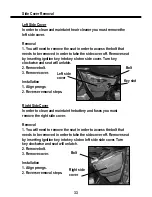
Side Cover Removal

Left Side Cover

In order to clean and maintain the air cleaner you must remove the 

left side cover.

Removal

1. You will need to remove the seat in order to access the bolt that 

needs to be removed in order to take the side cover off. Remove seat 

by inserting ignition key into key slot on side cover. Turn key 

clockwise and seat will unlatch.

2. Remove bolt.

3. Remove cover.

Installation

1. Align prongs

2. Reverse removal steps.

Right Side Cover

In order to clean and maintain the battery and fuses you must 

remove the right side cover.

Removal

1. You will need to remove the seat in order to access the bolt that 

needs to be removed in order to take the side cover off. Remove seat 

by inserting ignition key into key slot on left side side cover. Turn 

key clockwise and seat will unlatch.

2. Remove bolt.

3. Remove cover.

Installation

1. Align prongs.

2. Reverse removal steps.

Key slot

Bolt

Left side 

cover

Bolt

Right side 

cover

Содержание Phoenix 250

Страница 1: ...ed as a permanent part of the vehicle and should remain with the vehicle when resold or otherwise transferred to a new user or operator The manual contains important safety information and instruction...

Страница 2: ...nd your responsibilities If you have any questions comment or concerns contact Baja INC at 888 863 2252 All information illustrations photographs and specifications contained in this manual are based...

Страница 3: ...s of safety information you will find in this manual Safety Labels On your motorcycle Safety Messages Warning Caution and Danger The meaning of Warning Caution and Danger Safety Messages Death or seri...

Страница 4: ...17 Loading guidelines and Load limits Pg 18 Starting Procedures Pg 19 Starting and Stopping Engine Pg 19 Shifting gears Pg 21 Braking Pg 23 Parking Pg 24 Maintenance Safety Pg 26 Servicing Pg 32 Side...

Страница 5: ...ts Suspension Pg 45 Brakes Pg 47 Tires Pg 51 Drive chain Pg 54 Battery Pg 58 Appearance care Pg 61 Vehicle Identification Pg 62 Specifications Pg 63 Wire Diagram Pg 66 Emission Control System Warranty...

Страница 6: ...ays Frame Warranty 90 days Warranty is void if Frame is bent or broken due to abuse Wheels are bent or broken Fender bent or broken due to abuse Any sign of impact accident jumping spin outs or roll o...

Страница 7: ...O LEARN AND PRACTICE Take time to get to know this vehicle The operator s ability to operate this motorcycle safely is largely dependent upon the oper ator s ability to exercise proper judgement The o...

Страница 8: ...eyond your abilities and never faster than the posted speed limit NEVER OPERATE THIS VEHICLE WHILE UNDER THE INFLUENCE OF ALCOHOL DRUGS OR MEDICATION OF ANY KIND SUCH OPERATION COULD BE DANGEROUS TO Y...

Страница 9: ...inches 750 inches Failure to follow these safety precautions may increase your risk of injury Wear a helmet eye protection and bright protec tive clothing Do not ride after consuming alcohol or other...

Страница 10: ...s Headlight Fuel valve Air cleaner Rear shock preload adjuster Passenger footrest Kick stand footrest Shift lever Tail light Battery Main fuse Indicators Steering lock Tool kit compartment Oil cap dip...

Страница 11: ...y Labels Speedometer Indicator lights Brake fluid reservoir Brake lever Throttle grip Engine stop switch Fuel fill cap Ignition switch Rear view mirror Clutch lever Headlight dimmer switch Turn signal...

Страница 12: ...when hi beam lights are on Turn signal indicator Flashes when left right turn signal is on Neutral indicator Illuminates when transmission is in neutral Trip meter reset know Turn this knob to reset t...

Страница 13: ...w to the carburetor OFF gasoline cannot flow to the carburetor RES gasoline can flow to the carburetor when you have run out of gas in the gas tank Make sure to refuel as soon as possible CHOKE LEVER...

Страница 14: ...ill start the engine When button is pressed in the start motor will crank the engine headlights will turn off but the taillight will stay on See starting procedures Engine stop switch In case of an em...

Страница 15: ...to LO beam HI LO Turn signal switch Use this switch to signal a lane change or turn Horn The horn is used to warn other motorist Left Right TRIP METER RESET Tripmeter reset knob Trip meter reset knob...

Страница 16: ...h ing The proper clothes can protect you from injury Wear an ap proved motorcycle helmet goggles a good pair of gloves strong boots that cover the ankle long pants and a long sleeve shirt every time y...

Страница 17: ...ose LIGHTS Be sure that your headlight tail light brake light and turn signals are working properly CHAIN Check the condition Adjust the slack if any and lubricate if needed TIRES Use an air pressure...

Страница 18: ...ding of your motorcycle may affect your stability With the motorcycle properly loaded always ride at a reduced speed If you have questions about carrying cargo contact Baja INC for advice Check the fo...

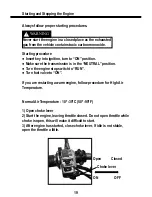
Страница 19: ...warm engine follow procedure for High Air Temperature Normal Air Temperature 10 35 C 50 95 F 1 Open choke lever 2 Start the engine leaving throttle closed Do not open throttle while choke is open this...

Страница 20: ...choke can cause damage to the piston and cylinder wall Fast idling for more than 5 minutes at Normal Air Temperature can cause exhaust pipe discoloration Flooded Engine The engine may be flooded with...

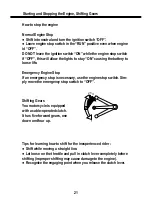
Страница 21: ...se life Emergency Engine Stop If an emergency stop is necessary use the engine stop switch Sim ply move the emergency stop switch to OFF Shifting Gears You motorcycle is equipped with a cable operated...

Страница 22: ...e Do not coast or tow your motorcycle for a long period of time while the engine is off If your speed drops below 9mph 15km h pull in clutch lever and shift down to 1st gear or stalling can occur Reco...

Страница 23: ...ply you brakes too abruptly you may lock the wheels slide and loose control of your motorcycle If this should happen release the brakes and steer straight until you have completely regained control Be...

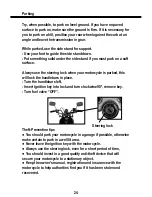
Страница 24: ...rcycle is parked this will lock the handlebars in place Turn the handlebars left Insert ignition key into lock and turn clockwise 90 remove key Turn fuel valve OFF Theft Prevention tips You should par...

Страница 25: ...ect your investment avoid break downs and have maximum performance The maintenance of your motorcycle id YOUR responsibility In the event of an accident have a service center inspect ALL parts even if...

Страница 26: ...s Let the engine cool before touching any related parts Do not touch any moving parts while engine is running Make sure you have the tools and skills required before perform ing any maintenance repair...

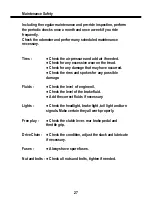
Страница 27: ...r any damage that may have occurred Check the rims and spokes for any possible damage Fluids Check the level of engine oil Check the level of the brake fluid Add the correct fluids if necessary Lights...

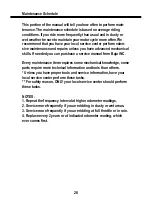
Страница 28: ...purchase a service manual from Baja INC Every maintenance item requires some mechanical knowledge some parts require more technical information and tools than others Unless you have proper tools and...

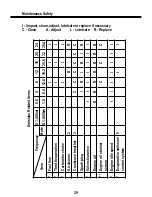
Страница 29: ...hoke I I I Air cleaner 2 R R Crankcase breather 3 C C C C C C Spark plug I R I R I R Valve clearance I I I I I I I Engine oil R R R R R R R Engine oil strainer screen C C C Engine idle speed I I I I I...

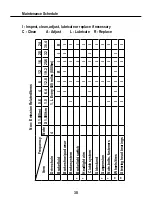
Страница 30: ...I R Brake shoe pad wear I I I I I I Brake system I I I I Brake light switch I I I Headlight aim I I I Clutch system I I I I I I I Side stand I I I Suspension I I I Nuts bolts fasteners I I I I Wheels...

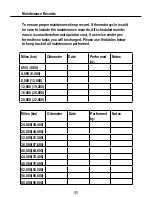
Страница 31: ...per forms these tasks you will be charged Please use the tables below to keep track of all maintenance performed Miles km Odometer Date Performed by Notes 600 1 000 4 000 6 400 8 000 12 000 12 000 19...

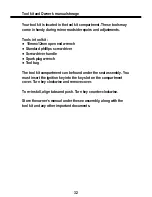
Страница 32: ...ndard phillips screw driver Screw driver handle Spark plug wrench Tool bag The tool kit compartment can be found under the seat assembly You must insert the ignition key into the key slot on the compa...

Страница 33: ...ove bolt 3 Remove cover Installation 1 Align prongs 2 Reverse removal steps Right Side Cover In order to clean and maintain the battery and fuses you must remove the right side cover Removal 1 You wil...
Страница 34: ...use an octane number of 86 or higher Using a lower octane gasoline can cause severe damage to the engine Never use stale or contaminated gasoline or an oil gasoline mixture Fuel Capacity Fuel tank ca...

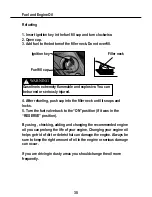
Страница 35: ...RESERVE position By using checking adding and changing the recommended engine oil you can prolong the life of your engine Changing your engine oil helps get rid of dirt or debris that can damage the e...

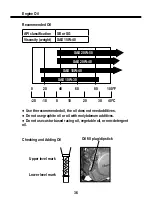
Страница 36: ...ith molybdenum additives Do not use castor based racing oil vegetable oil or non detergent oil Checking and Adding Oil API classification SE or SG Viscosity weight SAE 15W 40 SAE 20W 50 SAE 20W 40 SAE...

Страница 37: ...oil is at or near the upper level mark there is no need to add oil If the oil is at or near the lower level mark add the recommended oil until it reaches the upper level mark and do not overfill 8 Scr...

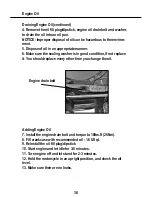
Страница 38: ...washer is in good condition if not replace it You should replace every other time you change the oil Adding Engine Oil 7 Install the engine drain bolt and torque to 18lbs ft 25Nm 8 Fill crankcase wit...

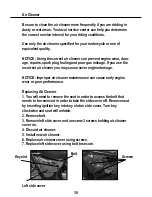
Страница 39: ...aner you may cause sever engine damage NOTICE Improper air cleaner maintenance can cause early engine wear or poor performance Replacing Air Cleaner 1 You will need to remove the seat in order to acce...

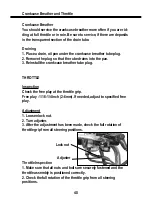
Страница 40: ...o the pan 3 Reinstall the crankcase breather tube plug THROTTLE Inspection Check the free play at the throttle grip Free play 1 16 1 4 inch 2 6mm If needed adjust to specified free play Adjustment 1 L...

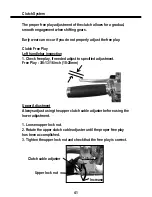
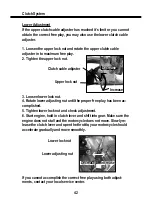
Страница 41: ...Check free play if needed adjust to specified adjustment Free Play 3 8 13 16 inch 10 20mm Upper Adjustment Always adjust using the upper clutch cable adjuster before using the lower adjustment 1 Loos...

Страница 42: ...nut until the proper free play has been ac complished 5 Tighten lower lock nut and check adjustment 6 Start engine hold in clutch lever and shift into gear Make sure the engine does not stall and the...

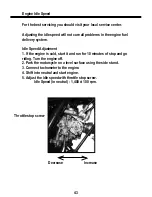
Страница 43: ...le Speed Adjustment 1 If the engine is cold start it and run for 10 minutes of stop and go riding Turn the engine off 2 Park the motorcycle on a level surface using the side stand 3 Connect tachometer...

Страница 44: ...electrodes on the spark plug for corrosion and depos its if it has great corrosion replace the plug 5 Using a wire type feeler check the gap on every new spark plug If an adjustment is needed bend th...

Страница 45: ...ons change be sure to adjust the rear suspension pre load If you set the spring pre load to a lower setting would accomplish a softer ride This setting should be used with a light load and smooth road...

Страница 46: ...ing conditions Position 1 Lightest load and smoothest ride Position 2 Standard position Positions 3 5 Heavier heaviest load and firmer ride Always adjust both shocks to the same position Adjust in seq...

Страница 47: ...immediately If the pads are still in good condition there may be air in the brake system You will need to bleed the brakes visit your local service center for help Brake Fluid Recommendation We recomm...

Страница 48: ...wash thoroughly Contact with eyes wash thoroughly and see a doctor immediately Brake Pads Wear Brake pad wear depends on how much you use the brakes the type of riding and road conditions Normally bra...

Страница 49: ...to engage to check the free play 0 78 1 2 inch 20 30mm If needed adjust to specified range Adjustment 1 Turn the rear brake adjusting nut clockwise to increase free play and counter clockwise to decre...

Страница 50: ...disas semble the rear end There is an external brake wear indicator By depressing the brake pedal the brake arm arrow moves toward a reference mark on the brake pedal 1 Park your motorcycle and use th...

Страница 51: ...and check the pressure each month by using an air pressure gauge Be sure that the tires are inflated to the pressures shown below Tire pressure should only be measured or adjusted when the tires are...

Страница 52: ...ils embedded in the tire Excessive wear Pull to the side of the road if you drive over a pothole or any hard objects to inspect the tire for possible damage You should replace the tires if the thread...

Страница 53: ...ent When tire replacement is needed always replace them with the same size load range and speed rating Recommended Tire Size Front 110 90 16 Rear 130 90 15 When replacing a tire Have the wheel balance...

Страница 54: ...in dusty or muddy conditions remember to maintain and service the chain more often than usual Before any servicing to the chain occurs be sure the engine id off and in neutral You do not need to remov...

Страница 55: ...ear sprocket teeth for excessive wear or damage If needed replace the sprocket NOTICE The use of a new chain with a worn sprocket will cause quick wear to the chain Adjustment Every 500 miles you shou...

Страница 56: ...slack it should allow vertical movement by hand 9 16 inch 15 30mm 5 You can check the rear axle alignment by making sure the index marks align with the rear edge of the adjusting slots Both marks shou...

Страница 57: ...not use a steam cleaner high pressure washer or certain sol vents These product can damage the o rings 1 Use a dry cloth to clean the side surface of the chain Use a high flash point solvent not gaso...

Страница 58: ...quently You should remove the battery or disconnect the battery cables if you do not plan to ride for two weeks or more Battery Storage We recommend that you remove the battery from your motorcycle if...

Страница 59: ...ate location off of the floor and out of reach of children 7 Clean battery box before storing 8 Use a slow trickle charger every 30 days to maintain life of the battery To avoid possibility of explosi...

Страница 60: ...ctions on the battery For home charging we suggest you use a trickle charger A trickle charger can be left connects for a long period of time without causing damage to the battery Do not leave the bat...

Страница 61: ...a mild cleaner de greaser Do not use products that contain chemical solvents or harsh deter gents Before cleaning make sure the engine is cool Wash your motorcycle in a shady area Direct sunlight can...

Страница 62: ...u may also need this information when ordering parts make sure to keep these numbers in a safe spot Frame number VIN Vehicle Identification Number can be found on the left side of the front forks stam...

Страница 63: ...recommendation Unleaded Octane 86 or higher Fuel tank capacity 3 12 US gal Fuel tank reserve capacity 0 47 US gal Engine oil recommendation API service classification SF or SG SAE 15W 40 Engine oil ca...

Страница 64: ...xhaust 0 002in 0 05mm Spark plug gap 0 024 0 028 0 60 0 70mm Idle speed 1 400 100rpm Primary reduction 3 631 Gear ratio 1st 2 846 Gear ratio 2nd 1 777 Gear ratio 3rd 1 333 Gear ratio 4th 1 083 Gear ra...

Страница 65: ...ignal light 12V10W Neutral indicator 12V3W Turn signal indicator 12V3W High beam indicator 12V3W Main fuse 10A Oil drain bolt torque 18ft lbs 25Nm Front wheel axle torque 45ft lbs 61Nm Front wheel pin...

Страница 66: ...switch Diode Start relay Battery 12V 9Ah Starter motor Fuel sensor Fuse 15A Rear indicator RH 12V 21W Tail light 12V 21 5W Rear indicator LH 21V 21W Ignition coil Ignition coil C D I Spark plug Spark...

Страница 67: ...ance performed on your vehicle and retain all receipts covering maintenance on your vehicle You may not be denied a warranty claim solely because of your failure to ensure the perfor mance of all sche...

Страница 68: ...repair to bring your vehicle into compliance with applicable standards may be denied If an emergency situation exists when a warranted part or a dealer is not reason ably available to the owner repair...

Страница 69: ...the vehicle or transportation of the vehicle to from the authorized dealer The Distributor is not liable to any person for incidental consequential or special damages of any description whether arisin...

Страница 70: ...70 Baja INC P O Box 61150 Phoenix AZ 85082 Tel 602 443 9180 Toll Free 888 863 2252...

Отзывы: